
This is how I installed Kali Linux in virtualbox using the ova file method in my windows 10 PC along with its screenshots.
Requirements:
- Kali Linux 2019.1 Preinstalled Image: Download Link (Torrent) (~3.2 GB) [Updated link o latest Kali Version]
- VirtualBox: Download Link (~200 MB)
- CPU that supports Virtualization.
- Atleast 8GB of free disk space.
- 7-zip: Download Link (~1.4 MB) [ Note: Winrar is another alternative you could use instead of 7-zip.]
- Virtual Box Extension Pack: Download Link (~22 MB) [Optional]
Installation Procedure:
The first thing you need to do is go ahead download and install Virtualbox in your system. Then download the Kali Linux ova file mentioned above and extract it using 7-zip or Winrar. The extracted file would be a .ova file format which is a pre-installed Kali Linux machine. Using a pre-installed file saves us a lot of time as we don’t have to go through the whole installation process.
Now, open VirtualBox:
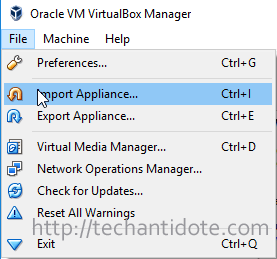
Then click on “File” and then click on “Import Appliance“.
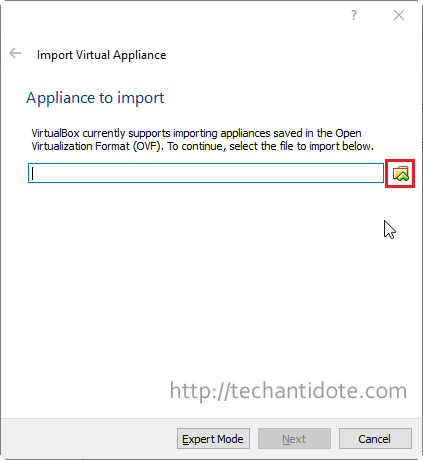
Click on the folder icon as shown below.
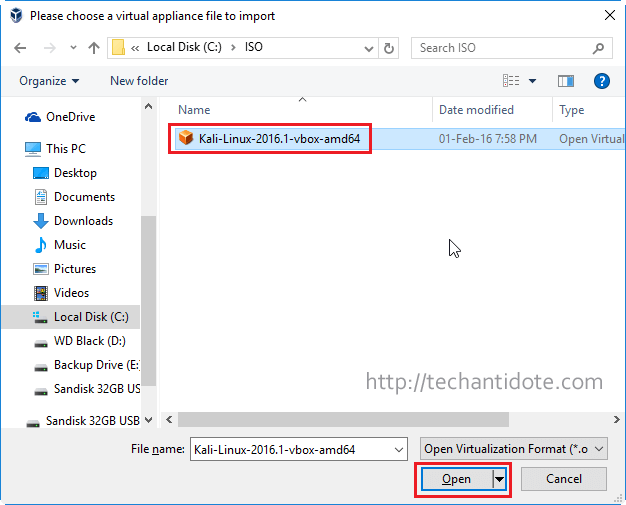
Now, browse to and select the extract .ova Kali Linux image file and click on “Open“.
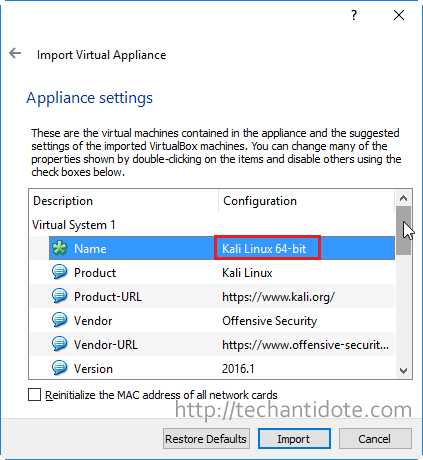
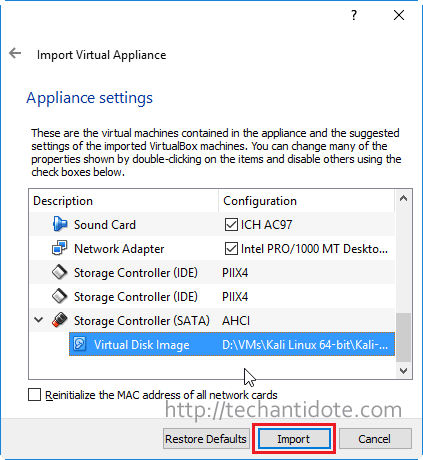
You would now see a window called “Appliance settings” where you can configure stuff like the name of your VM, the amount of RAM to be allocated to your Kali Linux VM etc.
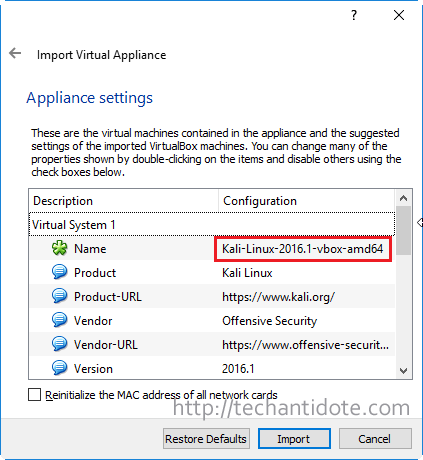
If you want to change the name of the VM, simply click on the text and you can change it according to your will.
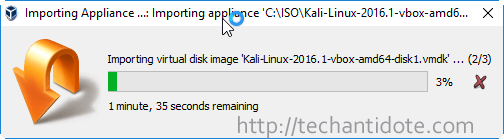
Finally, click on “Import” and wait for a few moments to import the Kali Linux Appliance.
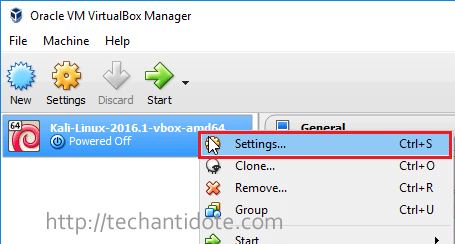
Now, right click on your Kali Linux Virtual machine as shown below and click on “Settings“.
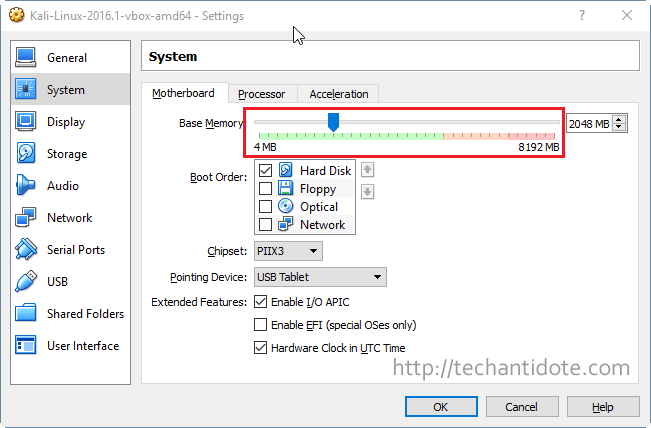
If you need to adjust the amount of RAM, click on “System” and you can move the slider accordingly. I would suggest atleast a minimum of 2048 MB (2GB) of RAM.
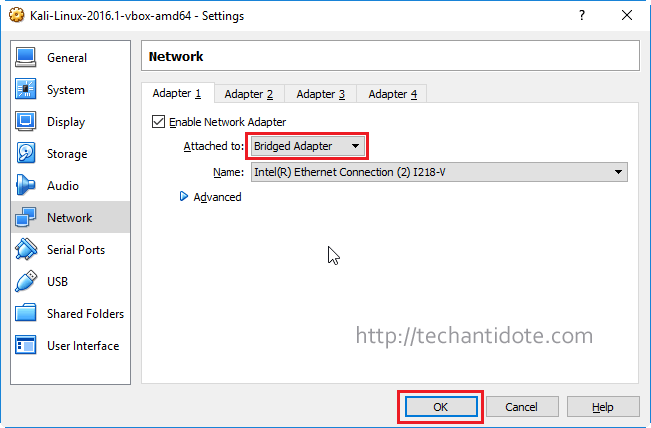
Now, click on “Network” as shown below and select “Bridged Adapter” and then click on “OK“.
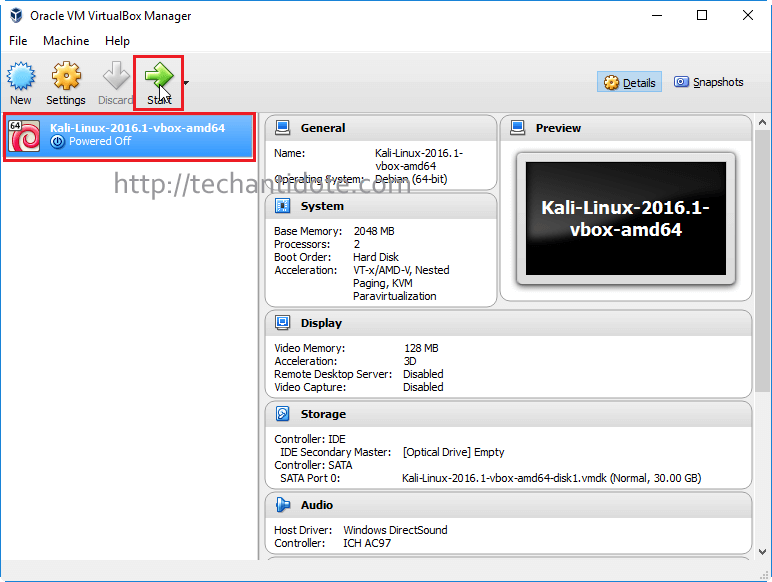
Click on your Kali Linux VM and then click on Start as shown below.
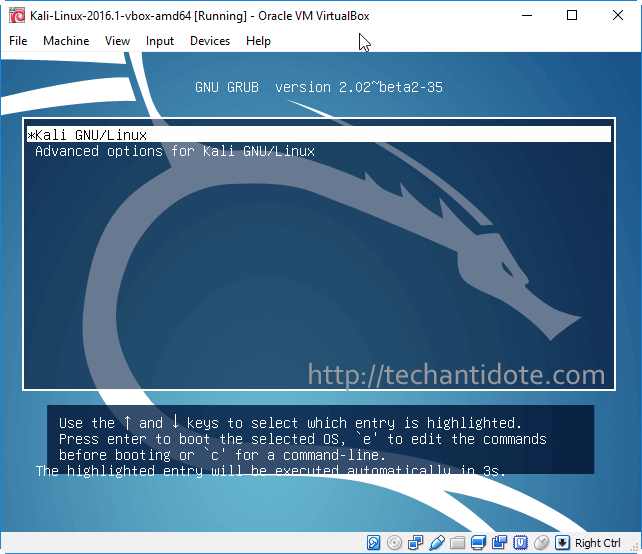
You should now be able to see the grub menu. Hit “Enter” in your keyboard.
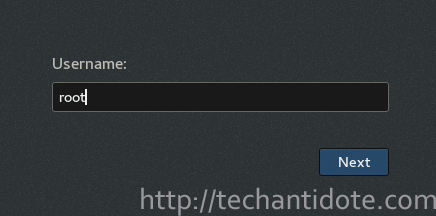
Now, login to your Kali Linux machine with the default username as root and password toor.
Note: If you are using newer Kali versions (from year 2020 ), the username and password is “kali”.
Ref: https://www.kali.org/docs/introduction/default-credentials/
You should now be booted into your Kali Linux desktop.

Customize Kali (Optional):
I would like to make some minor changes to make sure the VM is not interrupted during pen testing. This section is purely optional, you can skip to the next section if you don’t want to customize it.
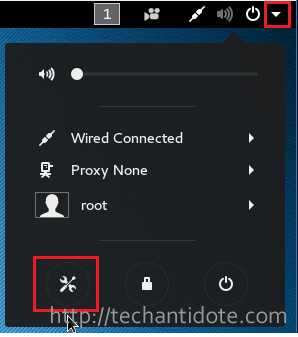
Click on the triangle pointing downwards in the upper right corner and then click on the “Settings” icon.
This will bring you the “All Settings” window as shown below. Click on “Date & Time“.
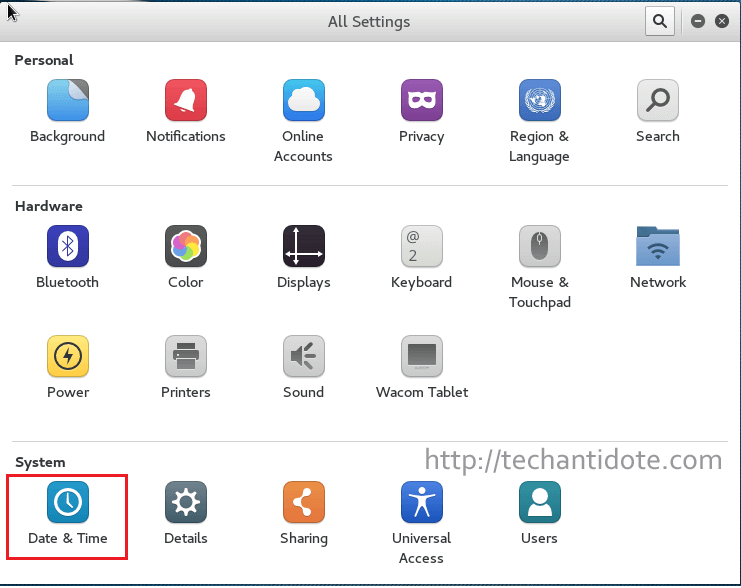
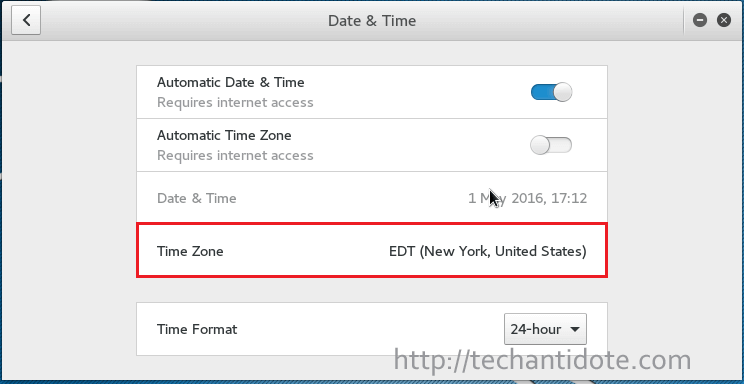
You can change the time zone to your time zone.
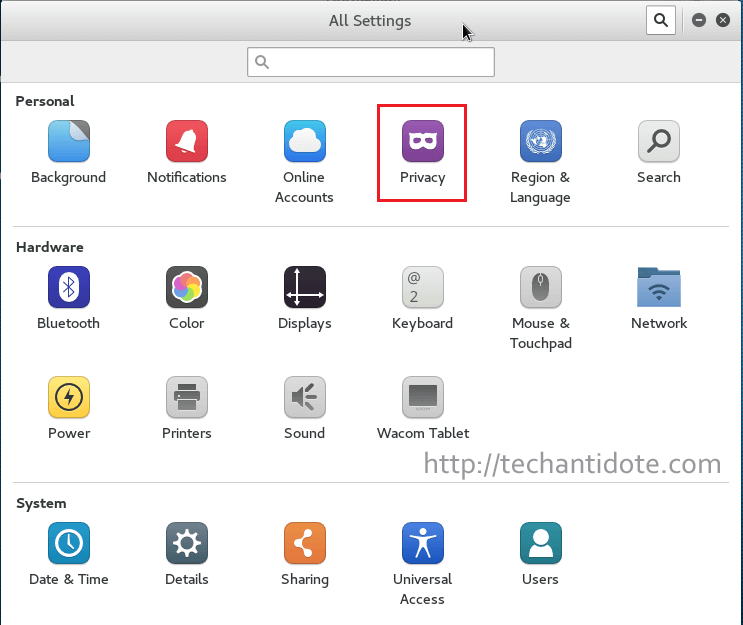
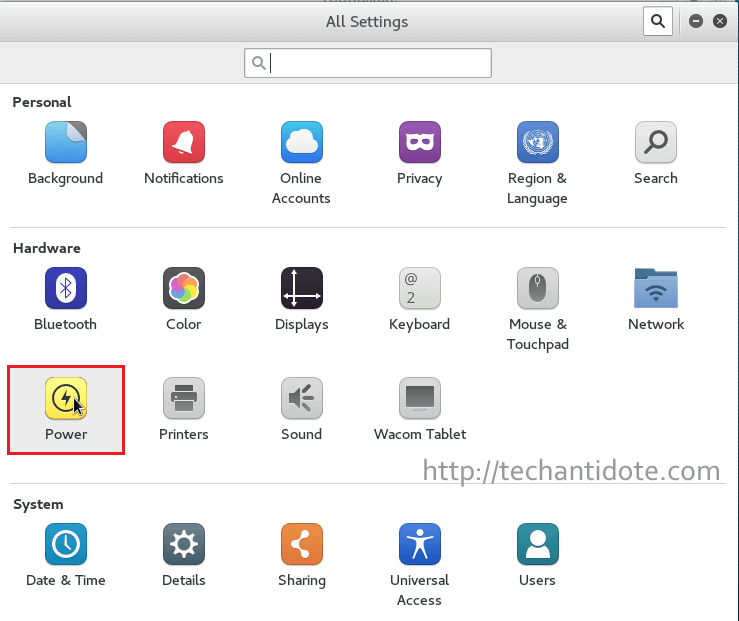
Now, go back to the “All Settings” window and then click on “Privacy“.
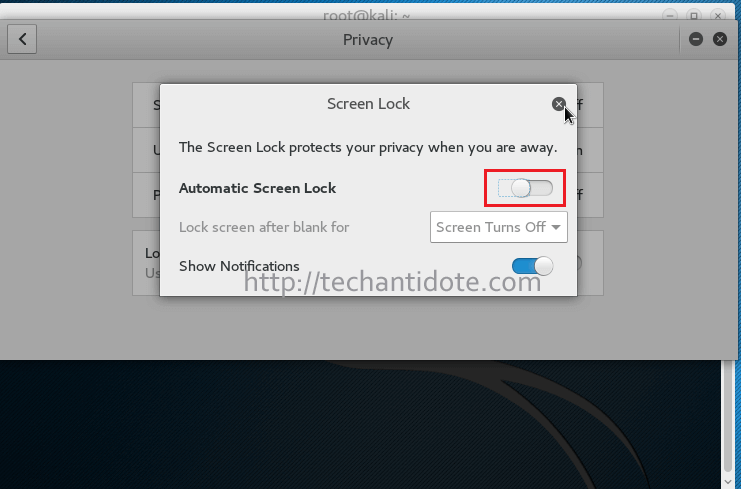
You would see a screen similar to the one below:

Now, disable “Automatic Screen Lock” by moving the slider.
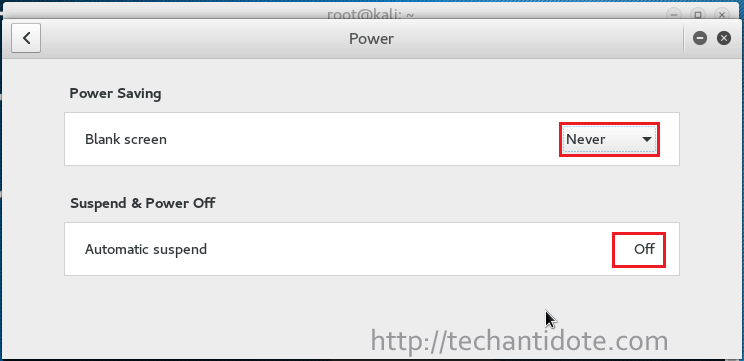
Go back to “All Settings“, then click on “Power“.
Now, select Blank Screen option as “Never” and turn off “Automatic Suspend” as shown below.
Update Kali Linux:
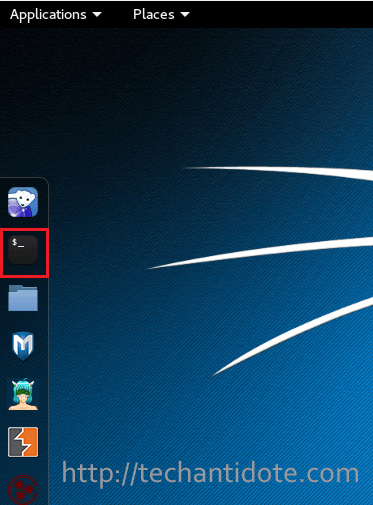
Open the terminal window by clicking on the icon as shown below:
This is what the terminal window would look like in a Kali Linux system.
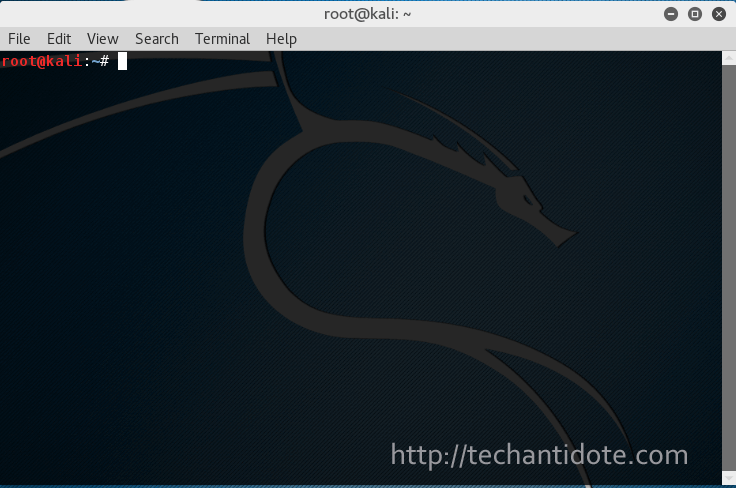
Enter the following commands in the terminal to update your Kali Linux system.
apt-get clean && apt-get update -y
apt-get upgrade -y && apt-get dist-upgrade -y
This may take a while depending on your internet connection for the update to complete.
And that is it for setting up Kali Linux in virtualbox to get started with pentesting (only for ethical hacking and for purely educational purposes).
If you have any sort of queries regarding this installation, just leave a comment and will get back to you. I will be posting some ethical hacking tutorials in the future, so stay tuned.

Excellent Description to install Kali Linux.
@Ashish, Thanks a ton!
Regards,
ΞXΤЯ3МΞ
Hi ξΧΤЯ3Μξ !!
Ι download Kali 2018.1 – directly from the Offensive Security website (the torrent file). I m running VBox v. 5.2.6 . on a Mac.
So .. i check the ¨Import Appliance¨ , choose the – kali-linux-2018.1-vbox-i386 – file, click “import ” .. everything ok so far, but after 4-5 minutes , i m getting this error message :
<>
…. Note that the downloaded torrent file wasn’t corrupted . Any help will be greatly appreciated .
Alex .
I followed this for the 2016.2 ova and it worked like a charm. Many thanks.
@Chris, Thats great! Glad to hear ! Happy new year! 🙂
Hello i use this method but when i rename it to .ova file and import in vm its show failed to open error what to do explain
Hi Anuj,
You dont need to rename the ova file to import to virtualbox. You just need to leave the file extension as .ova and import as mentioned in the article.
Also, could check the md5sum of the downloaded image and verify the integrity is correct?
Regards,
EXTR3ME
It showing (0×80BB0005)
error
@Anuj, I did come across this link:
https://forums.virtualbox.org/viewtopic.php?f=6&t=26953
Do check if it helps
Please how many hard disk space is needed
I was told to give it at least 32GB, though at 64GB is recommended if you can spare it.
Cool! Thanks for the help. It usually takes me about 3 complete install cycles to learn something new… and you just saved me at least 2! 😀
Hello everyone
Can anyone help
I did the same process and till here I am getting “You should now be able to see the grub menu. Hit “Enter” in your keyboard.”
After that Kali login screen is not appear only I can see black screen with cursor .i did all the steering advise
Anyone can help ..urgent
Thanks
Rajiv
Go to the settings and click on the type of operating system you wish to work upon, other than “other” option and a corresponding version should be selected, which I think is automatic. Now, go on to the Display settings, and make your video memory 128MB and press ok. Now you’re good to go.
Excellent Post!! Thanks for sharing this method about how to Install Kali Linux in VirtualBox. It’s very informative.
why i am getting kernel panic – not syncing ERROR?
CAN ANYONE HELP ME?
I did check on this issue and below seemed to have fixed the issue for some users:
Edit Virtual machine -> Settings -> System
Then change Chipset from PIIX3 to ICH9 and enable “Enable IO APIC”
Let me know if it works.
why i am getting kernel-panic ERROR?
i guess i followed all steps mentioned here, but it did not work for me.
i got this ERROR : kernel panic not syncing.
can anyone help me, pls?
thx
I did check on this issue and below seemed to have fixed the issue for some users:
Edit Virtual machine -> Settings -> System
Then change Chipset from PIIX3 to ICH9 and enable “Enable IO APIC”
Thank you for sharing this amazing post. I am going to follow this tutorial, hope I don’t get stuck anywhere.
Nice information
Thanks for such a great information sir.
@Jayeshm Your Welcome! 🙂
I try updating the OS and it isn’t downloading anything. I think it may be because it’s not detecting a wireless network adapter despite the fact that the wifi on my host destop works fine. Here’s what I get when I type in iwconfig in kali:
lo no wireless extensions
eth0 no wireless extensions.
Any help would be appreciated. Thanks.
@BJ Korb, Passing USB adaptors via virtualbox dont usually work always.
– Connect using LAN, update and upgrade your kali linux.
Verify that virtualbox guest editions are installed.
-Do verify that the USB adapter is selected in your VBox settings.
Type “dmesg” in your terminal and check if you see your wireless adapter detected? [It might show up as an Intel device at times.]
-Also,try editing your VirtualBox VM settings for Kali and set the network to “NAT” and reboot you VM. Check if you are able see the ifconfig and iwconfig does show any interface being up. [It may identify as a LAN connection in this case but not sure.]
Finally, if nothing works out, try using
VMware Workstation Pro (Free Trial is available) which has better support when it comes to using external USB wifi adapters.
Hi ξΧΤЯ3Μξ !!
Ι download Kali 2018.1 – directly from the Offensive Security website (the torrent file). I m running VBox v. 5.2.6 . on a Mac.
So .. i check the ¨Import Appliance¨ , choose the – kali-linux-2018.1-vbox-i386 – file, click “import ” .. everything ok so far, but after 4-5 minutes , i m getting this error message :
<>
…. Note that the downloaded torrent file wasn’t corrupted . Any help will be greatly appreciated .
Alex .
Hi Alex,
I dont own a Mac so I am unable to test the same. Perphaps, we could narrow down the issue.
-Verify if the checksums match. Below is the SHA256Sum for “kali-linux-2018.1-vbox-i386.ova”:
85bab7b5887586da03fd212e82321b292a473963000f1d5f2da2d1da95d1d2ab
-You can run the following in your terminal and check if the data if the value you get is the same as the above:
sha256sum kali-linux-2018.1-vbox-i386.ova”
-If the checksums dont match, its a bad image and you can re-download. If it does match, check the following:
-Are you able to boot other linux 32-bit ova images(for ex: linux mint 32bit) into virtualbox on your MAC?
– I came across the below thread for issue with older Macs, check if below is relavent(but there are for ISOs):
https://mattgadient.com/2016/07/11/linux-dvd-images-and-how-to-for-32-bit-efi-macs-late-2006-models/
-If nothing works out, download the ISO image for 2018 Kali, install it and check if you are able to boot it successfully. If you are able to boot and install Kali, well and good. You could then create an OVA file using File>Export Appliance.
-If you need to use the OVA in the future for testing, you could then use the newly created ISO.
Do let me know the results.
[PS: I dont own a Mac not have not tried importing Kali onto Vbox on a mac.]
thanks for your reply ξXΤЯ3Мξ .
I m
always verify the checksums (since Backtrack). I have already download and import the ISO file (together with the OVA). The ISO works great on VBox – i just wanted to use an OVA file ‘cause they’re already modified for VBox. I never had any problems with older versions (Kali 2016 works like a charm, with all the necessary updates ..etc ). The think is that i recently upgrade my (old) MacBook from Snow Leopard to El Capitan – witch i have already regret (Matt Gradient, seems to agree with me also) and now running the (latest) VBox 5.2.8, so maybe there is an issue with the new version (also tried VB 5.2.6 – with the same results) …
So, for now i ll use the ISO file !
Again thanks for your effort and help.
Alex .
This is amazing but I keep on getting a black screen when i launch it. The black screen comes at the startup when the login screen should pop up.
THANKS A LOT.
VERY HELPFUL.
@Ronak, Glad it was helpfull.
Regards
ΞXΤЯ3МΞ
If you are getting an error about USB and if in the Settings you default on USB 2.0, set it to USB 1.0, that worked for me and it worked. Thanks.
@Crestarrd, Thank you for the tip! Have a great day! 🙂
Regards,
ΞXΤЯ3МΞ
Hi, i have used VM version 6.0 on MAC, there are small diff, on creation stage i should be disable USB port or i should to download the driver from Oracle site.
All the rest steps are brilliant !!!
Thank you so much
@Ben Thanks a ton for the additional info for MACs. Have a great day!
Regards,
ΞXΤЯ3МΞ
super!
what is diffrence between ova file and regular iso file?
Hi bunny,
If you are refering to operating system downloads, OVA files usually contained pre-installed packages or has some kind of automated setup to get the system up and runnning.
For example: If you download an OVA for an Kali/Ubuntu, you can simlply load it in VirtualBox/Vmware and you dont need to go through the installation process which saves time. However, for an ISO – you would need to create a VM and load the ISO and usually install the OS, reboot to start using the OS. [Note: This is not the most accurate definition but I have explained it in the context of the article.]
Hope this helps!
Regards,
ΞXΤЯ3МΞ
sir ihave try this step but the login screen appearing blank screen can you help me out how to solve the problem
@whitehunt,
If you press CTRL+ALT+F1 or CTRL+ALT+F2, do you get a CLI prompt?
Make sure you have provided at-least 2 gigs of RAM to the VM.
Regards,
ΞXΤЯ3МΞ
I have this error:Failed to import appliance /Volumes/——–/VitualBox/kali-linux-2019.3-vbox-amd64.ova.
Result Code: NS_ERROR_INVALID_ARG (0x80070057)
@hw, As per one of the VirtualBox ticket, it did mention about not having sufficient disk.
Source: https://www.virtualbox.org/ticket/18343
Alternatively, try to use the locations in Quotes or use the UUID.
Source: https://forums.virtualbox.org/viewtopic.php?t=58492
Do let me know if this works.
Regards,
ΞXΤЯ3МΞ
how do i know if my CPU supports virtualization
@FREDERICK, Please refer to this article:
https://extr3metech.wordpress.com/2012/10/27/how-to-check-if-your-processor-supports-virtualization/
Regards,
ΞXΤЯ3МΞ
Try the following link: https://extr3metech.wordpress.com/2012/10/27/how-to-check-if-your-processor-supports-virtualization/
Regards,
ΞXΤЯ3МΞ
When I download the OVA file, it shows as kali-linux-2019.1-vbox-amd64.ova.torrent . How do I convert this file from a .torrent file to a .ova file so that I can use it? I have 7Zip on my Windows 10 computer but it can’t extract it.
it does not login there is something wrong with the pasword
@Tarek The new versions have a different user/pass. The username and password for newer versions are “kali”.
Ref: https://www.kali.org/docs/introduction/default-credentials/
Ref: https://www.kali.org/docs/introduction/default-credentials/
i just can’t seem to download updated Kali Linux OS in either ova or ovf format as i keep getting it in torrents.
can anyone please share a link to have it in the desired format so as to enable be open and install in VirtualBox.
Hi Extreme,
i just downloaded and installed Kali Liux in Virtualbox and below is the erro message econcountered,
”Failed to open a session for the virtual machine Kali-Linux-2019.1-vbox-amd64.
Not in a hypervisor partition (HVP=0) (VERR_NEM_NOT_AVAILABLE).
VT-x is disabled in the BIOS for all CPU modes (VERR_VMX_MSR_ALL_VMX_DISABLED).
Result Code: E_FAIL (0x80004005)
Component: ConsoleWrap
Interface: IConsole {872da645-4a9b-1727-bee2-5585105b9eed}”
@Laval, Is VT-x enabled in your BIOS? Please check the below link:
https://extr3metech.wordpress.com/2012/10/27/how-to-check-if-your-processor-supports-virtualization/
Regards,
ΞXΤЯ3МΞ
@Lawal, Is VT-x enabled in your BIOS? Please check the following:
https://extr3metech.wordpress.com/2012/10/27/how-to-check-if-your-processor-supports-virtualization/
i am not able to update kali linux .it is saying permission denied.what should i do?
did you using “sudo” ?
i need the 32 kali linux
Hi I tried the steps you mentioned to update the Kali i am getting permission denied what should i do now ?
Is there a option to select the preffered partion for installation?
Hello. I am following this great guide, but when I hit Enter at the grub menu, all I get is a black screen with the Kali logo and nothing happens. I let it sit for an hour, but still nothing.
Thank you for your write up.
It worked on Win7, Home version, Sep updates done.
HP Envy model. 2 core
x64 based PC
Awesome! Glad it worked.
Informasi ini bagus
This is very useful
niceeeee