Its 2020!!!! Wohoo!! Happy new year to all! God Bless you!

Its 2020!!!! Wohoo!! Happy new year to all! God Bless you!
To run a bash script (Example: bash-script.sh) from inside a perl script, you could use the following syntax:
system("sh", "bash-script.sh")
Note: Here, once the bash script completes execution it will continue with the execution of the perl script.
Example:
Perl Script: perl-script.pl
Bash Script: bash-script.sh
Below is a perl script “perl-script.pl” which calls an external bash script “bash-script.sh”.
#!/usr/bin/perl
use strict;
use warnings;

print "Running parent perl script. \n";
print "Starting to call external bash script\n";

# Sample Argument to be passed to the bash script
my $my_arg = "ARG1";

# With arguments - pass them inside quotes seperated by commas
system("sh", "bash-script.sh","$my_arg");

print "Back to parent perl script\n";
Below is the sample “bash-script.sh” which prints the variable.
#!/bin/bash
echo "---Start of Bash script---"

a=$1
echo "Argument from Perl script is" $a
To test, execute the perl script:
./perl-script.pl
Credits/References
https://stackoverflow.com/questions/3200801/how-can-i-call-a-shell-command-in-my-perl-script
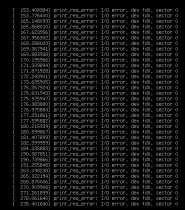
After a fresh install of Ubuntu, my terminal was being flooded with “print_req_error: I/O error, dev fd0, sector 0” error.
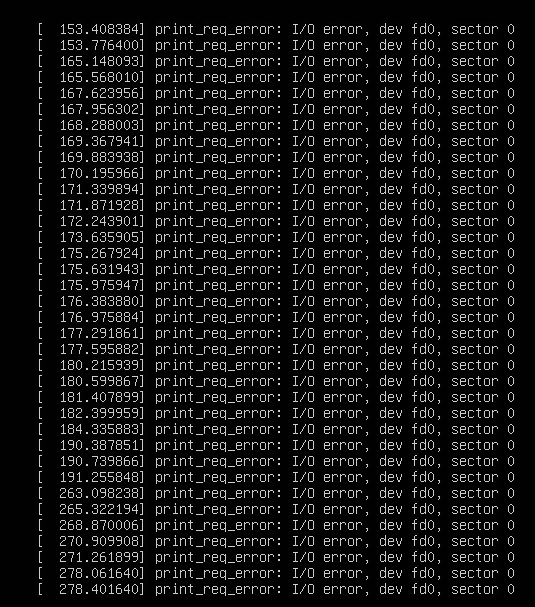
This is because, your kernel thinks you have a floppy disk fd0, but cant find one. To fix this issue, you can run the following in your terminal:
sudo rmmod floppy
echo "blacklist floppy" | sudo tee /etc/modprobe.d/blacklist-floppy.conf
sudo dpkg-reconfigure initramfs-tools

EDIT: Thanks @Joanmi for your comment (For the noticing the issue with sudo command.)
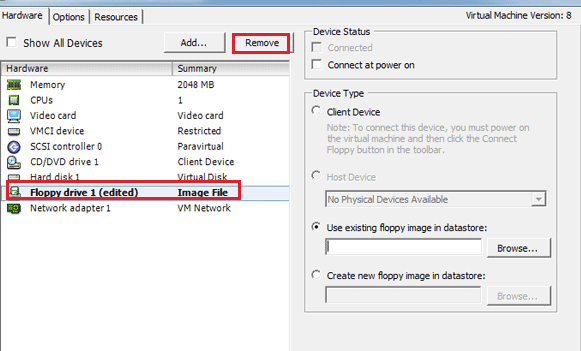
Misc: If you are deploying a new virtual machine, you can avoid this issue by deleting the Floppy Disk drive.
Source: StackOverflow
While using “dd”, by default it does not show the progress nor status of the transfer. However, you could use the flag “status=progress” to show the status/progress of the transfer. Here is a screenshot:

This flag is available in the newer version of dd. Here are the CLI outputs for the text ninjas:
$ sudo dd if=archlinux-2019.06.01-x86_64.iso bs=4M of=/dev/sdd status=progress oflag=sync
641728512 bytes (642 MB, 612 MiB) copied, 16 s, 39.1 MB/s
153+1 records in
153+1 records out
643825664 bytes (644 MB, 614 MiB) copied, 16.4601 s, 39.1 MB/s
PS: Use dd (data duplicator) with caution. ‘dd‘ is also known as disk destroyer in an alternate universe.
Regards,
ΞXΤЯ3МΞ
Check out the brand new Cyberpunk 2077 E3 Trailer. This is literally the going to be the best game ever! Trust me, you are gonna love this one!
[PS: To avoid any spoiler, I used the video with the above thumbnail.]
To my fellow Gamers: After you watch this video after you watch the above, watch the presentation HERE. The crowd goes in-freaking-sane during the presentation. Check out the crowd reaction here.
This literally has been the best E3 so far. Holy smoke! I am Pumped!!!
Regards,
ΞXΤЯ3МΞ
This is a blog post on reverse engineering TP Link TD-W8970v3 router firmware.
Requirements:
Disclaimer:
This is strictly for educational purposes ONLY and not be used for conducting any illegal activities. I hold no responsibility for misuse of this information.
Download the firmware:
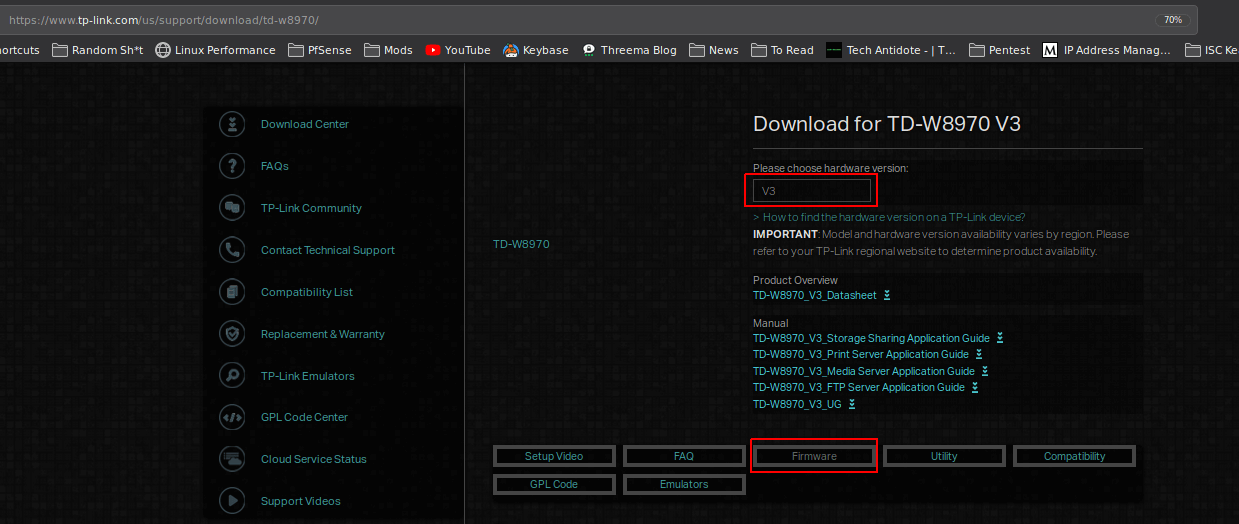
First, we need to download the firmware that we need to reverse engineer. I am using the TP Link TD-W8970 v3 firmware.
To download the firmware, go to the below link. -Select “V3” as the version and click on “Firmware”.
https://www.tp-link.com/us/support/download/td-w8970/
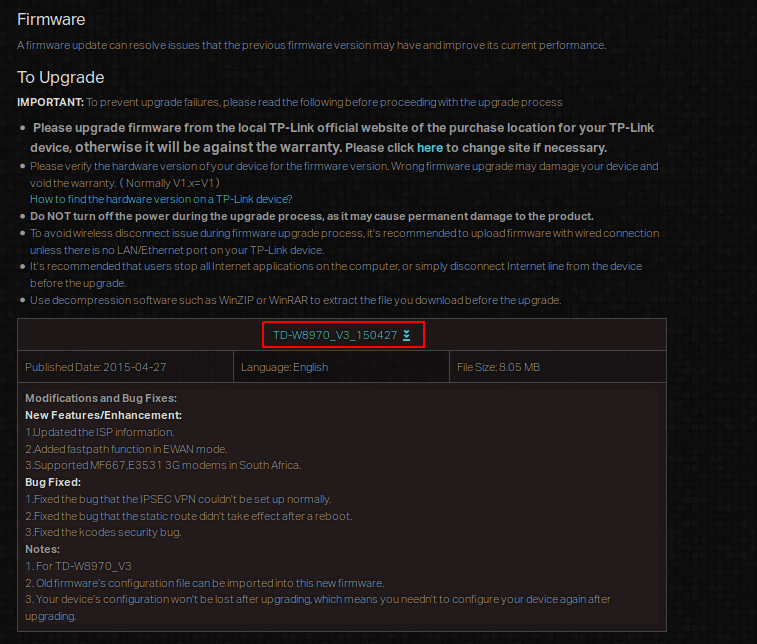
Download the firmware.
Time to dig around!!
Copy the firmware to a new location and extract it.
mkdir ~/firmware
cp ~/Downloads/TD-W8970_V3_150427.zip ~/firmware/
cd firmware/
unzip TD-W8970_V3_150427.zip
cd TD-W8970\(UN\)_V3_150427/
So, here we can see the firmware upgrade image itself with the “.bin” extension along with the firmware upgrade guide.
$ ls -l
total 8296
-rw-rw-r-- 1 extr3me extr3me  317017 Dec 25  2013 'How to upgrade TP-LINK ADSL Modem Router - Copy.pdf'
-rw-rw-r-- 1 extr3me extr3me 8174304 Apr 27  2015 'TD-W8970v3_0.9.1_1.2_up_boot(150427)_2015-04-27_17.48.51.bin'
extr3me@op3n TD-W8970(UN)_V3_150427 $
For sanity purposes, I removed the firmware upgrade guide which I don’t need here.
$ rm How\ to\ upgrade\ TP-LINK\ ADSL\ Modem\ Router\ -\ Copy.pdfInspecting the binary with “file” command shows that it of type “data”.
$ file TD-W8970v3_0.9.1_1.2_up_boot\(150427\)_2015-04-27_17.48.51.bin
TD-W8970v3_0.9.1_1.2_up_boot(150427)_2015-04-27_17.48.51.bin: data
Below is a screenshot:
![]()
I tried to run hexdump and filter out some data but did not get any useful info here yet.
$ hexdump -C TD-W8970v3_0.9.1_1.2_up_boot\(150427\)_2015-04-27_17.48.51.bin | head -10
00000000  03 00 00 00 76 65 72 2e  20 32 2e 30 00 ff ff ff  |....ver. 2.0....|
00000010  ff ff ff ff ff ff ff ff  ff ff ff ff ff ff ff ff  |................|
*
00000030  ff ff ff ff 08 97 00 03  00 00 00 35 00 00 00 00  |...........5....|
00000040  9c e8 56 2f 7d cd f2 5a  80 92 27 b5 dd 23 66 ea  |..V/}..Z..'..#f.|
00000050  00 00 00 00 ff ff ff ff  ff ff ff ff ff ff ff ff  |................|
00000060  ff ff ff ff ff ff ff ff  80 01 00 00 80 2e 00 20  |............... |
00000070  00 7e 02 00 00 00 02 00  00 13 d6 d3 00 13 d6 e0  |.~..............|
00000080  00 67 e0 00 00 00 00 00  00 00 e3 90 55 aa 01 02  |.g..........U...|
00000090  a5 00 09 01 55 d1 51 bb  ff ff ff ff ff ff ff ff  |....U.Q.........|
Now, use the tools “strings” to print out all the human readable strings in the binary. Here, I filtered the 1st 10 lines.
-The output does show two strings that seemed interesting.
$ strings TD-W8970v3_0.9.1_1.2_up_boot\(150427\)_2015-04-27_17.48.51.bin | head -10
ver. 2.0
79!8
@ !<
6H!$
cfe-v
e=192.168.1.1:ffffff00 h=192.168.1.100 g= r=f f=vmlinux i=bcm963xx_fs_kernel d=1 p=0
96361I2
  c
!P%@
!H$5)
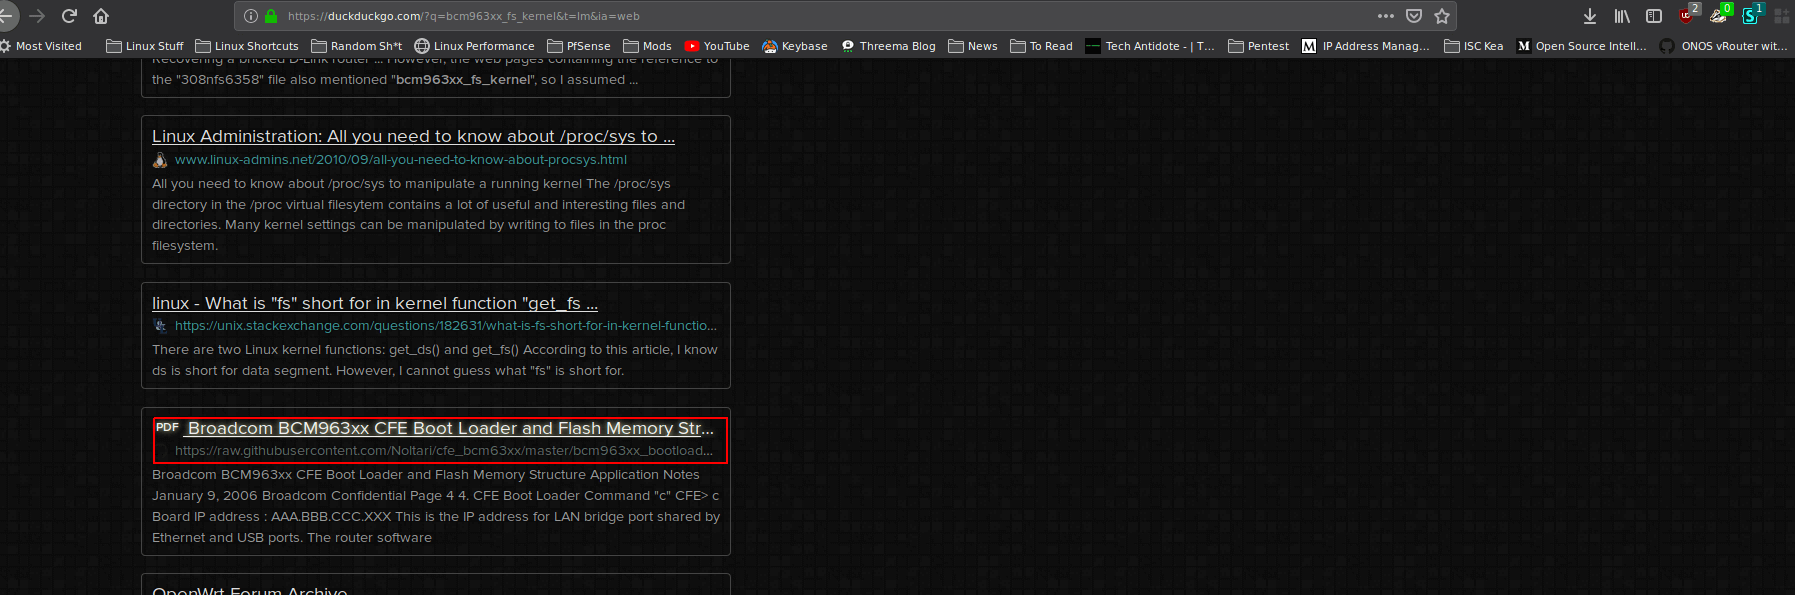
A bit off topic. But out of curiosity, I searched online for “bcm963xx_fs_kernel” and came across a PDF document “Broadcom BCM963xx CFE Boot Loader and Flash Memory Structure Application Notes”‘ from Jan 2006.
Here is a screenshot of the document itself:
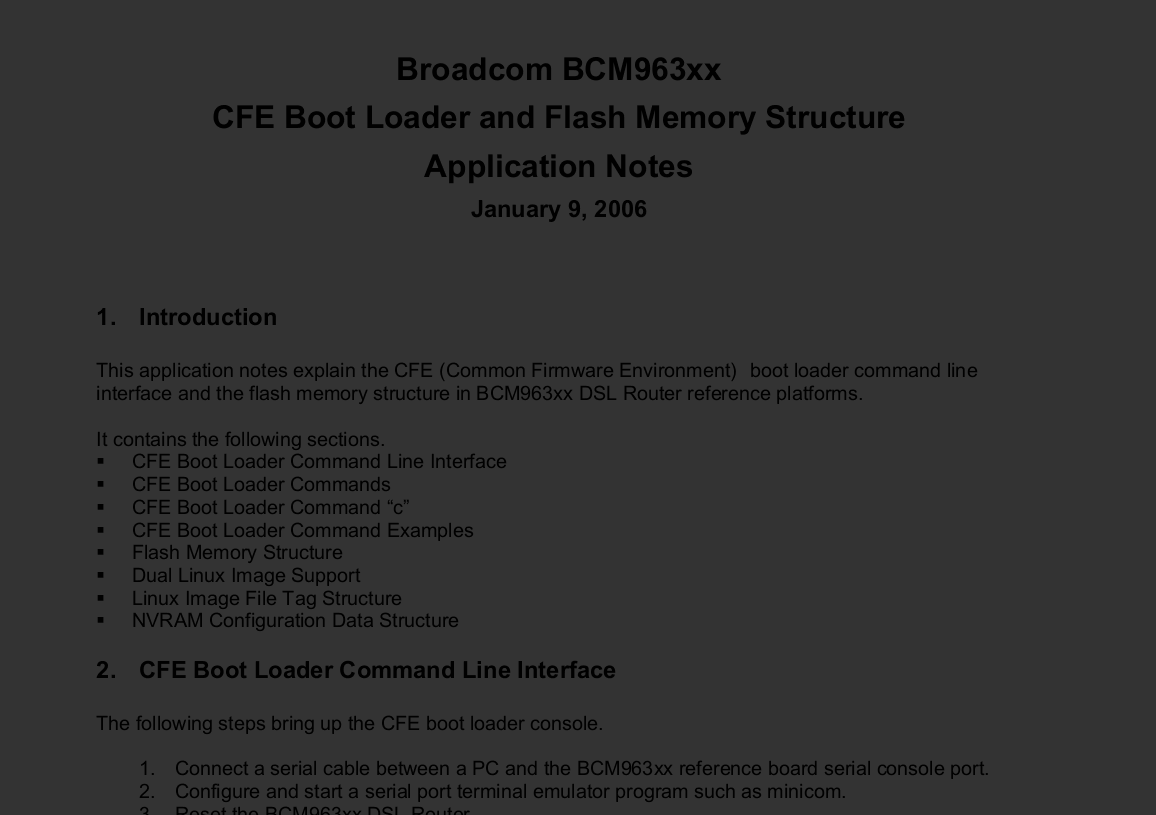
So, it looks like the router firmware has “Broadcom” and we now know the bootloader and we can get more information from the PDF.
Here is a link to the document: Broadcom CFE Link
cfe-v
e=192.168.1.1:ffffff00 h=192.168.1.100 g= r=f f=vmlinux i=bcm963xx_fs_kernel d=1 p=0
The strings output also shows “cfe-v” which looks to “Common Firmware Environment”.
It also has information on the CFE bootloader flash memory:
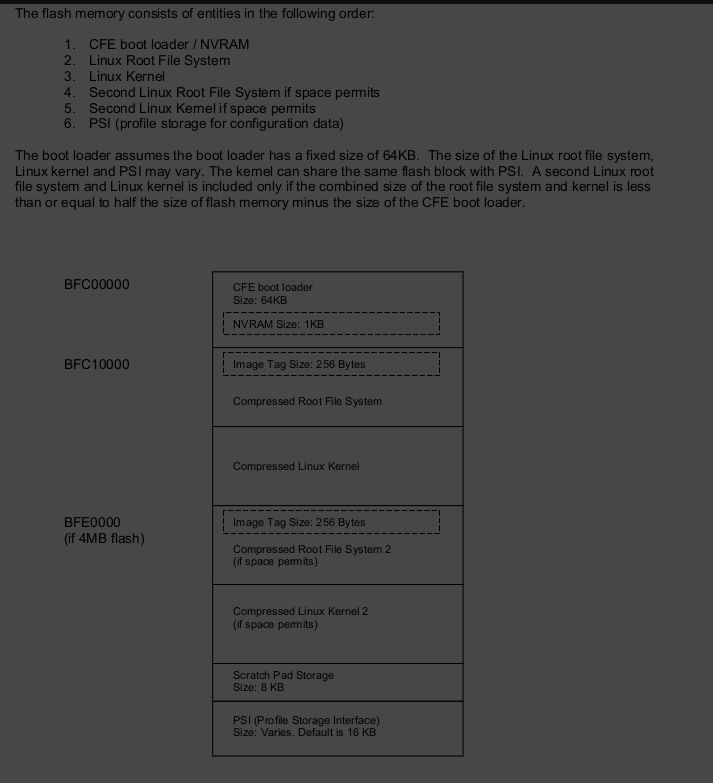
In Page 5 of the Broadcom documentation, it does refer to the TFTP flashing method and could see some similarties from the output of the “strings” command.
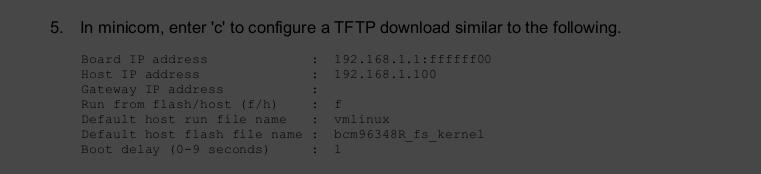
T his is what I could come up so far, comparing the screenshot and the below line:
“e=192.168.1.1:ffffff00 h=192.168.1.100 g= r=f f=vmlinux i=bcm963xx_fs_kernel d=1 p=0“,
e=192.168.1.1:ffffff00     => "192.168.1.1" => Board IP. I assume "ffffff00" => subnet mask 255.255.255.0 or CIDR.
h=192.168.1.100            => "192.168.1.100" => Host IP
g=                         => "empty" => Gateway IP
r=f                        => "f" => Run from Flash
f=vmlinux                  => "vmlinux" | Default run hostfilename is "vmlinux"
i=bcm963xx_fs_kernel       => "bcm963xx_fs_kernel" | Default flash filename is "bcm963xx_fs_kernel"
d=1                        => "1" | Delay = 1
p=0                        => "0" | [I have no idea what this is.]
So, the e, h, g, r, f, i, d and p seems to be variables that would be used during the flashing procedure via minicom to emulate a serial device.
If you would like to dig deeper, you could read about CPE by clicking here.
Extracting Router Filesystem:
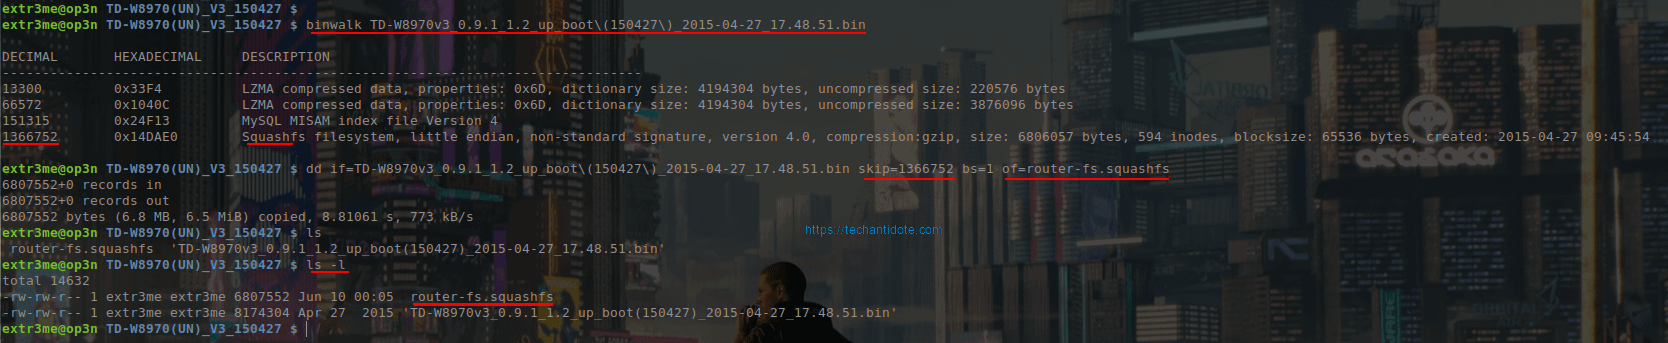
To check what is in the router firmware binary, I have used “binwalk“. Below is output of binwalk:
$ binwalk TD-W8970v3_0.9.1_1.2_up_boot\(150427\)_2015-04-27_17.48.51.bin

DECIMAL       HEXADECIMAL     DESCRIPTION
--------------------------------------------------------------------------------
13300         0x33F4          LZMA compressed data, properties: 0x6D, dictionary size: 4194304 bytes, uncompressed size: 220576 bytes
66572         0x1040C         LZMA compressed data, properties: 0x6D, dictionary size: 4194304 bytes, uncompressed size: 3876096 bytes
151315        0x24F13         MySQL MISAM index file Version 4
1366752       0x14DAE0        Squashfs filesystem, little endian, non-standard signature, version 4.0, compression:gzip, size: 6806057 bytes, 594 inodes, blocksize: 65536 bytes, created: 2015-04-27 09:45:54
The Ahaaa moment!
So, here we see this binary contains a squashfs filesystem starting at decimal “1366752”.

We can extract the squashfs filesystem alone from the firmware binary using the “dd” command by skiping up to “1366752” using the “skip” flag.
$ dd if=TD-W8970v3_0.9.1_1.2_up_boot\(150427\)_2015-04-27_17.48.51.bin skip=1366752 bs=1 of=router-fs.squashfs
6807552+0 records in
6807552+0 records out
6807552 bytes (6.8 MB, 6.5 MiB) copied, 8.81061 s, 773 kB/s
Here, we are providing the input file as the router firmware, setting the block size to “1” and getting data from “1366752” to the end of the binary and storing it to a file “router-fs.squashfs”. Here, if we dont specify the “bs” the copy would most likely fail.
So, the squashfs file system is about ~6.5MB in size compressed.
$ ls -lh
total 15M
-rw-rw-r-- 1 extr3me extr3me 6.5M Jun 10 00:05  router-fs.squashfs
-rw-rw-r-- 1 extr3me extr3me 7.8M Apr 27  2015 'TD-W8970v3_0.9.1_1.2_up_boot(150427)_2015-04-27_17.48.51.bin'
– Now, Checking the file shows as “data”.
$ file router-fs.squashfs
router-fs.squashfs: data
$ binwalk router-fs.squashfs

DECIMAL       HEXADECIMAL     DESCRIPTION
--------------------------------------------------------------------------------
0             0x0             Squashfs filesystem, little endian, non-standard signature, version 4.0, compression:gzip, size: 6806057 bytes, 594 inodes, blocksize: 65536 bytes, created: 2015-04-27 09:45:54
Now, we can extract the filesystem using “unsquashfs”.
$ unsquashfs router-fs.squashfs-You may see some error such as below:
“create_inode: could not create character device squashfs-root/dev/bcmadsl0, because you’re not superuser!”
These logs can be safely ignored. Here is the output for reference:
$ unsquashfs router-fs.squashfs
[130/91284]
Parallel unsquashfs: Using 8 processors
546 inodes (811 blocks) to write
create_inode: could not create character device squashfs-root/dev/bcmadsl0, because you're not superuser!
create_inode: could not create character device squashfs-root/dev/bcmarl, because you're not superuser!
create_inode: could not create character device squashfs-root/dev/bcmfap, because you're not superuser!
create_inode: could not create character device squashfs-root/dev/bcmvlan, because you're not superuser!
create_inode: could not create character device squashfs-root/dev/bcmxtmcfg0, because you're not superuser!
create_inode: could not create character device squashfs-root/dev/bpm, because you're not superuser!
create_inode: could not create character device squashfs-root/dev/brcmboard, because you're not superuser!
create_inode: could not create block device squashfs-root/dev/caldata, because you're not superuser!
create_inode: could not create character device squashfs-root/dev/console, because you're not superuser!
create_inode: could not create character device squashfs-root/dev/dk0, because you're not superuser!
create_inode: could not create character device squashfs-root/dev/fcache, because you're not superuser!
create_inode: could not create character device squashfs-root/dev/flash0, because you're not superuser!
create_inode: could not create character device squashfs-root/dev/gmac, because you're not superuser!
create_inode: could not create character device squashfs-root/dev/gpio, because you're not superuser!
create_inode: could not create character device squashfs-root/dev/gpio1, because you're not superuser!
create_inode: could not create character device squashfs-root/dev/ingqos, because you're not superuser!
create_inode: could not create character device squashfs-root/dev/led, because you're not superuser!
create_inode: could not create block device squashfs-root/dev/mtd, because you're not superuser!
create_inode: could not create character device squashfs-root/dev/mtd0, because you're not superuser!
create_inode: could not create character device squashfs-root/dev/mtd1, because you're not superuser!
create_inode: could not create character device squashfs-root/dev/mtd2, because you're not superuser!
create_inode: could not create character device squashfs-root/dev/mtd3, because you're not superuser!
create_inode: could not create character device squashfs-root/dev/mtd4, because you're not superuser!
create_inode: could not create character device squashfs-root/dev/mtd5, because you're not superuser!
create_inode: could not create block device squashfs-root/dev/mtdblock0, because you're not superuser!
create_inode: could not create block device squashfs-root/dev/mtdblock1, because you're not superuser!
create_inode: could not create block device squashfs-root/dev/mtdblock2, because you're not superuser!
create_inode: could not create block device squashfs-root/dev/mtdblock3, because you're not superuser!
create_inode: could not create block device squashfs-root/dev/mtdblock4, because you're not superuser!
create_inode: could not create block device squashfs-root/dev/mtdblock5, because you're not superuser!
create_inode: could not create character device squashfs-root/dev/net/tun, because you're not superuser!
create_inode: could not create character device squashfs-root/dev/null, because you're not superuser!
create_inode: could not create character device squashfs-root/dev/pmap, because you're not superuser!
create_inode: could not create character device squashfs-root/dev/ppp, because you're not superuser!
create_inode: could not create character device squashfs-root/dev/pppox_iptables, because you're not superuser!
create_inode: could not create character device squashfs-root/dev/ptmx, because you're not superuser!
create_inode: could not create character device squashfs-root/dev/ptyp0, because you're not superuser!
create_inode: could not create character device squashfs-root/dev/ptyp1, because you're not superuser!
create_inode: could not create character device squashfs-root/dev/ptyp2, because you're not superuser!
create_inode: could not create character device squashfs-root/dev/pwrmngt, because you're not superuser!
create_inode: could not create character device squashfs-root/dev/qostype, because you're not superuser!
create_inode: could not create character device squashfs-root/dev/random, because you're not superuser!
create_inode: could not create block device squashfs-root/dev/sda, because you're not superuser!
create_inode: could not create block device squashfs-root/dev/sda1, because you're not superuser!
create_inode: could not create block device squashfs-root/dev/sda2, because you're not superuser!
create_inode: could not create block device squashfs-root/dev/sdb, because you're not superuser!
create_inode: could not create block device squashfs-root/dev/sdb1, because you're not superuser!
create_inode: could not create block device squashfs-root/dev/sdb2, because you're not superuser!
create_inode: could not create character device squashfs-root/dev/tty, because you're not superuser!
create_inode: could not create character device squashfs-root/dev/tty0, because you're not superuser!
create_inode: could not create character device squashfs-root/dev/ttyACM0, because you're not superuser!
create_inode: could not create character device squashfs-root/dev/ttyACM1, because you're not superuser!
create_inode: could not create character device squashfs-root/dev/ttyACM10, because you're not superuser!
create_inode: could not create character device squashfs-root/dev/ttyACM11, because you're not superuser!
create_inode: could not create character device squashfs-root/dev/ttyACM12, because you're not superuser!
create_inode: could not create character device squashfs-root/dev/ttyACM13, because you're not superuser!
create_inode: could not create character device squashfs-root/dev/ttyACM14, because you're not superuser!
create_inode: could not create character device squashfs-root/dev/ttyACM15, because you're not superuser!
create_inode: could not create character device squashfs-root/dev/ttyACM2, because you're not superuser!
create_inode: could not create character device squashfs-root/dev/ttyACM3, because you're not superuser!
create_inode: could not create character device squashfs-root/dev/ttyACM4, because you're not superuser!
create_inode: could not create character device squashfs-root/dev/ttyACM5, because you're not superuser!
create_inode: could not create character device squashfs-root/dev/ttyACM6, because you're not superuser!
create_inode: could not create character device squashfs-root/dev/ttyACM7, because you're not superuser!
create_inode: could not create character device squashfs-root/dev/ttyACM8, because you're not superuser!
create_inode: could not create character device squashfs-root/dev/ttyACM9, because you're not superuser!
create_inode: could not create character device squashfs-root/dev/ttyS0, because you're not superuser!
create_inode: could not create character device squashfs-root/dev/ttyUSB0, because you're not superuser!
create_inode: could not create character device squashfs-root/dev/ttyUSB1, because you're not superuser!
create_inode: could not create character device squashfs-root/dev/ttyUSB10, because you're not superuser!
create_inode: could not create character device squashfs-root/dev/ttyUSB11, because you're not superuser!
create_inode: could not create character device squashfs-root/dev/ttyUSB12, because you're not superuser!
create_inode: could not create character device squashfs-root/dev/ttyUSB13, because you're not superuser!
create_inode: could not create character device squashfs-root/dev/ttyUSB14, because you're not superuser!
create_inode: could not create character device squashfs-root/dev/ttyUSB15, because you're not superuser!
create_inode: could not create character device squashfs-root/dev/ttyUSB2, because you're not superuser!
create_inode: could not create character device squashfs-root/dev/ttyUSB3, because you're not superuser!
create_inode: could not create character device squashfs-root/dev/ttyUSB4, because you're not superuser!
create_inode: could not create character device squashfs-root/dev/ttyUSB5, because you're not superuser!
create_inode: could not create character device squashfs-root/dev/ttyUSB6, because you're not superuser!
create_inode: could not create character device squashfs-root/dev/ttyUSB7, because you're not superuser!
create_inode: could not create character device squashfs-root/dev/ttyUSB8, because you're not superuser!
create_inode: could not create character device squashfs-root/dev/ttyUSB9, because you're not superuser!
create_inode: could not create character device squashfs-root/dev/ttyp0, because you're not superuser!
create_inode: could not create character device squashfs-root/dev/ttyp1, because you're not superuser!
create_inode: could not create character device squashfs-root/dev/ttyp2, because you're not superuser!
create_inode: could not create character device squashfs-root/dev/urandom, because you're not superuser!
create_inode: could not create character device squashfs-root/dev/watchdog, because you're not superuser!

create_inode: could not create character device squashfs-root/dev/zero, because you're not superuser!
[====================================================================================================================================================================================================| ] 722/811 89%

created 370 files
created 48 directories
created 87 symlinks
created 0 devices
created 0 fifos
-Now, we should see a folder named “squashfs-root”
$ ls -l
total 14636
-rw-rw-r--  1 extr3me extr3me 6807552 Jun 10 00:05  router-fs.squashfs
drwxrwxr-x 13 extr3me extr3me    4096 Apr 27  2015  squashfs-root
-rw-rw-r--  1 extr3me extr3me 8174304 Apr 27  2015 'TD-W8970v3_0.9.1_1.2_up_boot(150427)_2015-04-27_17.48.51.bin'
Now, change into the folder ”
$ cd squashfs-root/-Listing the files shows that we have the router’s filesystem.
$ ls -a
.  ..  bin  dev  etc  lib  linuxrc  mnt  proc  sbin  sys  tmp  usr  var  web
-To value a view of the filesystem in a tree like format, I have used the command “tree” and piping it to less:
$ tree -C | less -RGuessing the Linux Kernel version:
-Checking the files with “.ko” extension for keyword “vermagic” would be the best guess to the Linux kernel version.
$ strings ./lib/modules/NetUSB.ko | grep vermagic
vermagic=2.6.30 SMP preempt mod_unload MIPS32_R1 32BIT
Now, that I know the kernel version I could then check for exploits that affect this kernel version.
For example: Check for CVEs that affect this version. [Link]
Some random things worth checking:
-The list of libraries installed can be found under:
$ tree -C lib/ | less -R– So, the chrooted environment were the user inputs commands seems to be via a binary “usr/bin/cli” or could be translating the user commands to the actual deamon.
$ strings ./usr/bin/cli | less-Btw, I found a blooper while checking this binary. Searching this binary, I did find a few misspelled words. Example: “histroy” instead of “history” 😛
serial
wan2lan
start
exit
clear
clear screen
enter config mode
enable
enter privilege mode
leave to the privious mode
help
help info
history
show histroy commands
Guessing GCC Version:
$ strings ./usr/bin/cli | grep GCC
GCC: (GNU) 3.3.2
GCC: (Buildroot 2010.02-git) 4.4.2
Cracking password from the router’s filesystem:
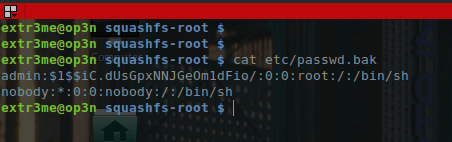
-Looking at the filesystem, I could see a file “passswd.bak” under etc/ directory.

-Reading the file shows there are two users with has shell access.
$ cat etc/passwd.bak
admin:$1$$iC.dUsGpxNNJGeOm1dFio/:0:0:root:/:/bin/sh
nobody:*:0:0:nobody:/:/bin/sh
Here:
Username indicated in green.
Hashed password indicated in orange.
Assigned shell indicated in pink.
This looks to be the “shadow” file usually located under etc/shadow which my assumption is to be copied to etc/shadow during upgrade.
Here is something wierd. Why does user “nobody” has /bin/bash shell ? Manufacturer backdoor??Mmmmm….! We will come to that later.
Messing around – Cracking passwords:
Before cracking the password, lets understand something about the hash+salt. Here, the “$” signs are special
admin:$1$$iC.dUsGpxNNJGeOm1dFio/:0:0:root:/:/bin/sh
The string that we require is the following:
$1$$iC.dUsGpxNNJGeOm1dFio/
The string is specificied in the following format:
$id$salt$encrypted
$1 => Indicates that MD5 is used to create the hash the password. Below is a table of the list of possible values for the 1st section.
--------------------
| 1  | MD5         |
--------------------
| 2  | Blowfish    |
--------------------
| 2a | eksBlowfish |
--------------------
| 5  | SHA-256     |
--------------------
| 6  | SHA-512     |
--------------------
For testing purposes, I was able to crack the password with John the ripper.
If the passwords had complex salts + hashing methods, for ex SHA-512 it may take longer than expected. [Again, this is for educational purposes ONLY!]
$ john etc/passwd.bak
Loaded 1 password hash (md5crypt [MD5 32/64 X2])
No password hashes left to crack (see FAQ)
– To view the cracked password, you could use the –show flag along with the input file etc/passwd.bak
$ john --show etc/passwd.bak
admin:1234:0:0:root:/:/bin/sh
1 password hash cracked, 0 left
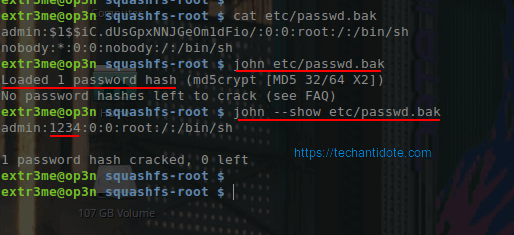
-So, the password “admin” user is “1234”.
The user “nobody”:
Coming back to the user “nobody”.
Ideally, for security purposes “nobody” user is used with a combination of a non existing directory along with a nologin shell. Below is a sample of an acceptable configuration to me:
nobody:x:65534:65534:nobody:/nonexistent:/usr/sbin/nologin
However, in the router’s FS, it seems wierd that the user “nobody” seems to have “/” or the actual root as mount along with “/bin/bash”.
nobody:*:0:0:nobody:/:/bin/sh
Anyways, may be this is just my paranoia/spidey sense kicking in. 😛
If you read this far. Thanks a ton! Hope you learned something from this article. Do bookmark this page for future references. Cheers
Regards,
ΞXΤЯ3МΞ
References:
https://openwrt.org/docs/techref/bootloader/cfe
https://en.wikipedia.org/wiki/Common_Firmware_Environment
https://www.cvedetails.com/version/81666/Linux-Linux-Kernel-2.6.30.html
https://charlesreid1.com/wiki/John_the_Ripper/Shadow_File
https://www.openwall.com/john/doc/EXAMPLES.shtml
Click to access bcm963xx_bootloader_appnote.pdf
http://plastilinux.blogspot.com/2009/11/how-to-know-version-of-kernel-without.html
ase1590
This is tutorial on how to filter/search for AWS EC2 instances using AWS CLI by filtering with their tag and values.
For instructions on how to install AWS CLI in your machine, you can refer to on my previous blog posts. [Link ].
Below is a screenshot of an EC2 instance that two tags and their corresponding values.

To search for instances using their tags and the values , you can use the following syntax:
aws ec2 describe-instances --filters Name=tag:Owner,Values=TechAntidote
Here, “Owner” is the key and the Value is “TechAntidote”. Here is a screnshot of the output:
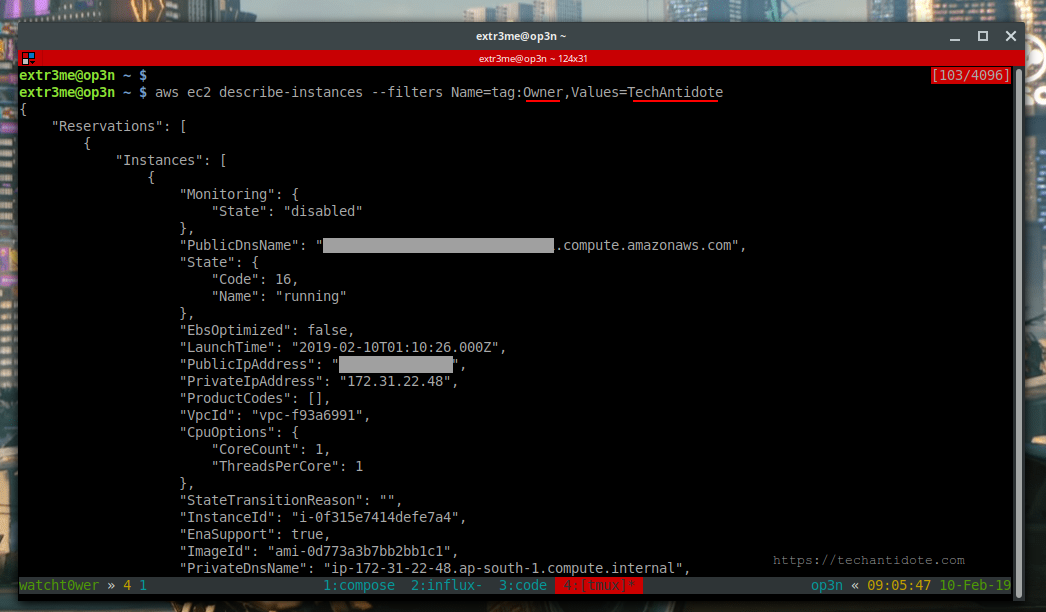
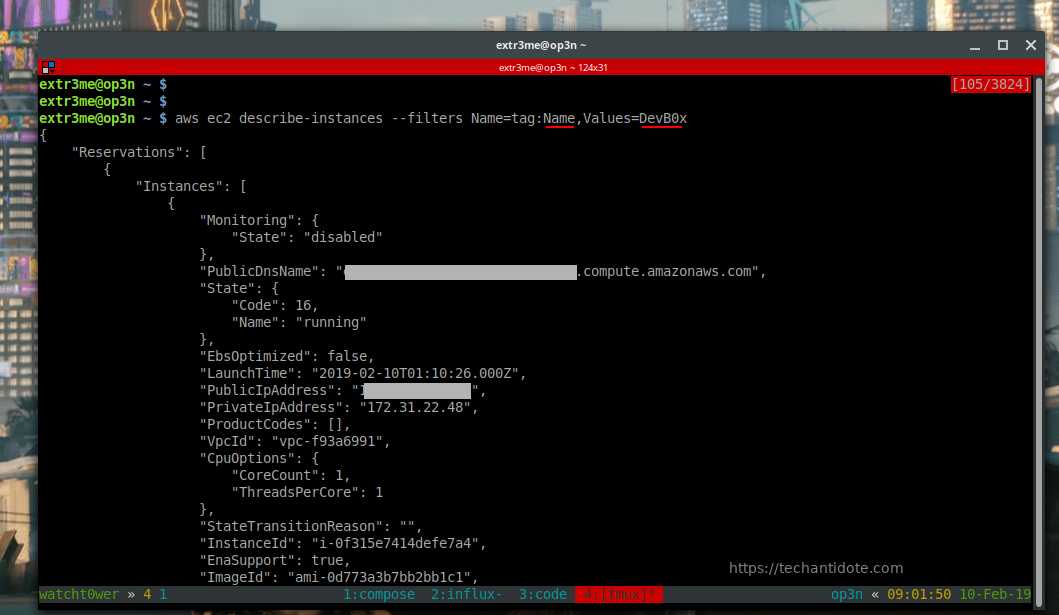
You can search for other tags as well by providing the respective Key/value pairs. [Note: The strings are case-sensitive.]
aws ec2 describe-instances --filters Name=tag:Name,Values=DevB0x
Hope this helps. Cheers! 🙂
Source/References: AWS CLI Command Reference
This is a tutorial on how to install Docker on Ubuntu 18.04. [Works on Ubuntu 16.04 / 17.04 / 18.04.1 ]
Before we install docker, verify if you had installed any older versions of docker. If so, we need to remove them.
Run the following to remove any old versions of docker:
sudo apt-get remove docker docker-engine docker.io containerd runc -y
Install Prerequisites:
sudo apt-get install apt-transport-https ca-certificates curl software-properties-common -y
Install docker using convenience script
curl -fsSL get.docker.com -o get-docker.sh
sudo sh get-docker.sh
Add current user to docker group
sudo usermod -aG docker $USER
Enable Docker service on boot:
To enable docker service to run on boot, run the following:
sudo systemctl enable docker
Now, we need to exit out of the terminal and open a new terminal so that we can start using docker. Else, you may get a permission error. [You could either type “exit” and re-login to your ubuntu server or open a new terminal session].
After re-logging in, we can start using docker.
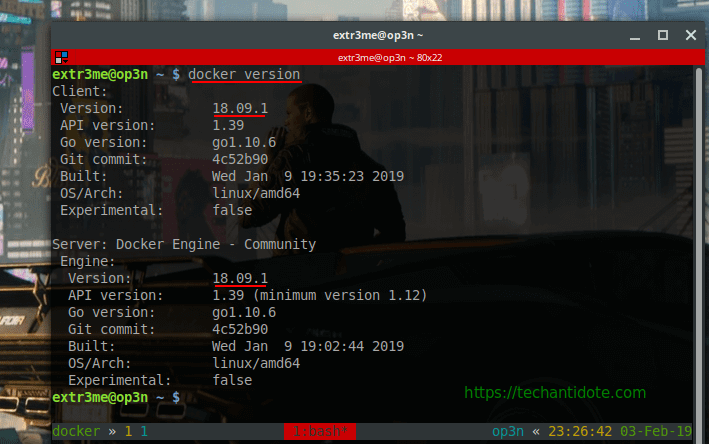
To start with, you can check the version of docker installed on your system.
docker version
Here is a screenshot of the outputs for reference:
When I got this, I’ll was like…
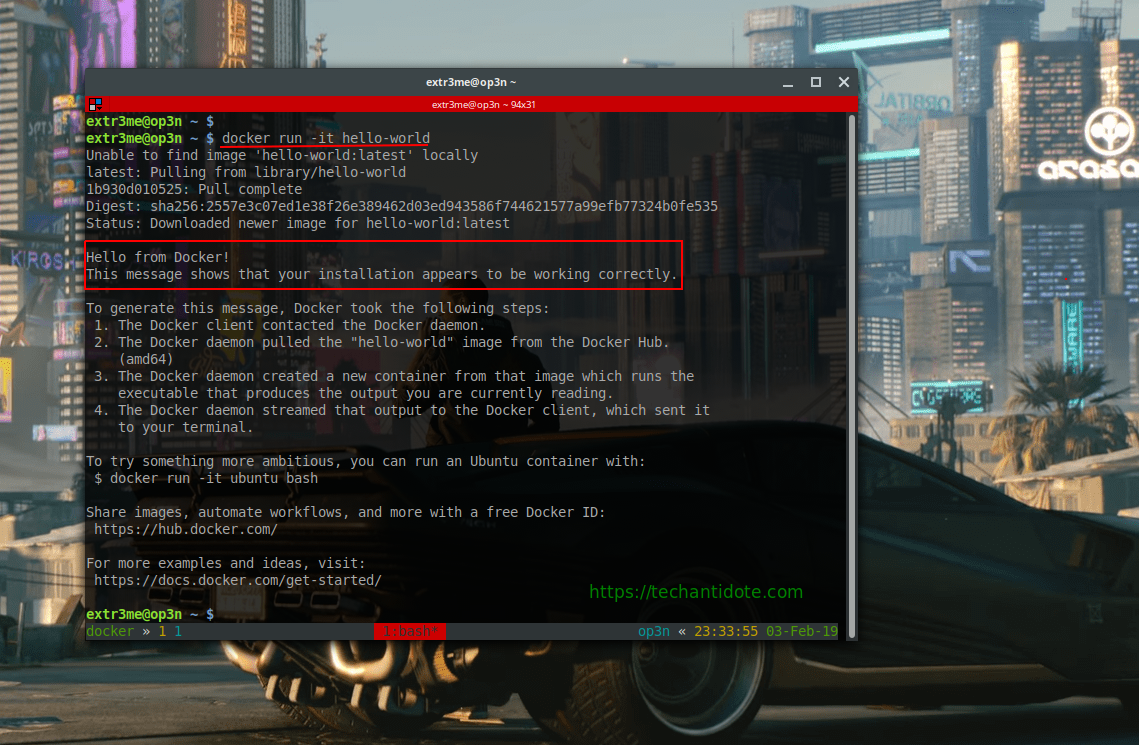
Now, lets run a docker container, you can use the following:
docker run -it hello-worldYou should ideally see docker downloads a docker image and provide you with a hello world message as shown below:
Just kidding, you should see something outputs as below:
Thats all for this tutorial. Do Leave a comment down below if you docker installed successfully.
Do bookmark my website/follow for future docker tutorials.
#PeaceOut
References/Sources:
Step 1. Perform a speed test
Go to https://tools.pingdom.com and enter your website to test your current load time. This is to get a idea the load time and performance score for reference.
Step 2. Configure Cloudflare CDN for your wordpress
You can configure cloudflare CDN for your wordpress website for free which will reduce latency and hence improve page load speeds. Create an account at http://www.cloudflare.com and change your name servers to the ones provided by cloudflare. For a more detailed guide with screenshots on how to configure cloudflare CDN for your website, you can find it here. (Link opens in new tab)
Step 3. Optimize your images
If your wordpress blog has a ton of images, then its best you optimize them so that your blog would load faster. You can either use plugins such as ‘WP Smush‘ (Plugin Link) or “Compress JPEG & PNG images” (Plugin Link) to optimize images. You can also manually optimize it and upload them if your an expert.
I also did notice that if the image are of .PNG format, then its best to use Tiny PNG (https://tinypng.com) or use their plugin “Compress JPEG & PNG images” as it is more efficient than ‘WP Smush’.
Step 4. Remove Google Fonts
If your theme loads google fonts, you may find few requests going out to the google server which can slow down your site. Disabling it is easy and all you have to do is install plugin named ‘Remove Google Fonts References‘.
Step 5: Disable Gravatar Hoovercards
This step is only needed if you have installed and configured Jetpack for your wordpress blog.
Go to your wordpress dashboard, click on Settings>Discussion. Uncheck the option “View people’s profiles when you mouse over their Gravatars” next to “Gravatar Hovercards”.
If ‘Gravator Hovercards’ section is greyed out, then click on “Shows Avatars”, uncheck “View people’s profiles when you mouse over their Gravatars” and then uncheck “Shows Gravatar” and save changes.
Step 6. Remove query strings from static resources
This have a huge impact on your performance score in pingdom and Gtmetrics. I have written an article on how to remove query strings from static resources to improve load times here. (Link opens in new tab)
Step 7. Remove unwanted plugins
Like the title suggests, if you don’t use a plugin its best to remove them.
Once done, re-run the speed tests https://tools.pingdom.com to compare before and after performance results.
Sources: Link
This is project build using “motion” which a software based motion detector. I have created a docker image for this project for portability reasons inside my Pi Zero W.
So what does this project do?
– If you need a surveillance system for your home you can build it yourself pretty cheap using a Raspberry PI and a webcam.
– Configure webcam it to stream and record footage full time or record only when a motion is detected.
– Moreover, this a fun project to run docker on a Pi simply to test docker for Pi Zero.
– This could be run on Pi Zero W/Pi 3/Pi 3 Model B/Banna PI/Orange Pi as well.
What not to expect?
-Well, this is a Pi zero. So, don’t expect it to render 1080p at 60fps. 😛
Requirements:
Setting up your Raspberry PI:
First, we need to create a folder where we need to store the footage. So, SSH into your Raspberry Pi.
Create a folder where you would like to store the footage. We will be using this folder later to map inside the docker container. Example, create a folder called “surv”.
mkdir ~/surv
Unplug any USB devices connected to your Pi, then type in the following:
dmesg -w
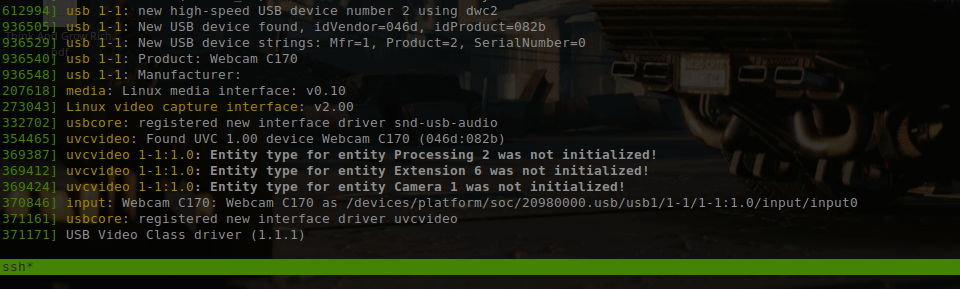
Plug in your USB webcam to your Raspberry PI Zero, and you should see that the webcam is connected. Below are some sample logs, that I got once I connected the usb webcam:
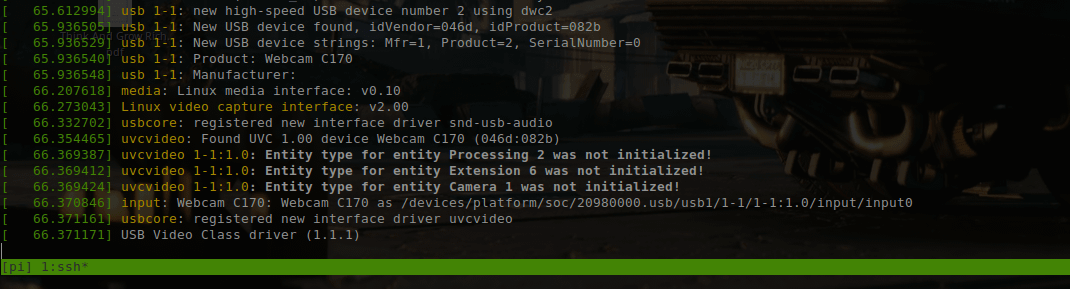
Additionally, you could run the following to view connected video devices:
v4l2-ctl --list-devices
ls -l /dev/video0
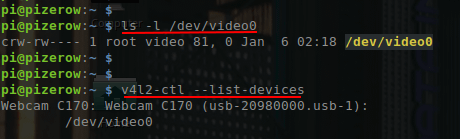
You should ideally see the USB webcam in the dmesg logs and in the lsusb outputs.
– Pull the docker image:
docker pull techantidote/motion
To run the docker container, run the following:
docker run -dit --net=host --privileged -v /dev/video0:/dev/video0 -v ~/surv:/footage --name watchtower techantidote/motion motion -nHere, we are passing the /dev/video0 which the camera attached to the rasbperry pi to /dev/video0.
To view the live stream, open a browser and go to:
http://ip-of-your-pi:8081
Alternative method:
If you are testing the configuration, you can try the following:
docker run -dit --net=host --privileged -v /dev/video0:/dev/video0 -v ~/surv:/footage --name watchtower techantidote/motionNow from inside the container, you can make changes to your configuration files and then start the motion service manually using the following:
service motion start
You can make now changes on the fly and then restart the motion service:
service motion restart
[Note: You may have to restart the docker container “docker start watchtower”]
I have already added the configuration files inside the docker image itself. If you need to tweak the settings such as the resolution/frame rates, you can edit the below two configuration files inside the docker container:
/etc/motion/motion.conf
/etc/default/motion
The log files for motion detection are stored in /var/log/motion/logs. If you would to view the log files real time, you run the following command:
docker exec -it watchtower tail -f /var/log/motion/logs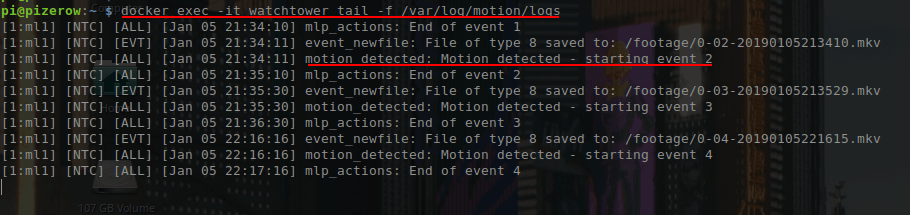
Conclusions:
-Running docker inside a Pi Zero for motion detection may not be the best idea.
-Flashing MotionEyeOS which is Video Surveillance OS designed to run on single board computers.
Want to contribute to this project?
If you would like to contribute to this project, feel free to reach out to me at twitter. @techantidote
Docker Image for Pi Zero W:
https://hub.docker.com/r/techantidote/motion
Credits/References:
Thanks to motion-project
Base image used for building the image => resin/rpi-raspbian:stretch
Accessing hardware device such as a camera from inside a container.