Happy new year to all my readers!!
Wishing you a happy, healthy and peaceful 2026.
I hope this year your life is filled with joy, kindness, good health and abundance.

Have a good one #Defenders! May the force be with you 🙂
Regards,
ΞXΤЯΞМΞ
Happy new year to all my readers!!
Wishing you a happy, healthy and peaceful 2026.
I hope this year your life is filled with joy, kindness, good health and abundance.
Have a good one #Defenders! May the force be with you 🙂
Regards,
ΞXΤЯΞМΞ
If you are running a WordPress site and you have cloudflare setup, you may have noticed that the http access logs log the IP of cloudflare instead of the actual client IP. This is a guide to enable logging of the real client IP instead of the cloudflare IP in the apache2 logs. This was tested on a Ubuntu 20.04 machine + apache2 and traffic is proxied from cloudflare.
– Install Prerequisites:
sudo apt-get install apache2-dev libtool git
Git clone the mod_clouflare repo from cloulflare:
cd ~/
git clone https://github.com/cloudflare/mod_cloudflare.git
cd mod_cloudflare
Use the Apache extension tool to convert the .c file into a module:
apxs -a -i -c mod_cloudflare.c
Restart Apache:
sudo apachectl restart
Verify that the module is active:
apache2ctl -M|grep cloudflare
The output should show “cloudflare_module (shared)“
Now your apache logs should show the real client IP instead of the cloudflare IPs.
tail -f /var/log/apache2/access.log
-Below is screenshot of access log that shows the real client IP(right click and open image in new lab for high res image):

Sources/Credits/References:
This is a quick guide to running Loki APT Scanner to check for IOCs on a Linux machine.
Debian/Ubuntu:
– Run the below commands to setup Loki:
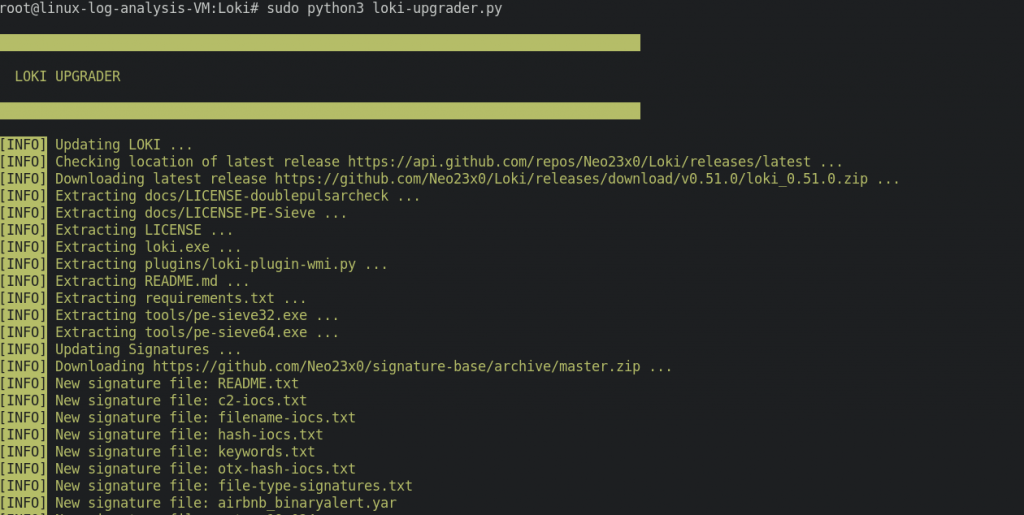
sudo su -
apt-get install libssl-dev -y
apt-get install python3.8-venv -y
git clone https://github.com/Neo23x0/Loki.git
cd Loki
python3 -m venv .
source bin/activate
pip install colorama yara-python psutil rfc5424-logging-handler netaddr
python3 loki-upgrader.py
– Run Loki Scanner as root to check for IOCs, you the below command:
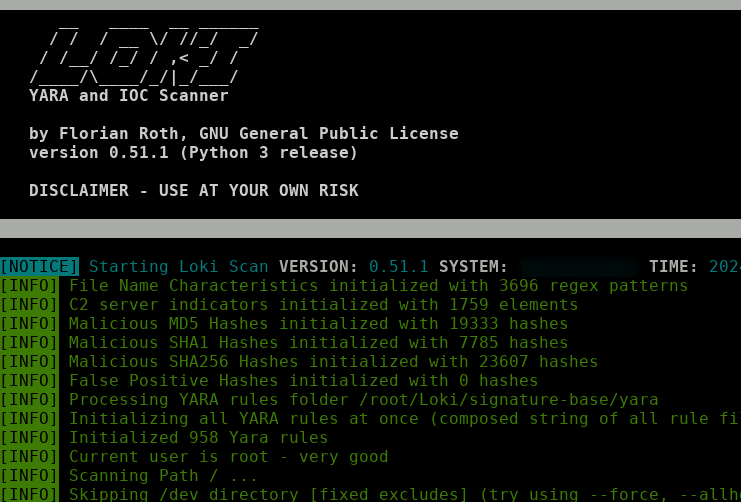
python3 loki.py
– You can also search for IOCs in a particular directory using -p flag . For example:
python3 loki.py -p /var/log/apache2/
RHEL/CentOS systems:
On CentOS based system, you can run the below to use find IOCs using APT:
sudo su -
yum install python3 python3-pip python3-devel openssl openssl-devel -y
pip install colorama yara-python psutil rfc5424-logging-handler netaddr
git clone https://github.com/Neo23x0/Loki.git
cd Loki
python3 loki-upgrader.py
python3 loki.py
Credits/Sources/References:
Neo23x0
Hope this helps! Happy Hunting Protectors! 🙂
ΞXΤЯ3МΞ
At work, I had a task to perform a quick compromise assessment for a hacked Windows server and I got a bunch of etvx files from the suspected host for analysis. I run Linux Mint + i3-gaps and its much easier and productive performing forensics from a Linux machine than Windows in my honest opinion. This post is meant for Linux users who want to perform Digital Forensics to find IOCs from Windows artifacts such as event logs / evtx files. Here my setup for forensics analsys for windows from a Linux perspective and the tools that I use.
Here are some tools that will come handy:
apt update && apt install git vim tar jq libxml2-utils source-highlight -yGet the latest sigma rules:
cd ~/
git clone https://github.com/SigmaHQ/sigma
git clone https://github.com/sbousseaden/EVTX-ATTACK-SAMPLES.git– Install chainsaw:
wget https://github.com/WithSecureLabs/chainsaw/releases/download/v2.9.1-2/chainsaw_x86_64-unknown-linux-gnu.tar.gz -O ~/chainsaw.tar.gz
tar zxvf ~/chainsaw.tar.gz
chmod +x ~/chainsaw/chainsaw
Example: Assume that you have a bunch of evtx files that you want to analyze and you have it in a directory "~/EVTX-ATTACK-SAMPLES/", you can run chainsaw against the directory where the evtx files are stored with the below command:
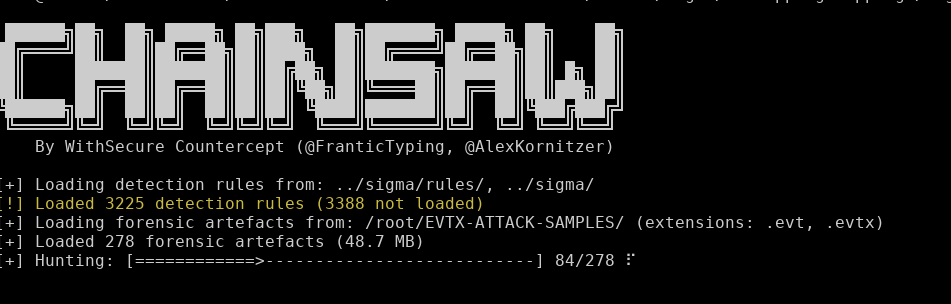
./chainsaw/chainsaw hunt ~/EVTX-ATTACK-SAMPLES/ -s ~/sigma/ --mapping ~/chainsaw/mappings/sigma-event-logs-all.yml -r ~/sigma/rules– The above will output the findings in stdout.
Now, let say you want to output these in csv for reporting or further analysis, you can run the below:
./chainsaw/chainsaw hunt ~/EVTX-ATTACK-SAMPLES/ -s ~/sigma/ --mapping ~/chainsaw/mappings/sigma-event-logs-all.yml -r ~/sigma/rules/ --csv --output csv-outputsAlternatively, chainsaw also has the option to output in json file. This comes handy if you want to injest into a SIEM tool like Wazuh/Opensearch/ES/Spunk.
/chainsaw/chainsaw hunt ~/EVTX-ATTACK-SAMPLES/ -s ~/sigma/ --mapping ~/chainsaw/mappings/sigma-event-logs-all.yml -r ~/sigma/rules/ --json --output json-outputChainsaw filters and advanced searching:
– Chainsaw has options to search for specific event ids. For example, to search for Login Failures (Windows Event ID = 4625), you use the below command:
./chainsaw search -t 'Event.System.EventID: =4625' windows-log.evtx
– To search for specific strings such as to search for lssas dumps:
./chainsaw search -e "lsass" -i windows-log.evtx
– You can also search an entire directory of evtx files as well:
./chainsaw search -e "lsass" -i ~/EVTX-ATTACK-SAMPLES/– To search for events between two timeframes:
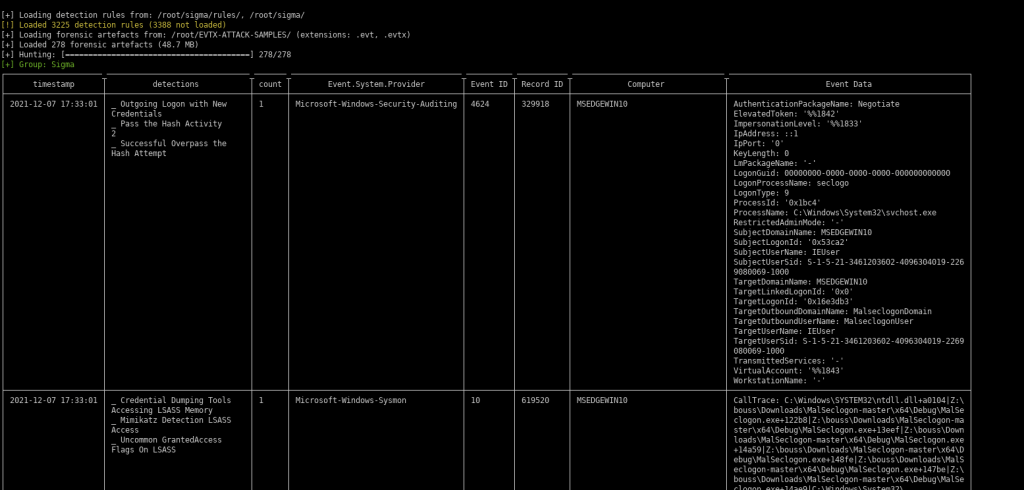
./chainsaw/chainsaw hunt ~/EVTX-ATTACK-SAMPLES/ -s ~/sigma/ --mapping ~/chainsaw/mappings/sigma-event-logs-all.yml -r ~/sigma/rules/ --from "2021-11-01T07:01:00" --to "2022-01-01T07:01:00"– Below is screenshot for reference. (Right click image and open in new tab for better visual)
If you like to dump all the events in a Windows event file for further analysis, there is an awesome opensource tool that allows you to just do that.
wget https://github.com/omerbenamram/evtx/releases/download/v0.8.2/evtx_dump-v0.8.2-x86_64-unknown-linux-gnu -O ~/evtx_dump
chmod +x ~/evtx_dump
– To use the dump (Events will be separated with string “Event <count>” in the output file). This is handy when using vim/less by searching for “^Event ” and then using “n” to go the next event.
./evtx_dump-v0.8.2-x86_64-unknown-linux-gnu \
EVTX-ATTACK-SAMPLES/Discovery/4799_remote_local_groups_enumeration.evtx > 4799_remote_local_groups_enumeration.parsed.xmlCredits/References:
Chainsaw github
EVTX-ATTACK-SAMPLES
izzyboop
Hope this helps. Happy Hunting Defenders! 🙂
ΞXΤЯ3МΞ
Happy new Year to all my readers! God Bless!
Hope you have a great one! Cheers! 🙂
If you try to expand the disk without stopping/de-allocating the VM, depending on disk config it may not allow your to change the size and a banner with message “Changes to the disk size can be made only when the disk is unattached or the managing virtual machine(s) are deallocated.” would be displayed. To increase the disk size of a Linux VM, you can perform the following:
In my environment, the VM OS disk size was smaller than 4TB and could not be resized using the online method that could be done without downtime(it requires some special configuration which I didnt really get deep into). This method will involve shutting down the VM, de-allocating the VM, increasing the disk and then bringing the disk back online. So, there would be some downtime.
Another thing:
Note: Replace text in blue with your environment specific values.
1. Stop the VM:
az vm stop –resource-group Resource-Group-Name –name VM-NAME –subscription SUBSCRIPTION-ID
2. De-allocate the VM: (This may take a few minutes)
az vm deallocate –resource-group Resource-Group-Name –name VM-NAME –subscription SUBSCRIPTION-ID
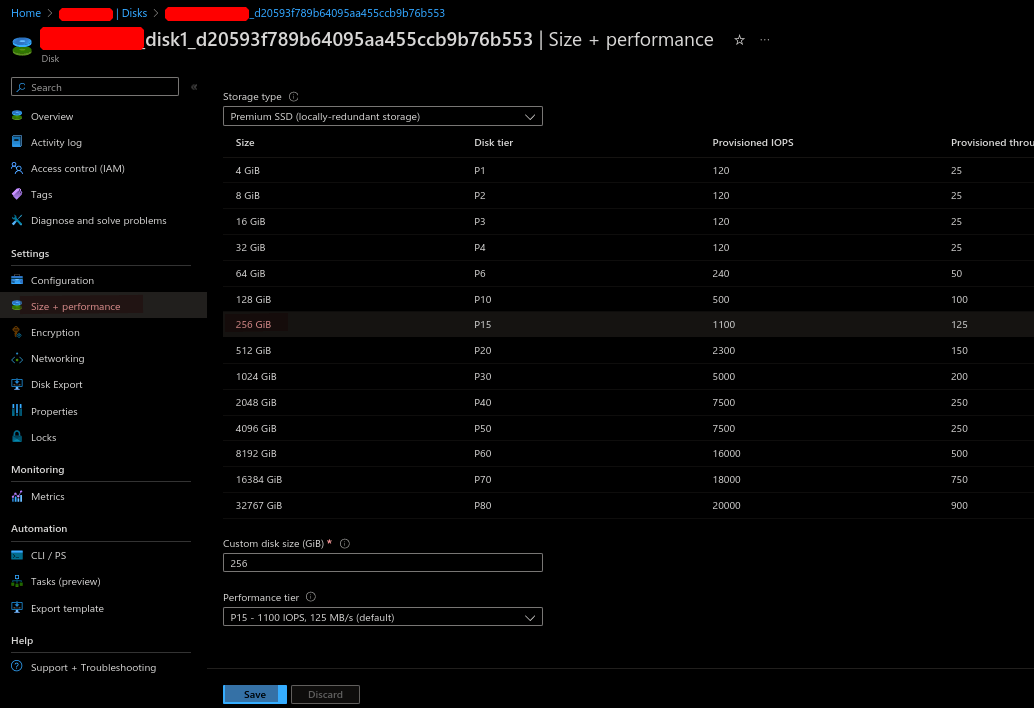
3. Increase the Disk (from the UI):
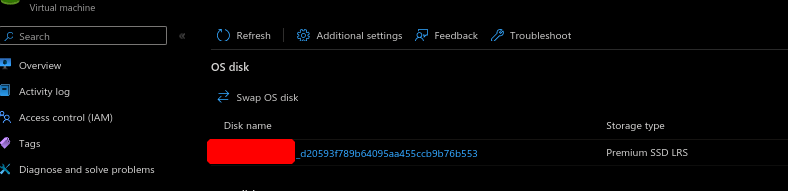
-Navigate to the VM in Azure. Click on “Disks”
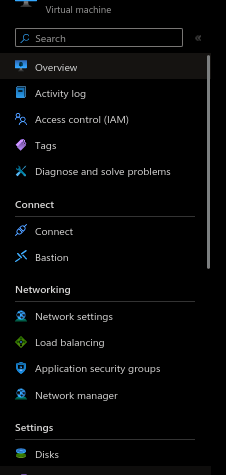
-Select the disk that you need to resize.
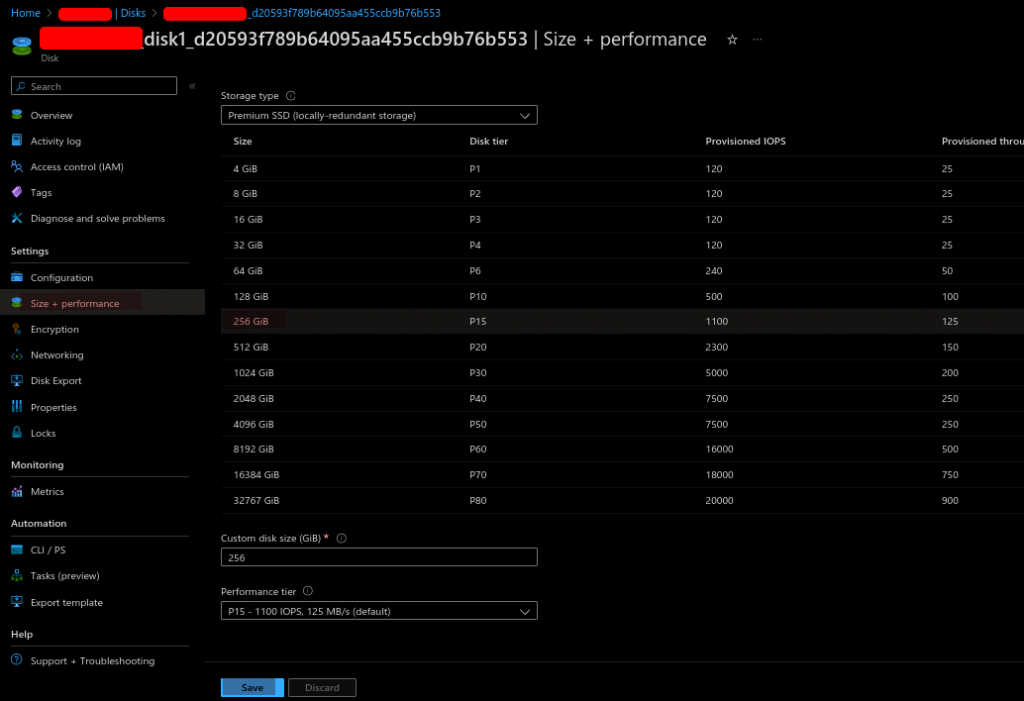
Click on “Size + performance” and select the disk size to which you want to increase to and then click on “Save”
4. Start the VM:
az vm start –resource-group Resource-Group-Name –name VM-NAME –subscription SUBSCRIPTION-ID
My Azure VM was based on Ubuntu 20.04.x and did not need additional changes in the OS. After the VM booted backup, it did automatically expand to the new allocated size.
Some of my thoughts on Azure Naming and resizing:
For some wierd reason, Azure does not make things easy for resizing disks. Ideally, you should be able to shutdown the VM and increase the disk, BUT Azure needs you to de-allocate the VM before you can make any changes to the disk. Another strange thing Azure decided to do is to label “de-allocate VM” instead of some sane label as at first it sound as if going to delete the VM and all its data when when in reality it does not.
Sources/References:
https://learn.microsoft.com/en-us/azure/virtual-machines/linux/expand-disks?tabs=ubuntu
If you have any queries/feedback regarding this, feel free to leave a comment below and will get back to you as soon as I can.
This is a short post on how to password protect a file using 7z in Linux from the terminal.
Below is the sample command that encrypts file “file.txt” with password (Replace PASSWORD with your pass) and saves to encrypted zip file Protected.zip
7z a Protected.zip -pPASSWORD file.txt
Credits/References:
This is a guide on how to configure and install MacOS Ventura on Promox 8.x.x. (This was tested in my lab which runs Proxmox 8.0.3 and 8.0.4. It should work for other versions as well)
Requirements:
Download the OpenCore-v20.iso.gz from KVM-Opencore and extract it. [Link: https://github.com/thenickdude/KVM-Opencore/releases/tag/v20 ].
Create a VM in Proxmox with the below settings:
Minor Changes needed for it to work:
/vim /etc/pve/qemu-server/100.conf
args: -device isa-applesmc,osk="ourhardworkbythesewordsguardedpleasedontsteal(c)AppleComputerInc" -smbios type=2 -device usb-kbd,bus=ehci.0,port=2 -global nec-usb-xhci.msi=off -global ICH9-LPC.acpi-pci-hotplug-with-bridge-support=off -cpu host,vendor=GenuineIntel,+invtsc,+hypervisor,kvm=on,vmware-cpuid-freq=on
args: -device isa-applesmc,osk="ourhardworkbythesewordsguardedpleasedontsteal(c)AppleComputerInc" -smbios type=2 -device usb-kbd,bus=ehci.0,port=2 -global nec-usb-xhci.msi=off -global ICH9-LPC.acpi-pci-hotplug-with-bridge-support=off -cpu Haswell-noTSX,vendor=GenuineIntel,+invtsc,+hypervisor,kvm=on,vmware-cpuid-freq=on
Now, change the media=cdrom to cache=unsafe. Here is a sed command to do so:
sed -i 's/media=cdrom/cache=unsafe/g' /etc/pve/qemu-server/100.conf
Below is my config for reference (/etc/pve/qemu-server/100.conf):
args: -device isa-applesmc,osk="ourhardworkbythesewordsguardedpleasedontsteal(c)AppleComputerInc" -smbios type=2 -device usb-kbd,bus=ehci.0,port=2 -global nec-usb-xhci.msi=off -global ICH9-LPC.acpi-pci-hotplug-with-bridge-support=off -cpu host,vendor=GenuineIntel,+invtsc,+hypervisor,kvm=on,vmware-cpuid-freq=on

balloon: 0

bios: ovmf

boot: order=ide2;ide0;virtio0;net0

cores: 4

cpu: host

efidisk0: local-lvm:vm-100-disk-0,efitype=4m,size=4M

ide0: local:iso/macOS Ventura 13.0.1.iso,cache=unsafe,size=13073658K

ide2: local:iso/OpenCore-v20.iso,cache=unsafe,size=150M

machine: q35

memory: 8096

meta: creation-qemu=8.0.2,ctime=1690969304

name: MAC-OS

net0: vmxnet3=D6:41:D1:8F:B5:49,bridge=vmbr0,firewall=1

numa: 0

ostype: other

scsihw: virtio-scsi-pci

smbios1: uuid=57a6ce4a-a710-483a-8577-28c1feae47d4

sockets: 1

vga: vmware

virtio0: local-lvm:vm-100-disk-1,cache=unsafe,iothread=1,size=64G

vmgenid: a9dee6c6-376d-48b9-bc20-3c586856ffb4
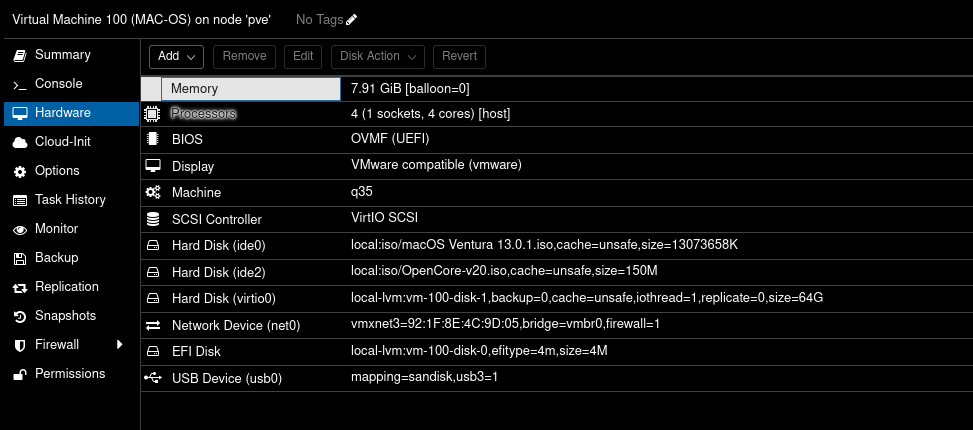
Here is a screenshot for reference of the settings page in Proxmox for the MacOS VM:
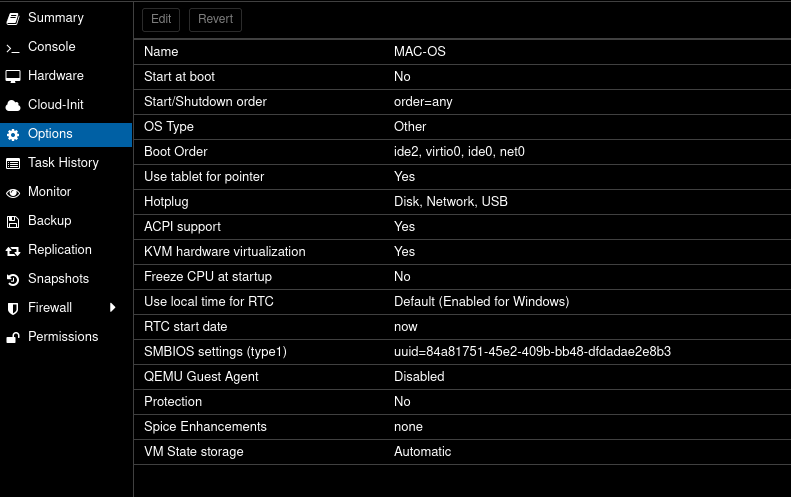
– Here is a screenshot of the boot order settings:
– Now Boot the MacOS VM, and select UEFI boot when prompted.
– At boot prompt, run the below:
System\Library\CoreServices\Boot.efi
Installation:
– Open Disk Utility
– Click “View” => Show All Devices.
– Select the First option that shows 64GB disk and click on “Erase”. Once done, close disk utility and click option to start installer.
– Select the disk and continue the install on it
The rest of the installation is pretty straightforward. It did take a very long time for the install to complete along with a few restarts. But, at the end you should be able to boot into the Proxmox VM.
-Here is a screenshot of my VM post install.

Hope this helps! Cheers
Credits/References:
https://github.com/thenickdude/KVM-Opencore/releases/tag/v20
https://i12bretro.github.io/tutorials/0775.html
Below are the steps to enable promiscuous mode for a VM in Vmware Workstation.
Shutdown the VM and edit the .vmx file. This is in the directory where your VM’s hard disks were configured to be sure.
vim /home/extr3me/vmware/pfsense/pfsense.vmx
Tip:
You can right click on the VM and select option “Open VM Directory” that will take you to the directory where the .vmx file is located.
Add the below line to the file:
ethernet0.noPromisc = "FALSE"
-If you have multiple interfaces, then add another line and replace the value 0 with 1 etc. Below is an example for two interfaces:
ethernet0.noPromisc = "FALSE"
ethernet1.noPromisc = "FALSE"

Source/Credits/Reference:
https://superuser.com/questions/1209497/how-do-you-enable-promiscuous-mode-in-vmware-workstation#1270695
This a guide on how to setup Wireguard VPN on Ubuntu and setting up a Wireguard client.
Requirements:
1. Ubuntu Server 20.04 used in my lab. (20.04 or higher is required for Policy routing)
2. Ubuntu Client (Ubuntu 20.04)
3. Root access to the server.
4. Network Access
Note: This should also work on Linux Mint 20.04
Login to the In my lab, I have set up a EC2 instance and below is the current IP configuration before setting up Wireguard.
root@ip-172-31-20-229:~# ip a
1: lo: <LOOPBACK,UP,LOWER_UP> mtu 65536 qdisc noqueue state UNKNOWN group default qlen 1000
    link/loopback 00:00:00:00:00:00 brd 00:00:00:00:00:00
    inet 127.0.0.1/8 scope host lo
       valid_lft forever preferred_lft forever
    inet6 ::1/128 scope host
       valid_lft forever preferred_lft forever
2: eth0: <BROADCAST,MULTICAST,UP,LOWER_UP> mtu 9001 qdisc fq_codel state UP group default qlen 1000
    link/ether 02:ca:92:5f:0e:80 brd ff:ff:ff:ff:ff:ff
    inet 172.31.20.229/20 brd 172.31.31.255 scope global dynamic eth0
       valid_lft 2617sec preferred_lft 2617sec
    inet6 fe80::ca:92ff:fe5f:e80/64 scope link
       valid_lft forever preferred_lft forever
From above, I have a single interface with IP 172.31.20.229 assigned to eth0.
sudo apt update && sudo apt upgrade -y
sudo apt install wireguard -y
-Switch to root and run the following:
sudo su –
Below are the default permissions on the wireguard dir:
root@ip-172-31-20-229:~# ls -l /etc/ | grep wireguard
drwx------ 2 root root       4096 Aug  4  2020 wireguard
-You could set permissions to the directory as follows:
chmod 0700 /etc/wireguard/
root@ip-172-31-20-229:~# ls -l /etc/ | grep wireguard
drwx------ 2 root root       4096 Aug  4  2020 wireguard
To check the version of Wireguard installed:
root@ip-172-31-20-229:/etc/wireguard# wg --version
wireguard-tools v1.0.20200513 - https://git.zx2c4.com/wireguard-tools/
-Generate public and private key pairs:
cd /etc/wireguard/
umask 077; wg genkey | tee privatekey | wg pubkey > publickey
This should generate the private and the public key:
root@ip-172-31-20-229:/etc/wireguard# ls -l
total 8
-rw------- 1 root root 45 Jun 30 20:23 privatekey
-rw------- 1 root root 45 Jun 30 20:23 publickey
-Take a note of the private key “privatekey” cat privatekey . You will need to add this to the WG server’s conf file.
Setting up the Wireguard Server’s configuration file
vim /etc/wireguard/wg0.conf
Add below content. (Here, I chose the IP as 192.168.6.1 which is the new VPN private address that will be assigned to the interface)
[Interface]
## My VPN server private IP address ##
Address = 192.168.6.1

## My VPN server port ##
ListenPort = 41194

## VPN server's private key i.e. string from /etc/wireguard/privatekey ##
PrivateKey = ADD_PRIVATE_KEY_HERE
-Allow the port in the Server’s Firewall:
root@ip-172-31-20-229:~# sudo ufw allow 41194/udp
Rules updated
Rules updated (v6)
-To check the status:
sudo ufw status
– Enable wireguard service on boot on the server and start the service:
ubuntu@ip-172-31-20-229:~$ sudo systemctl enable wg-quick@wg0
Created symlink /etc/systemd/system/multi-user.target.wants/[email protected] → /lib/systemd/system/[email protected].

ubuntu@ip-172-31-20-229:~$ sudo systemctl start wg-quick@wg0
To check the status of the wireguard service, use the following:
root@ip-172-31-20-229:~# sudo systemctl status wg-quick@wg0
● [email protected] - WireGuard via wg-quick(8) for wg0
     Loaded: loaded (/lib/systemd/system/[email protected]; enabled; vendor preset: enabled)
     Active: active (exited) since Thu 2022-06-30 21:29:01 UTC; 8min ago
       Docs: man:wg-quick(8)
             man:wg(8)
             https://www.wireguard.com/
             https://www.wireguard.com/quickstart/
             https://git.zx2c4.com/wireguard-tools/about/src/man/wg-quick.8
             https://git.zx2c4.com/wireguard-tools/about/src/man/wg.8
    Process: 2230 ExecStart=/usr/bin/wg-quick up wg0 (code=exited, status=0/SUCCESS)
   Main PID: 2230 (code=exited, status=0/SUCCESS)

Jun 30 21:29:01 ip-172-31-20-229 systemd[1]: [email protected]: Succeeded.
Jun 30 21:29:01 ip-172-31-20-229 systemd[1]: Stopped WireGuard via wg-quick(8) for wg0.
Jun 30 21:29:01 ip-172-31-20-229 systemd[1]: Starting WireGuard via wg-quick(8) for wg0...
Jun 30 21:29:01 ip-172-31-20-229 wg-quick[2230]: [#] ip link add wg0 type wireguard
Jun 30 21:29:01 ip-172-31-20-229 wg-quick[2230]: [#] wg setconf wg0 /dev/fd/63
Jun 30 21:29:01 ip-172-31-20-229 wg-quick[2230]: [#] ip -4 address add 192.168.6.1/24 dev wg0
Jun 30 21:29:01 ip-172-31-20-229 wg-quick[2230]: [#] ip link set mtu 8921 up dev wg0
Jun 30 21:29:01 ip-172-31-20-229 systemd[1]: Finished WireGuard via wg-quick(8) for wg0.
Checking the ifconfig output, you would see a new interface wg0 is created automatically which is expected.
root@ip-172-31-20-229:~# ip a
1: lo: <LOOPBACK,UP,LOWER_UP> mtu 65536 qdisc noqueue state UNKNOWN group default qlen 1000
    link/loopback 00:00:00:00:00:00 brd 00:00:00:00:00:00
    inet 127.0.0.1/8 scope host lo
       valid_lft forever preferred_lft forever
    inet6 ::1/128 scope host
       valid_lft forever preferred_lft forever
2: eth0: <BROADCAST,MULTICAST,UP,LOWER_UP> mtu 9001 qdisc fq_codel state UP group default qlen 1000
    link/ether 02:ca:92:5f:0e:80 brd ff:ff:ff:ff:ff:ff
    inet 172.31.20.229/20 brd 172.31.31.255 scope global dynamic eth0
       valid_lft 2235sec preferred_lft 2235sec
    inet6 fe80::ca:92ff:fe5f:e80/64 scope link
       valid_lft forever preferred_lft forever
5: wg0: <POINTOPOINT,NOARP,UP,LOWER_UP> mtu 8921 qdisc noqueue state UNKNOWN group default qlen 1000
    link/none
    inet 192.168.6.1/24 scope global wg0
       valid_lft forever preferred_lft forever
– You can check wireguard information/stats using the below command:
ubuntu@ip-172-31-20-229:~$ sudo wg
interface: wg0
  public key: pHrkGojLiNZy2GwshmdEXMaaOmowXXXXXXXXXXXXXXX=
  private key: (hidden)
  listening port: 41194
sudo apt install wireguard -y
– Create the configuration file
root@wg-client:~# sudo sh -c 'umask 077; touch /etc/wireguard/wg0.conf'

root@wg-client:~# ls -l /etc/wireguard/wg0.conf
-rw------- 1 root root 0 Jun 30 20:58 /etc/wireguard/wg0.conf
– In the client machine, create a key pair:
root@wg-client:~# cd /etc/wireguard/

root@wg-client:/etc/wireguard# umask 077; wg genkey | tee privatekey | wg pubkey > publickey

root@wg-client:/etc/wireguard# ls -l
total 8
-rw------- 1 root root 45 Jun 30 21:01 privatekey
-rw------- 1 root root 45 Jun 30 21:01 publickey
-rw------- 1 root root  0 Jun 30 20:58 wg0.conf
root@wg-client:/etc/wireguard#
– Take a note of the client’s public key. (This will be added in the server’s config later)
-Take a note of the private key from the client. This will be added in its own config file.
cat privatekey
vim /etc/wireguard/wg0.conf
– On the client, create the wireguard config file as below:
[Interface]
## Add the client's private key which is from /etc/wireguard/publickey ##
PrivateKey = CLIENT_PRIVATE_KEY_HERE

## Client ip address that will be set by this Client ##
Address = 192.168.6.2/24

[Peer]
## Ubuntu 20.04 server public key ##
PublicKey = SERVER_PUBLIC_KEY_HERE

## set ACL ##
AllowedIPs = 192.168.2.0/24

## Your Ubuntu 20.04 LTS server's public IPv4/IPv6 address and port ##
Endpoint = PUBLIC_IP_OF_YOUR_WIREGUARD_SERVER:41194

##  Key connection alive ##
PersistentKeepalive = 15
-On the client, enable and start the Wireguard service:
root@wg-client:/etc/wireguard# sudo systemctl enable wg-quick@wg0
Created symlink /etc/systemd/system/multi-user.target.wants/[email protected] -> /lib/systemd/system/[email protected].

root@wg-client:/etc/wireguard# sudo systemctl start wg-quick@wg0
– Check the status of the service in the client:
root@wg-client:~# sudo systemctl status wg-quick@wg0
* [email protected] - WireGuard via wg-quick(8) for wg0
     Loaded: loaded (/lib/systemd/system/[email protected]; enabled; vendor preset: enabled)
     Active: active (exited) since Thu 2022-06-30 21:35:17 UTC; 5min ago
       Docs: man:wg-quick(8)
             man:wg(8)
             https://www.wireguard.com/
             https://www.wireguard.com/quickstart/
             https://git.zx2c4.com/wireguard-tools/about/src/man/wg-quick.8
             https://git.zx2c4.com/wireguard-tools/about/src/man/wg.8
    Process: 123 ExecStart=/usr/bin/wg-quick up wg0 (code=exited, status=0/SUCCESS)
   Main PID: 123 (code=exited, status=0/SUCCESS)
        CPU: 28ms

Jun 30 21:35:17 wg-client systemd[1]: Starting WireGuard via wg-quick(8) for wg0...
Jun 30 21:35:17 wg-client wg-quick[123]: [#] ip link add wg0 type wireguard
Jun 30 21:35:17 wg-client wg-quick[123]: [#] wg setconf wg0 /dev/fd/63
Jun 30 21:35:17 wg-client wg-quick[123]: [#] ip -4 address add 192.168.6.2/24 dev wg0
Jun 30 21:35:17 wg-client wg-quick[123]: [#] ip link set mtu 1420 up dev wg0
Jun 30 21:35:17 wg-client systemd[1]: Finished WireGuard via wg-quick(8) for wg0.
-From the above output, we can see that the wireguard service has created the interface wg0 and assigned the IP 192.168.6.2/24 to it. You could also verify this by checking by checking the device ip conf as below:
root@wg-client:~# ip a
1: lo: <LOOPBACK,UP,LOWER_UP> mtu 65536 qdisc noqueue state UNKNOWN group default qlen 1000
    link/loopback 00:00:00:00:00:00 brd 00:00:00:00:00:00
    inet 127.0.0.1/8 scope host lo
       valid_lft forever preferred_lft forever
    inet6 ::1/128 scope host
       valid_lft forever preferred_lft forever
2: eth0@if114: <BROADCAST,MULTICAST,UP,LOWER_UP> mtu 1500 qdisc noqueue state UP group default qlen 1000
    link/ether aa:3c:37:57:21:8a brd ff:ff:ff:ff:ff:ff link-netnsid 0
    inet 192.168.1.143/24 brd 192.168.1.255 scope global dynamic eth0
       valid_lft 86010sec preferred_lft 86010sec
    inet6 fe80::a83c:37ff:fe57:218a/64 scope link
       valid_lft forever preferred_lft forever
3: wg0: <POINTOPOINT,NOARP,UP,LOWER_UP> mtu 1420 qdisc noqueue state UNKNOWN group default qlen 1000
    link/none
    inet 192.168.6.2/24 scope global wg0
       valid_lft forever preferred_lft forever
So far, we can configured the client to talk to the server. But the Server does not know about the client. So, next we need to update the Server’s Wireguard configuration file with the details of the wireguard client.
-Login to the Wireguard Server and add the below block to the server’s wireguard conf:
[Peer]
## Desktop/client VPN public key ##
PublicKey = CLIENT_PUB_KEY_HERE

## client VPN IP address (note  the /32 subnet) ##
AllowedIPs = 192.168.6.2/32
-So, your Wireguard server’s configuration file will be as follows:
[Interface]
## My VPN server private IP address ##
Address = 192.168.6.1

## My VPN server port ##
ListenPort = 41194

## VPN server's private key i.e. /etc/wireguard/privatekey ##
PrivateKey = ADD_PRIVATE_KEY_HERE

[Peer]
## Desktop/client VPN public key ##
PublicKey = CLIENT_PUB_KEY_HERE

## client VPN IP address (note  the /32 subnet) ##
AllowedIPs = 192.168.6.2/32
– Start the service again on the server:
sudo systemctl start wg-quick@wg0
Verify connectivity from the client => server:
– If the server is in the cloud, then update the security groups tallow the port.
– From the client, ping the server 192.168.6.1
root@wg-client:~# ping 192.168.6.1
PING 192.168.6.1 (192.168.6.1) 56(84) bytes of data.
64 bytes from 192.168.6.1: icmp_seq=1 ttl=64 time=81.9 ms
64 bytes from 192.168.6.1: icmp_seq=2 ttl=64 time=82.5 ms
^C
--- 192.168.6.1 ping statistics ---
2 packets transmitted, 2 received, 0% packet loss, time 1001ms
rtt min/avg/max/mdev = 81.886/82.172/82.458/0.286 ms
Checking active connections from Wireguard server:
– To see which clients are connected to the server and the statistics, you can run the below:
root@ip-172-31-20-229:~# sudo wg
interface: wg0
  public key: pHrkGojLiNZy2GwshmdEXMaaOmowXXXXXXXXXXXXXXX=
  private key: (hidden)
  listening port: 41194

peer: 8Zp7Cji5Aseew3L0P3c35sUzJNIPYYYYYYYYYYYYYYY=
  endpoint: 1.2.3.4:33395
  allowed ips: 192.168.6.2/32
  latest handshake: 1 minute, 12 seconds ago
  transfer: 3.94 KiB received, 1.47 KiB sent
Additional Information:
For debugging issue with wireguard, you could check the logs:
sudo journalctl -eu wg-quick@wg0
Here is a little cronjob to monitor the tunnel via ping and restart tunnel: (Credits to linuxbabe)
sudo crontab -e
-Add the below:
SHELL=/bin/bash
* * * * * for ((i=1; i<=6; i++)) do (ping -c9 192.168.6.1 > /dev/null || systemctl restart wg-quick@wg0) done
Hope this helps! Cheers!
Sources/References:
https://www.cyberciti.biz/faq/ubuntu-20-04-set-up-wireguard-vpn-server/