Increase OS Disk Size of an Azure Linux VM

If you try to expand the disk without stopping/de-allocating the VM, depending on disk config it may not allow your to change the size and a banner with message “Changes to the disk size can be made only when the disk is unattached or the managing virtual machine(s) are deallocated.” would be displayed. To increase the disk size of a Linux VM, you can perform the following:

In my environment, the VM OS disk size was smaller than 4TB and could not be resized using the online method that could be done without downtime(it requires some special configuration which I didnt really get deep into). This method will involve shutting down the VM, de-allocating the VM, increasing the disk and then bringing the disk back online. So, there would be some downtime.
Another thing:

Note: Replace text in blue with your environment specific values.

1. Stop the VM:

az vm stop –resource-group Resource-Group-Name –name VM-NAME –subscription SUBSCRIPTION-ID

2. De-allocate the VM: (This may take a few minutes)

az vm deallocate –resource-group Resource-Group-Name –name VM-NAME –subscription SUBSCRIPTION-ID

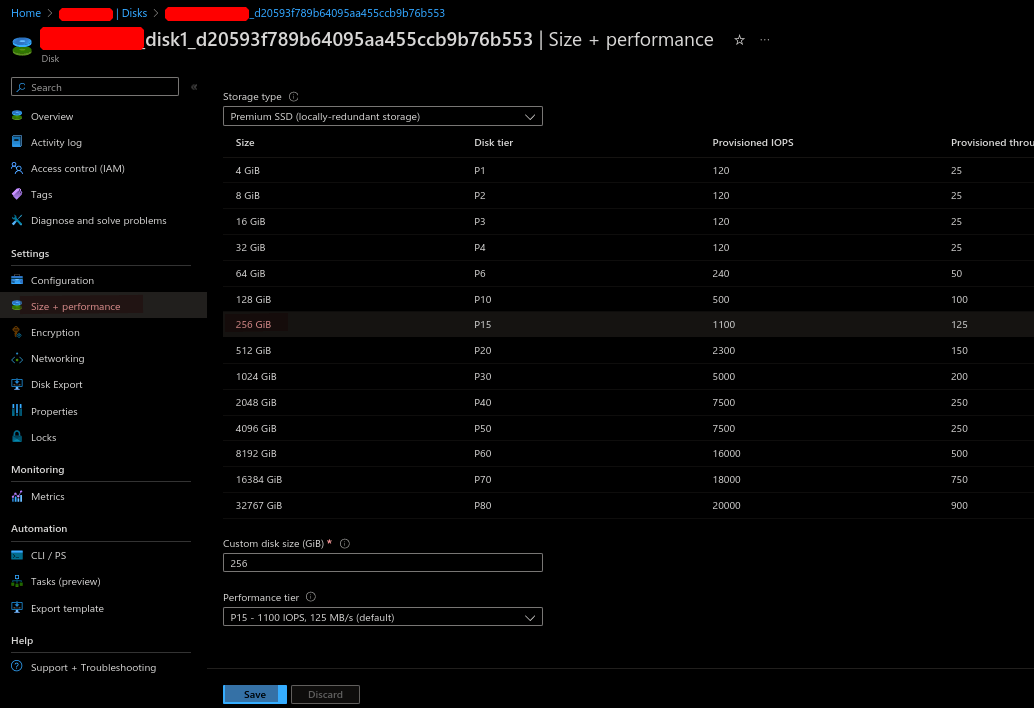
3. Increase the Disk (from the UI):

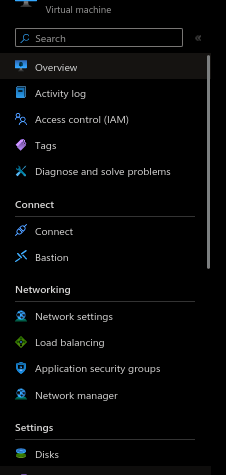
-Navigate to the VM in Azure. Click on “Disks”


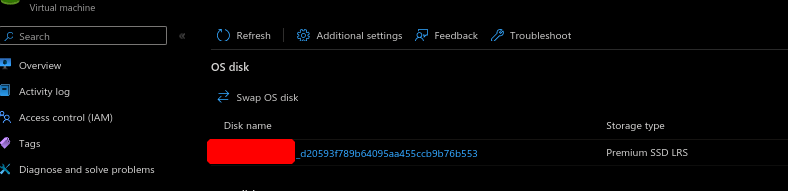
-Select the disk that you need to resize.


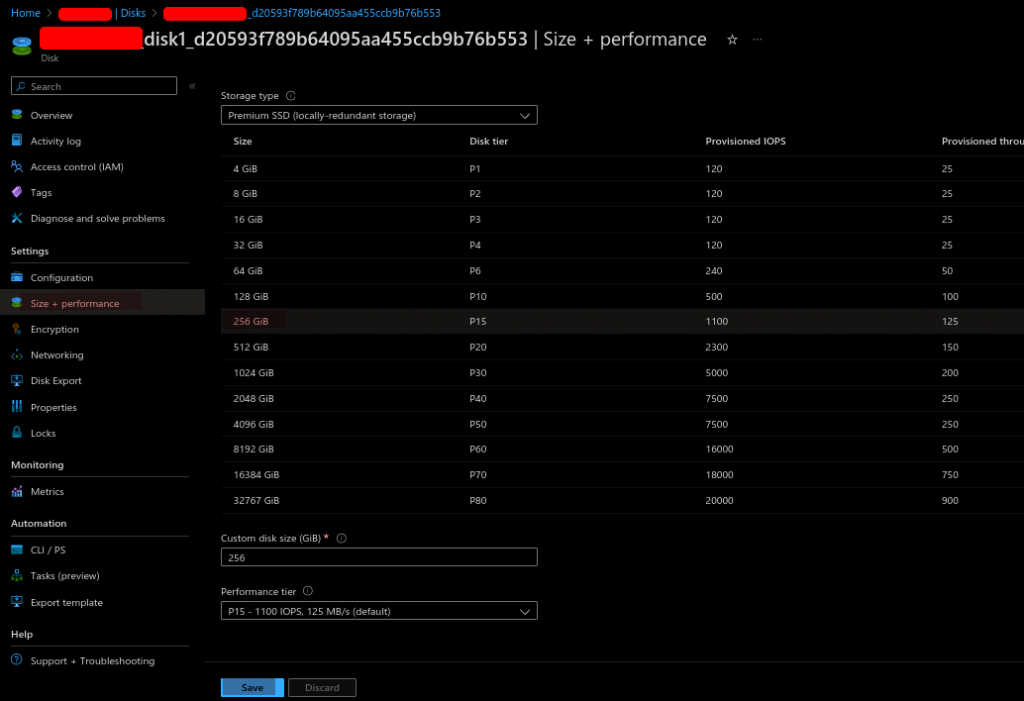
Click on “Size + performance” and select the disk size to which you want to increase to and then click on “Save”

4. Start the VM:

az vm start –resource-group Resource-Group-Name –name VM-NAME –subscription SUBSCRIPTION-ID

My Azure VM was based on Ubuntu 20.04.x and did not need additional changes in the OS. After the VM booted backup, it did automatically expand to the new allocated size.

Some of my thoughts on Azure Naming and resizing:
For some wierd reason, Azure does not make things easy for resizing disks. Ideally, you should be able to shutdown the VM and increase the disk, BUT Azure needs you to de-allocate the VM before you can make any changes to the disk. Another strange thing Azure decided to do is to label “de-allocate VM” instead of some sane label as at first it sound as if going to delete the VM and all its data when when in reality it does not.

Sources/References:
https://learn.microsoft.com/en-us/azure/virtual-machines/linux/expand-disks?tabs=ubuntu

If you have any queries/feedback regarding this, feel free to leave a comment below and will get back to you as soon as I can.

Filter AWS EC2 instances using tags with AWS CLI + Screenshots

This is tutorial on how to filter/search for AWS EC2 instances using AWS CLI by filtering with their tag and values.

For instructions on how to install AWS CLI in your machine, you can refer to on my previous blog posts. [Link ].

Below is a screenshot of an EC2 instance that two tags and their corresponding values.

aws ec2 instance tags screenshot

To search for instances using their tags and the values , you can use the following syntax:

aws ec2 describe-instances --filters Name=tag:Owner,Values=TechAntidote

Here, “Owner” is the key and the Value is “TechAntidote”. Here is a screnshot of the output:

aws cli ec2 searching with tags screenshot

You can search for other tags as well by providing the respective Key/value pairs.  [Note: The strings are case-sensitive.]

aws ec2 describe-instances --filters Name=tag:Name,Values=DevB0x

aws cli tag search results

Hope this helps. Cheers! 🙂

Source/References: AWS CLI Command Reference

How to fix “mysqld dead but subsys locked” EC2

My webserver’s mysqld service went down with the error message “mysqld dead but subsys locked”. The wordpress website was displaying the error “error establishing a database connection”. This is how I fixed it.

Upon visiting my website, I got the error message as shown below.

error establishing database connection ec2

Verify Issue – Check mysqld status:

To check the status of the mysqld database service, connect to your Amazon EC2 instance and then type the following command.

sudo service mysqld status

mysqld dead but subsys locked ec2

Investigate log files:

I checked my mysqld log files and found that the mysqld service was malfunctioning due to low memory.

sudo cat /var/log/messages | grep mysqld | less

check mysqld events in /var/log/messages
To check further events of mysqld , you can check mysqld.log using the following command:

sudo cat /var/log/mysqld.log | less

In my case, I found the mysqld service was panicking and got shutdown due to memory problems. [Note: The above outputs would differ from mine.]

Check if swap is present or not:

Run the below command to check if you have swap on your EC2 instance.

free -m

check if swap is present in ec2 using 'free -m' command

You can see here that Swap is 0. [Note: Swap is by default not created in your Amazon EC2 micro instance (free tier).]

Solution:

To resolve this issue, we need to create a swap file, mount it and make it persistent on boot.

Create swap file (1GB):

Type the following commands to create and activate the swap.

sudo dd if=/dev/zero of=/swapfile bs=1M count=1024

create swap file ec2

sudo mkswap /swapfile

mkswap command

Secure the swapfile:

To secure the swapfile from unauthorized access, type the following commands:

sudo chown root:root /swapfile

sudo chmod 600 /swapfile

chmod command to set swap file permission ec2


Finally, type the following command to load the swapfile and hit Enter.

sudo swapon /swapfile

Make swap persistent on boot:

To make the swap persistent on boot, edit the file /etc/fstab using the following command:

sudo vi /etc/fstab

Add the following at the end of the fstab file:

/swapfile swap swap defaults 0 0

Save and exit the file. Press ESC  and then type :wq and hit Enter.

Check if swap is active:

You can run the command below to check if swap is active or not.

free -m

check if swap is active free -m

As you can see highlighted section, the swap of size 1023MB is activated. It would use the swap file whenever necessary.

Restart / Start mysqld service:

You can type the following command to start the mysql service.

sudo service mysqld start

service mysqld start

Voila! You should now be able to access your website.

Change swappiness (Optional):

This step is purely optional. I would like my EC2 to use the RAM majority of the time and use the swap file when necessary. As you may know, its faster to access data from in the RAM rather than switching to the swap file which is stored in a mechanical drive in cloud.

sudo sysctl vm.swappiness=10

change swappiness

And that’s it folks, this should resolve the problem with the mysqld service crashing in your EC2 instance.

If this article helped you, do leave a comment below and follow us on Twitter, Facebook and Tumbler. You can also subscribe to our email subscription list to get latest updates right to your email. Cheers!

References: isitablog