Requirements:
- Proxmox 8.x.x
- Opencore ISO [ Link: https://github.com/thenickdude/KVM-Opencore/releases . https://github.com/thenickdude/KVM-Opencore/releases/tag/v20]
- MacOS Ventura ISO (You can get this from archive.org)
- Root access to Proxmox to edit config
Download the OpenCore-v20.iso.gz from KVM-Opencore and extract it. [Link: https://github.com/thenickdude/KVM-Opencore/releases/tag/v20 ].
Create a VM in Proxmox with the below settings:
- Select ISO Image as Opencore iso
- Set Guest OS type to “Other”
- Set Graphics card as “Vmware compatible”, Machine type “q35“
- Set BIOS to OMVF UEFI, add EFI Disk and select disk. Un-select Pre-enroll keys. Select SCSI Controller to “VirtIO SCSI”
- Set hard disk as “VirtIO Block” , size = 64GB, cache = Write back unsafe
- CPU: Set 1 Socket, 4 Cores, Type as “Host”
- 4GB Min RAM
- Set NIC to Vmware vmxnet3
- Then add second cd, select Bus/Device as defaults(IDE) and add MAC OS ISO.
- Change boot order so that opencore is first and then second is macos
Minor Changes needed for it to work:
- SSH into the Proxmox host and edit the VM config: (the VM ID = 100 for my newly created VM. It may be different in yours)
/vim /etc/pve/qemu-server/100.conf
- If your Proxmox server is running on an Intel CPU, then below line in top of the file:
args: -device isa-applesmc,osk="ourhardworkbythesewordsguardedpleasedontsteal(c)AppleComputerInc" -smbios type=2 -device usb-kbd,bus=ehci.0,port=2 -global nec-usb-xhci.msi=off -global ICH9-LPC.acpi-pci-hotplug-with-bridge-support=off -cpu host,vendor=GenuineIntel,+invtsc,+hypervisor,kvm=on,vmware-cpuid-freq=on
- If your Proxmox host is running on an AMD CPU, use the below line instead:
args: -device isa-applesmc,osk="ourhardworkbythesewordsguardedpleasedontsteal(c)AppleComputerInc" -smbios type=2 -device usb-kbd,bus=ehci.0,port=2 -global nec-usb-xhci.msi=off -global ICH9-LPC.acpi-pci-hotplug-with-bridge-support=off -cpu Haswell-noTSX,vendor=GenuineIntel,+invtsc,+hypervisor,kvm=on,vmware-cpuid-freq=on
Now, change the media=cdrom to cache=unsafe. Here is a sed command to do so:
sed -i 's/media=cdrom/cache=unsafe/g' /etc/pve/qemu-server/100.conf
Below is my config for reference (/etc/pve/qemu-server/100.conf):
args: -device isa-applesmc,osk="ourhardworkbythesewordsguardedpleasedontsteal(c)AppleComputerInc" -smbios type=2 -device usb-kbd,bus=ehci.0,port=2 -global nec-usb-xhci.msi=off -global ICH9-LPC.acpi-pci-hotplug-with-bridge-support=off -cpu host,vendor=GenuineIntel,+invtsc,+hypervisor,kvm=on,vmware-cpuid-freq=on

balloon: 0

bios: ovmf

boot: order=ide2;ide0;virtio0;net0

cores: 4

cpu: host

efidisk0: local-lvm:vm-100-disk-0,efitype=4m,size=4M

ide0: local:iso/macOS Ventura 13.0.1.iso,cache=unsafe,size=13073658K

ide2: local:iso/OpenCore-v20.iso,cache=unsafe,size=150M

machine: q35

memory: 8096

meta: creation-qemu=8.0.2,ctime=1690969304

name: MAC-OS

net0: vmxnet3=D6:41:D1:8F:B5:49,bridge=vmbr0,firewall=1

numa: 0

ostype: other

scsihw: virtio-scsi-pci

smbios1: uuid=57a6ce4a-a710-483a-8577-28c1feae47d4

sockets: 1

vga: vmware

virtio0: local-lvm:vm-100-disk-1,cache=unsafe,iothread=1,size=64G

vmgenid: a9dee6c6-376d-48b9-bc20-3c586856ffb4
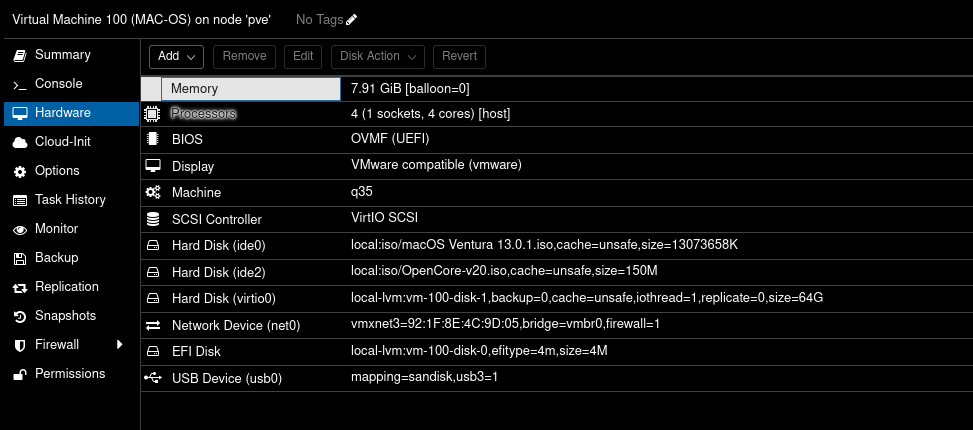
Here is a screenshot for reference of the settings page in Proxmox for the MacOS VM:
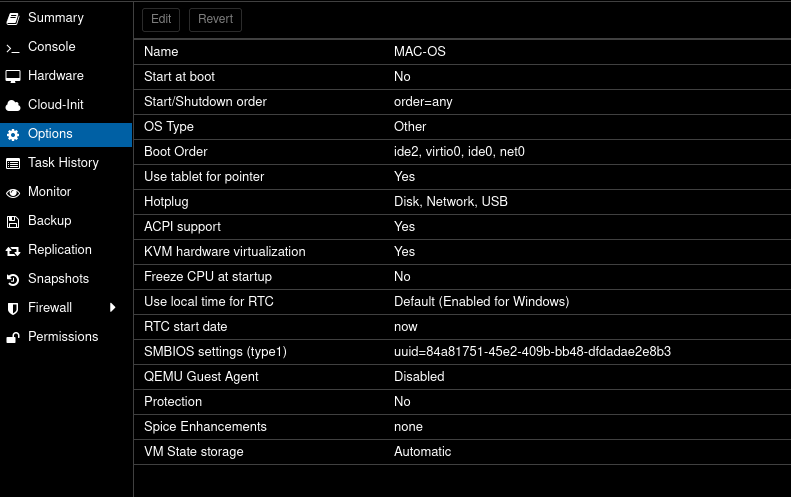
– Here is a screenshot of the boot order settings:
– Now Boot the MacOS VM, and select UEFI boot when prompted.
– At boot prompt, run the below:
System\Library\CoreServices\Boot.efi
Installation:
– Open Disk Utility
– Click “View” => Show All Devices.
– Select the First option that shows 64GB disk and click on “Erase”. Once done, close disk utility and click option to start installer.
– Select the disk and continue the install on it
The rest of the installation is pretty straightforward. It did take a very long time for the install to complete along with a few restarts. But, at the end you should be able to boot into the Proxmox VM.
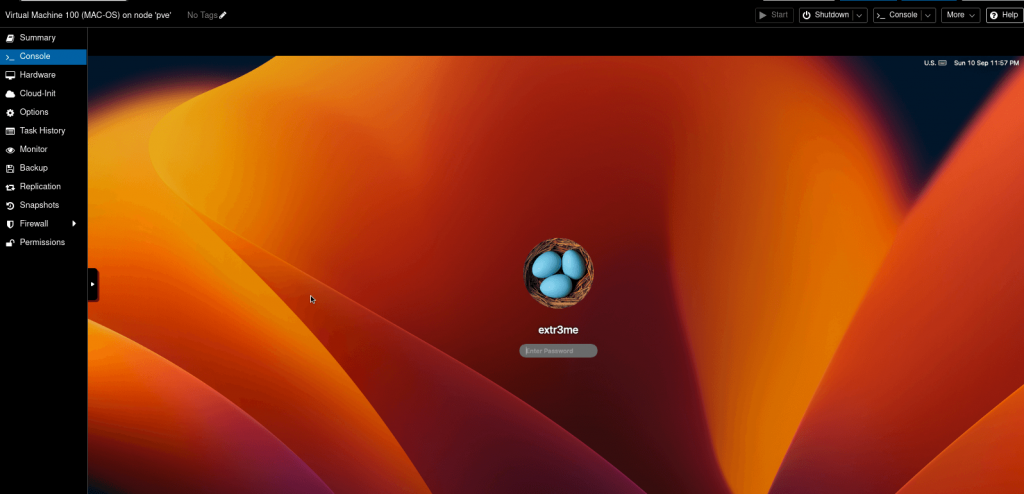
-Here is a screenshot of my VM post install.
Hope this helps! Cheers
Credits/References:
https://github.com/thenickdude/KVM-Opencore/releases/tag/v20
https://i12bretro.github.io/tutorials/0775.html