This is a blog post on reverse engineering TP Link TD-W8970v3 router firmware.
Requirements:
- Router Firmware [ TP-Link TD-W8970 v3 ]
- Linux Tools – binwalk, unsquashfs, dd, strings
- Optional: “John” a.k.a john the ripper (for Brute forcing passwords)
Disclaimer:
This is strictly for educational purposes ONLY and not be used for conducting any illegal activities. I hold no responsibility for misuse of this information.
Download the firmware:
First, we need to download the firmware that we need to reverse engineer. I am using the TP Link TD-W8970 v3 firmware.
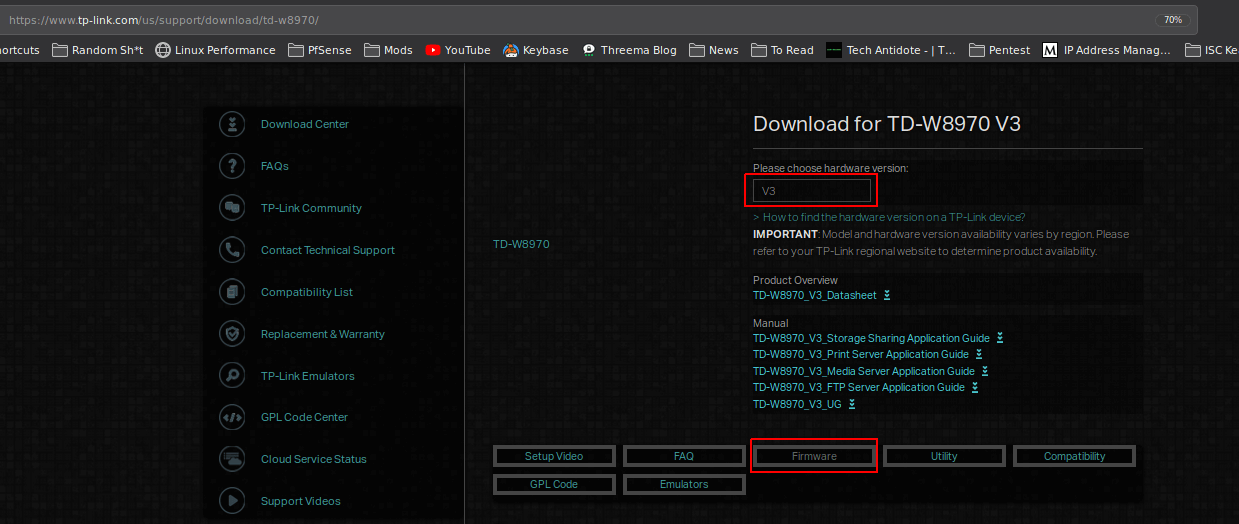
To download the firmware, go to the below link. -Select “V3” as the version and click on “Firmware”.
https://www.tp-link.com/us/support/download/td-w8970/
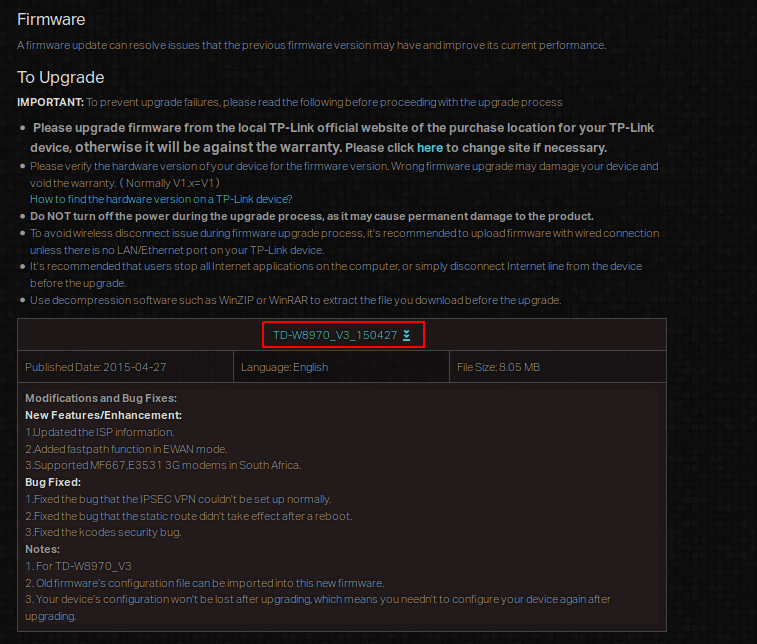
Download the firmware.
Time to dig around!!
Copy the firmware to a new location and extract it.
mkdir ~/firmware
cp ~/Downloads/TD-W8970_V3_150427.zip ~/firmware/
cd firmware/
unzip TD-W8970_V3_150427.zip
cd TD-W8970\(UN\)_V3_150427/
So, here we can see the firmware upgrade image itself with the “.bin” extension along with the firmware upgrade guide.
$ ls -l
total 8296
-rw-rw-r-- 1 extr3me extr3me  317017 Dec 25  2013 'How to upgrade TP-LINK ADSL Modem Router - Copy.pdf'
-rw-rw-r-- 1 extr3me extr3me 8174304 Apr 27  2015 'TD-W8970v3_0.9.1_1.2_up_boot(150427)_2015-04-27_17.48.51.bin'
extr3me@op3n TD-W8970(UN)_V3_150427 $
For sanity purposes, I removed the firmware upgrade guide which I don’t need here.
$ rm How\ to\ upgrade\ TP-LINK\ ADSL\ Modem\ Router\ -\ Copy.pdfInspecting the binary with “file” command shows that it of type “data”.
$ file TD-W8970v3_0.9.1_1.2_up_boot\(150427\)_2015-04-27_17.48.51.bin
TD-W8970v3_0.9.1_1.2_up_boot(150427)_2015-04-27_17.48.51.bin: data
Below is a screenshot:
![]()
I tried to run hexdump and filter out some data but did not get any useful info here yet.
$ hexdump -C TD-W8970v3_0.9.1_1.2_up_boot\(150427\)_2015-04-27_17.48.51.bin | head -10
00000000  03 00 00 00 76 65 72 2e  20 32 2e 30 00 ff ff ff  |....ver. 2.0....|
00000010  ff ff ff ff ff ff ff ff  ff ff ff ff ff ff ff ff  |................|
*
00000030  ff ff ff ff 08 97 00 03  00 00 00 35 00 00 00 00  |...........5....|
00000040  9c e8 56 2f 7d cd f2 5a  80 92 27 b5 dd 23 66 ea  |..V/}..Z..'..#f.|
00000050  00 00 00 00 ff ff ff ff  ff ff ff ff ff ff ff ff  |................|
00000060  ff ff ff ff ff ff ff ff  80 01 00 00 80 2e 00 20  |............... |
00000070  00 7e 02 00 00 00 02 00  00 13 d6 d3 00 13 d6 e0  |.~..............|
00000080  00 67 e0 00 00 00 00 00  00 00 e3 90 55 aa 01 02  |.g..........U...|
00000090  a5 00 09 01 55 d1 51 bb  ff ff ff ff ff ff ff ff  |....U.Q.........|
Now, use the tools “strings” to print out all the human readable strings in the binary. Here, I filtered the 1st 10 lines.
-The output does show two strings that seemed interesting.
$ strings TD-W8970v3_0.9.1_1.2_up_boot\(150427\)_2015-04-27_17.48.51.bin | head -10
ver. 2.0
79!8
@ !<
6H!$
cfe-v
e=192.168.1.1:ffffff00 h=192.168.1.100 g= r=f f=vmlinux i=bcm963xx_fs_kernel d=1 p=0
96361I2
  c
!P%@
!H$5)
A bit off topic. But out of curiosity, I searched online for “bcm963xx_fs_kernel” and came across a PDF document “Broadcom BCM963xx CFE Boot Loader and Flash Memory Structure Application Notes”‘ from Jan 2006.
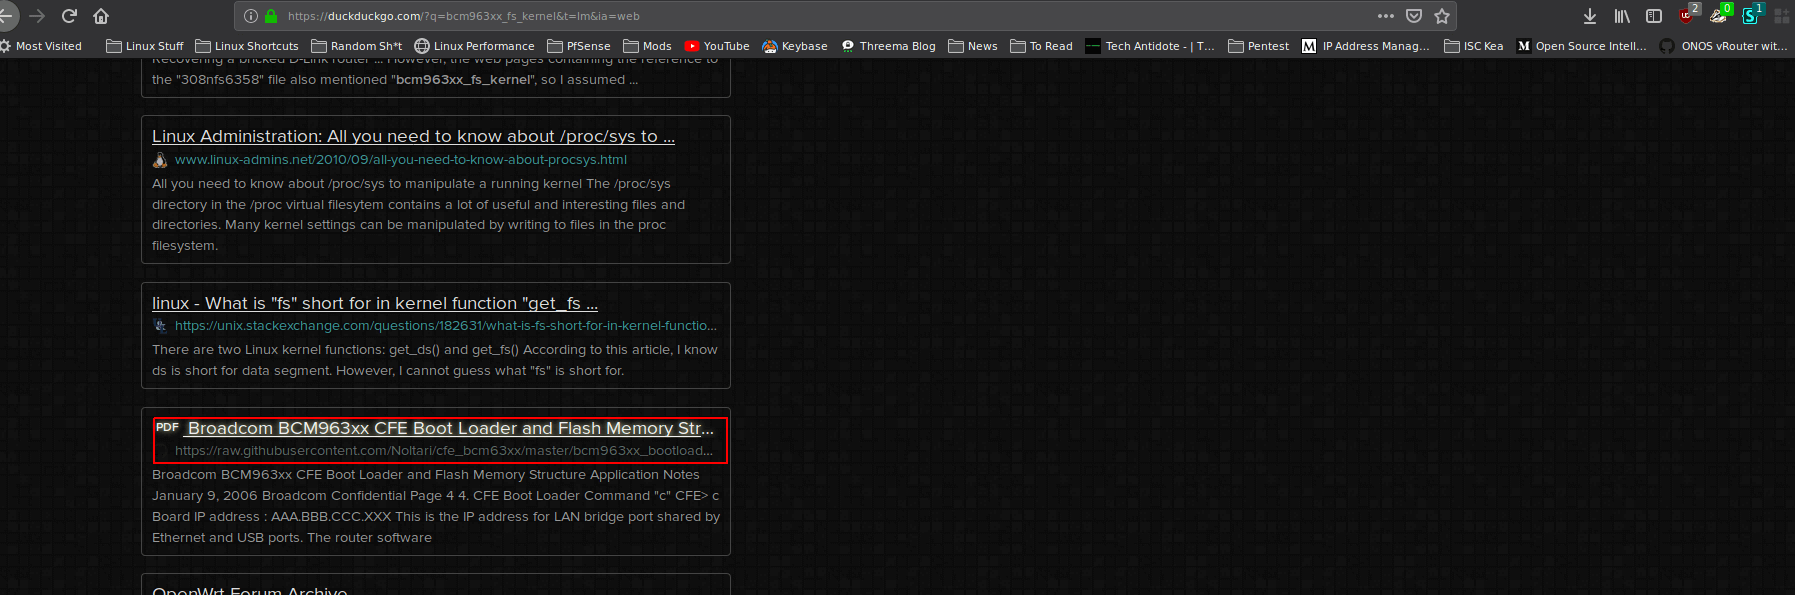
Here is a screenshot of the document itself:
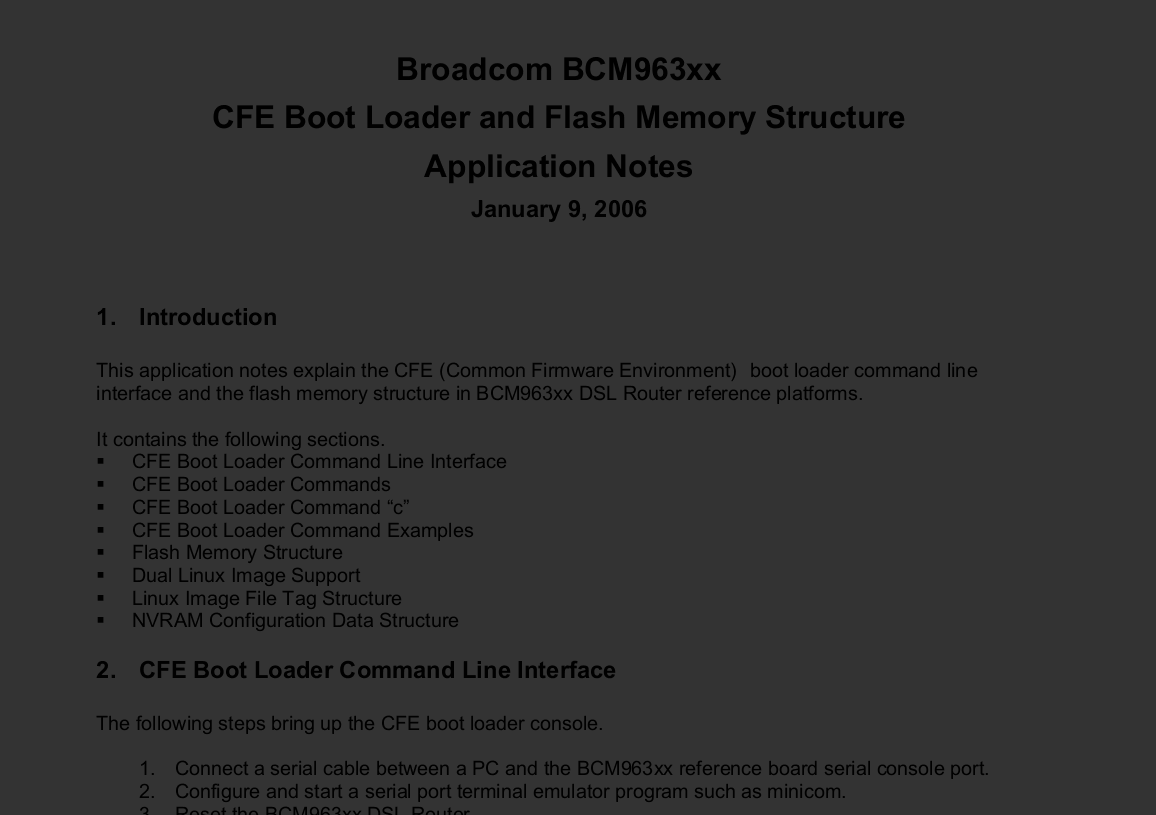
So, it looks like the router firmware has “Broadcom” and we now know the bootloader and we can get more information from the PDF.
Here is a link to the document: Broadcom CFE Link
cfe-v
e=192.168.1.1:ffffff00 h=192.168.1.100 g= r=f f=vmlinux i=bcm963xx_fs_kernel d=1 p=0
The strings output also shows “cfe-v” which looks to “Common Firmware Environment”.
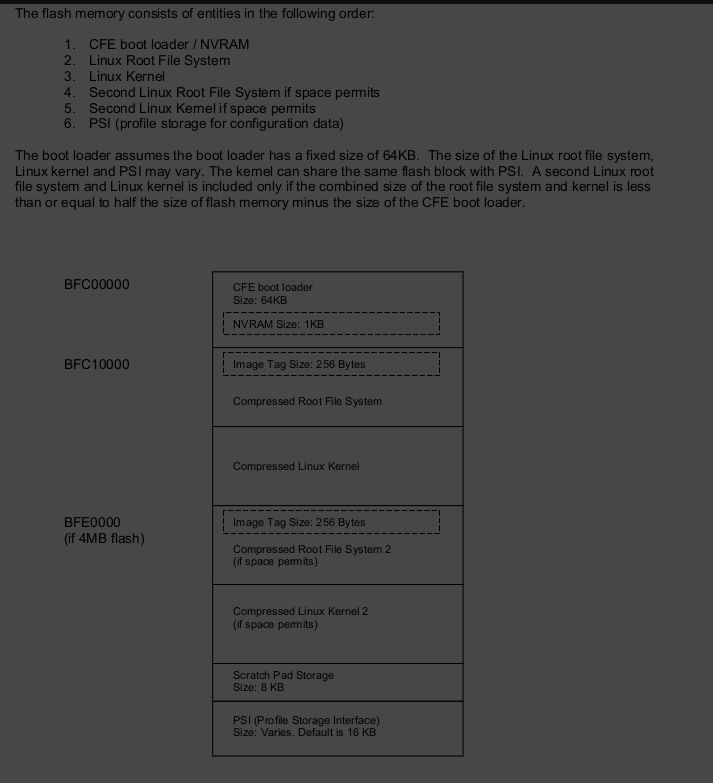
It also has information on the CFE bootloader flash memory:
In Page 5 of the Broadcom documentation, it does refer to the TFTP flashing method and could see some similarties from the output of the “strings” command.
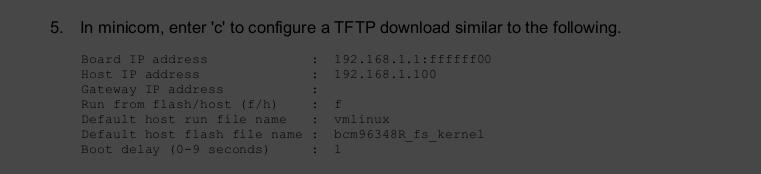
T his is what I could come up so far, comparing the screenshot and the below line:
“e=192.168.1.1:ffffff00 h=192.168.1.100 g= r=f f=vmlinux i=bcm963xx_fs_kernel d=1 p=0“,
e=192.168.1.1:ffffff00     => "192.168.1.1" => Board IP. I assume "ffffff00" => subnet mask 255.255.255.0 or CIDR.
h=192.168.1.100            => "192.168.1.100" => Host IP
g=                         => "empty" => Gateway IP
r=f                        => "f" => Run from Flash
f=vmlinux                  => "vmlinux" | Default run hostfilename is "vmlinux"
i=bcm963xx_fs_kernel       => "bcm963xx_fs_kernel" | Default flash filename is "bcm963xx_fs_kernel"
d=1                        => "1" | Delay = 1
p=0                        => "0" | [I have no idea what this is.]
So, the e, h, g, r, f, i, d and p seems to be variables that would be used during the flashing procedure via minicom to emulate a serial device.
If you would like to dig deeper, you could read about CPE by clicking here.
Extracting Router Filesystem:
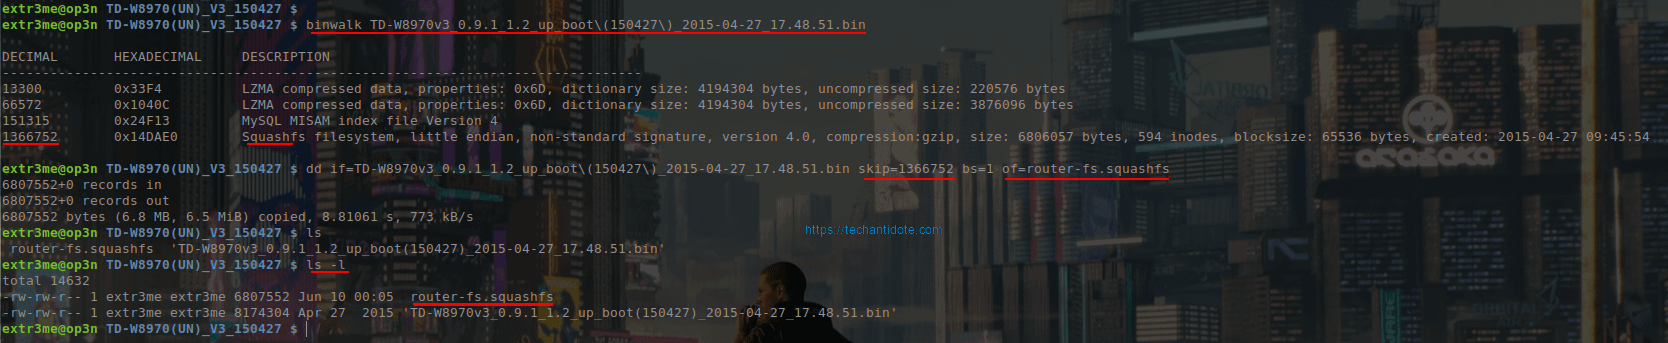
To check what is in the router firmware binary, I have used “binwalk“. Below is output of binwalk:
$ binwalk TD-W8970v3_0.9.1_1.2_up_boot\(150427\)_2015-04-27_17.48.51.bin

DECIMAL       HEXADECIMAL     DESCRIPTION
--------------------------------------------------------------------------------
13300         0x33F4          LZMA compressed data, properties: 0x6D, dictionary size: 4194304 bytes, uncompressed size: 220576 bytes
66572         0x1040C         LZMA compressed data, properties: 0x6D, dictionary size: 4194304 bytes, uncompressed size: 3876096 bytes
151315        0x24F13         MySQL MISAM index file Version 4
1366752       0x14DAE0        Squashfs filesystem, little endian, non-standard signature, version 4.0, compression:gzip, size: 6806057 bytes, 594 inodes, blocksize: 65536 bytes, created: 2015-04-27 09:45:54
The Ahaaa moment!
So, here we see this binary contains a squashfs filesystem starting at decimal “1366752”.

We can extract the squashfs filesystem alone from the firmware binary using the “dd” command by skiping up to “1366752” using the “skip” flag.
$ dd if=TD-W8970v3_0.9.1_1.2_up_boot\(150427\)_2015-04-27_17.48.51.bin skip=1366752 bs=1 of=router-fs.squashfs
6807552+0 records in
6807552+0 records out
6807552 bytes (6.8 MB, 6.5 MiB) copied, 8.81061 s, 773 kB/s
Here, we are providing the input file as the router firmware, setting the block size to “1” and getting data from “1366752” to the end of the binary and storing it to a file “router-fs.squashfs”. Here, if we dont specify the “bs” the copy would most likely fail.
So, the squashfs file system is about ~6.5MB in size compressed.
$ ls -lh
total 15M
-rw-rw-r-- 1 extr3me extr3me 6.5M Jun 10 00:05  router-fs.squashfs
-rw-rw-r-- 1 extr3me extr3me 7.8M Apr 27  2015 'TD-W8970v3_0.9.1_1.2_up_boot(150427)_2015-04-27_17.48.51.bin'
– Now, Checking the file shows as “data”.
$ file router-fs.squashfs
router-fs.squashfs: data
- For verification, check the unpacked binary “router-fs.squashfs” and it does show as “squashfs filesystem”.
$ binwalk router-fs.squashfs

DECIMAL       HEXADECIMAL     DESCRIPTION
--------------------------------------------------------------------------------
0             0x0             Squashfs filesystem, little endian, non-standard signature, version 4.0, compression:gzip, size: 6806057 bytes, 594 inodes, blocksize: 65536 bytes, created: 2015-04-27 09:45:54
Now, we can extract the filesystem using “unsquashfs”.
$ unsquashfs router-fs.squashfs-You may see some error such as below:
“create_inode: could not create character device squashfs-root/dev/bcmadsl0, because you’re not superuser!”
These logs can be safely ignored. Here is the output for reference:
$ unsquashfs router-fs.squashfs
[130/91284]
Parallel unsquashfs: Using 8 processors
546 inodes (811 blocks) to write
create_inode: could not create character device squashfs-root/dev/bcmadsl0, because you're not superuser!
create_inode: could not create character device squashfs-root/dev/bcmarl, because you're not superuser!
create_inode: could not create character device squashfs-root/dev/bcmfap, because you're not superuser!
create_inode: could not create character device squashfs-root/dev/bcmvlan, because you're not superuser!
create_inode: could not create character device squashfs-root/dev/bcmxtmcfg0, because you're not superuser!
create_inode: could not create character device squashfs-root/dev/bpm, because you're not superuser!
create_inode: could not create character device squashfs-root/dev/brcmboard, because you're not superuser!
create_inode: could not create block device squashfs-root/dev/caldata, because you're not superuser!
create_inode: could not create character device squashfs-root/dev/console, because you're not superuser!
create_inode: could not create character device squashfs-root/dev/dk0, because you're not superuser!
create_inode: could not create character device squashfs-root/dev/fcache, because you're not superuser!
create_inode: could not create character device squashfs-root/dev/flash0, because you're not superuser!
create_inode: could not create character device squashfs-root/dev/gmac, because you're not superuser!
create_inode: could not create character device squashfs-root/dev/gpio, because you're not superuser!
create_inode: could not create character device squashfs-root/dev/gpio1, because you're not superuser!
create_inode: could not create character device squashfs-root/dev/ingqos, because you're not superuser!
create_inode: could not create character device squashfs-root/dev/led, because you're not superuser!
create_inode: could not create block device squashfs-root/dev/mtd, because you're not superuser!
create_inode: could not create character device squashfs-root/dev/mtd0, because you're not superuser!
create_inode: could not create character device squashfs-root/dev/mtd1, because you're not superuser!
create_inode: could not create character device squashfs-root/dev/mtd2, because you're not superuser!
create_inode: could not create character device squashfs-root/dev/mtd3, because you're not superuser!
create_inode: could not create character device squashfs-root/dev/mtd4, because you're not superuser!
create_inode: could not create character device squashfs-root/dev/mtd5, because you're not superuser!
create_inode: could not create block device squashfs-root/dev/mtdblock0, because you're not superuser!
create_inode: could not create block device squashfs-root/dev/mtdblock1, because you're not superuser!
create_inode: could not create block device squashfs-root/dev/mtdblock2, because you're not superuser!
create_inode: could not create block device squashfs-root/dev/mtdblock3, because you're not superuser!
create_inode: could not create block device squashfs-root/dev/mtdblock4, because you're not superuser!
create_inode: could not create block device squashfs-root/dev/mtdblock5, because you're not superuser!
create_inode: could not create character device squashfs-root/dev/net/tun, because you're not superuser!
create_inode: could not create character device squashfs-root/dev/null, because you're not superuser!
create_inode: could not create character device squashfs-root/dev/pmap, because you're not superuser!
create_inode: could not create character device squashfs-root/dev/ppp, because you're not superuser!
create_inode: could not create character device squashfs-root/dev/pppox_iptables, because you're not superuser!
create_inode: could not create character device squashfs-root/dev/ptmx, because you're not superuser!
create_inode: could not create character device squashfs-root/dev/ptyp0, because you're not superuser!
create_inode: could not create character device squashfs-root/dev/ptyp1, because you're not superuser!
create_inode: could not create character device squashfs-root/dev/ptyp2, because you're not superuser!
create_inode: could not create character device squashfs-root/dev/pwrmngt, because you're not superuser!
create_inode: could not create character device squashfs-root/dev/qostype, because you're not superuser!
create_inode: could not create character device squashfs-root/dev/random, because you're not superuser!
create_inode: could not create block device squashfs-root/dev/sda, because you're not superuser!
create_inode: could not create block device squashfs-root/dev/sda1, because you're not superuser!
create_inode: could not create block device squashfs-root/dev/sda2, because you're not superuser!
create_inode: could not create block device squashfs-root/dev/sdb, because you're not superuser!
create_inode: could not create block device squashfs-root/dev/sdb1, because you're not superuser!
create_inode: could not create block device squashfs-root/dev/sdb2, because you're not superuser!
create_inode: could not create character device squashfs-root/dev/tty, because you're not superuser!
create_inode: could not create character device squashfs-root/dev/tty0, because you're not superuser!
create_inode: could not create character device squashfs-root/dev/ttyACM0, because you're not superuser!
create_inode: could not create character device squashfs-root/dev/ttyACM1, because you're not superuser!
create_inode: could not create character device squashfs-root/dev/ttyACM10, because you're not superuser!
create_inode: could not create character device squashfs-root/dev/ttyACM11, because you're not superuser!
create_inode: could not create character device squashfs-root/dev/ttyACM12, because you're not superuser!
create_inode: could not create character device squashfs-root/dev/ttyACM13, because you're not superuser!
create_inode: could not create character device squashfs-root/dev/ttyACM14, because you're not superuser!
create_inode: could not create character device squashfs-root/dev/ttyACM15, because you're not superuser!
create_inode: could not create character device squashfs-root/dev/ttyACM2, because you're not superuser!
create_inode: could not create character device squashfs-root/dev/ttyACM3, because you're not superuser!
create_inode: could not create character device squashfs-root/dev/ttyACM4, because you're not superuser!
create_inode: could not create character device squashfs-root/dev/ttyACM5, because you're not superuser!
create_inode: could not create character device squashfs-root/dev/ttyACM6, because you're not superuser!
create_inode: could not create character device squashfs-root/dev/ttyACM7, because you're not superuser!
create_inode: could not create character device squashfs-root/dev/ttyACM8, because you're not superuser!
create_inode: could not create character device squashfs-root/dev/ttyACM9, because you're not superuser!
create_inode: could not create character device squashfs-root/dev/ttyS0, because you're not superuser!
create_inode: could not create character device squashfs-root/dev/ttyUSB0, because you're not superuser!
create_inode: could not create character device squashfs-root/dev/ttyUSB1, because you're not superuser!
create_inode: could not create character device squashfs-root/dev/ttyUSB10, because you're not superuser!
create_inode: could not create character device squashfs-root/dev/ttyUSB11, because you're not superuser!
create_inode: could not create character device squashfs-root/dev/ttyUSB12, because you're not superuser!
create_inode: could not create character device squashfs-root/dev/ttyUSB13, because you're not superuser!
create_inode: could not create character device squashfs-root/dev/ttyUSB14, because you're not superuser!
create_inode: could not create character device squashfs-root/dev/ttyUSB15, because you're not superuser!
create_inode: could not create character device squashfs-root/dev/ttyUSB2, because you're not superuser!
create_inode: could not create character device squashfs-root/dev/ttyUSB3, because you're not superuser!
create_inode: could not create character device squashfs-root/dev/ttyUSB4, because you're not superuser!
create_inode: could not create character device squashfs-root/dev/ttyUSB5, because you're not superuser!
create_inode: could not create character device squashfs-root/dev/ttyUSB6, because you're not superuser!
create_inode: could not create character device squashfs-root/dev/ttyUSB7, because you're not superuser!
create_inode: could not create character device squashfs-root/dev/ttyUSB8, because you're not superuser!
create_inode: could not create character device squashfs-root/dev/ttyUSB9, because you're not superuser!
create_inode: could not create character device squashfs-root/dev/ttyp0, because you're not superuser!
create_inode: could not create character device squashfs-root/dev/ttyp1, because you're not superuser!
create_inode: could not create character device squashfs-root/dev/ttyp2, because you're not superuser!
create_inode: could not create character device squashfs-root/dev/urandom, because you're not superuser!
create_inode: could not create character device squashfs-root/dev/watchdog, because you're not superuser!

create_inode: could not create character device squashfs-root/dev/zero, because you're not superuser!
[====================================================================================================================================================================================================| ] 722/811 89%

created 370 files
created 48 directories
created 87 symlinks
created 0 devices
created 0 fifos
-Now, we should see a folder named “squashfs-root”
$ ls -l
total 14636
-rw-rw-r--  1 extr3me extr3me 6807552 Jun 10 00:05  router-fs.squashfs
drwxrwxr-x 13 extr3me extr3me    4096 Apr 27  2015  squashfs-root
-rw-rw-r--  1 extr3me extr3me 8174304 Apr 27  2015 'TD-W8970v3_0.9.1_1.2_up_boot(150427)_2015-04-27_17.48.51.bin'
Now, change into the folder ”
$ cd squashfs-root/-Listing the files shows that we have the router’s filesystem.
$ ls -a
.  ..  bin  dev  etc  lib  linuxrc  mnt  proc  sbin  sys  tmp  usr  var  web
-To value a view of the filesystem in a tree like format, I have used the command “tree” and piping it to less:
$ tree -C | less -RGuessing the Linux Kernel version:
-Checking the files with “.ko” extension for keyword “vermagic” would be the best guess to the Linux kernel version.
$ strings ./lib/modules/NetUSB.ko | grep vermagic
vermagic=2.6.30 SMP preempt mod_unload MIPS32_R1 32BIT
Now, that I know the kernel version I could then check for exploits that affect this kernel version.
For example: Check for CVEs that affect this version. [Link]
Some random things worth checking:
-The list of libraries installed can be found under:
$ tree -C lib/ | less -R– So, the chrooted environment were the user inputs commands seems to be via a binary “usr/bin/cli” or could be translating the user commands to the actual deamon.
$ strings ./usr/bin/cli | less-Btw, I found a blooper while checking this binary. Searching this binary, I did find a few misspelled words. Example: “histroy” instead of “history” 😛
serial
wan2lan
start
exit
clear
clear screen
enter config mode
enable
enter privilege mode
leave to the privious mode
help
help info
history
show histroy commands
Guessing GCC Version:
$ strings ./usr/bin/cli | grep GCC
GCC: (GNU) 3.3.2
GCC: (Buildroot 2010.02-git) 4.4.2
Cracking password from the router’s filesystem:
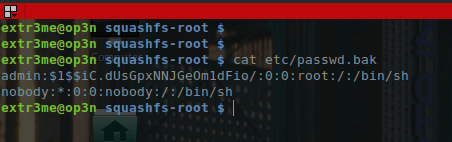
-Looking at the filesystem, I could see a file “passswd.bak” under etc/ directory.

-Reading the file shows there are two users with has shell access.
$ cat etc/passwd.bak
admin:$1$$iC.dUsGpxNNJGeOm1dFio/:0:0:root:/:/bin/sh
nobody:*:0:0:nobody:/:/bin/sh
Here:
Username indicated in green.
Hashed password indicated in orange.
Assigned shell indicated in pink.
This looks to be the “shadow” file usually located under etc/shadow which my assumption is to be copied to etc/shadow during upgrade.
Here is something wierd. Why does user “nobody” has /bin/bash shell ? Manufacturer backdoor??Mmmmm….! We will come to that later.
Messing around – Cracking passwords:
Before cracking the password, lets understand something about the hash+salt. Here, the “$” signs are special
admin:$1$$iC.dUsGpxNNJGeOm1dFio/:0:0:root:/:/bin/sh
The string that we require is the following:
$1$$iC.dUsGpxNNJGeOm1dFio/
The string is specificied in the following format:
$id$salt$encrypted
$1 => Indicates that MD5 is used to create the hash the password. Below is a table of the list of possible values for the 1st section.
--------------------
| 1  | MD5         |
--------------------
| 2  | Blowfish    |
--------------------
| 2a | eksBlowfish |
--------------------
| 5  | SHA-256     |
--------------------
| 6  | SHA-512     |
--------------------
For testing purposes, I was able to crack the password with John the ripper.
If the passwords had complex salts + hashing methods, for ex SHA-512 it may take longer than expected. [Again, this is for educational purposes ONLY!]
$ john etc/passwd.bak
Loaded 1 password hash (md5crypt [MD5 32/64 X2])
No password hashes left to crack (see FAQ)
– To view the cracked password, you could use the –show flag along with the input file etc/passwd.bak
$ john --show etc/passwd.bak
admin:1234:0:0:root:/:/bin/sh
1 password hash cracked, 0 left
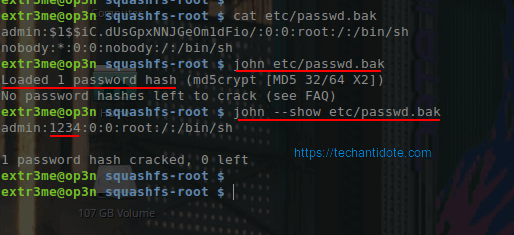
-So, the password “admin” user is “1234”.
The user “nobody”:
Coming back to the user “nobody”.
Ideally, for security purposes “nobody” user is used with a combination of a non existing directory along with a nologin shell. Below is a sample of an acceptable configuration to me:
nobody:x:65534:65534:nobody:/nonexistent:/usr/sbin/nologin
However, in the router’s FS, it seems wierd that the user “nobody” seems to have “/” or the actual root as mount along with “/bin/bash”.
nobody:*:0:0:nobody:/:/bin/sh
Anyways, may be this is just my paranoia/spidey sense kicking in. 😛
If you read this far. Thanks a ton! Hope you learned something from this article. Do bookmark this page for future references. Cheers
Regards,
ΞXΤЯ3МΞ
References:
https://openwrt.org/docs/techref/bootloader/cfe
https://en.wikipedia.org/wiki/Common_Firmware_Environment
https://www.cvedetails.com/version/81666/Linux-Linux-Kernel-2.6.30.html
https://charlesreid1.com/wiki/John_the_Ripper/Shadow_File
https://www.openwall.com/john/doc/EXAMPLES.shtml
Click to access bcm963xx_bootloader_appnote.pdf
http://plastilinux.blogspot.com/2009/11/how-to-know-version-of-kernel-without.html
ase1590