How to verify GPG key of a downloaded CentOS ISO and verify its checksum [Detailed]

This is a tutorial on how to check checksums of a CentOS image using GPG to verify the integrity of a downloaded CentOS ISO image.

1. Download the public key from the CentOS website

Open a terminal and create a directory where you need to download the ISO and the checksum file.

mkdir validate && cd validate/

Download the GPG public key from the official CentOS website. (You can find the full list of CentOS keys here. )

wget https://www.centos.org/keys/RPM-GPG-KEY-CentOS-Official

Below are the contents of the downloaded file which shows that this is a public key.

cat RPM-GPG-KEY-CentOS-Official
-----BEGIN PGP PUBLIC KEY BLOCK-----
Version: GnuPG v2.0.22 (GNU/Linux)

mQINBFzMWxkBEADHrskpBgN9OphmhRkc7P/YrsAGSvvl7kfu+e9KAaU6f5MeAVyn
rIoM43syyGkgFyWgjZM8/rur7EMPY2yt+2q/1ZfLVCRn9856JqTIq0XRpDUe4nKQ
8BlA7wDVZoSDxUZkSuTIyExbDf0cpw89Tcf62Mxmi8jh74vRlPy1PgjWL5494b3X
5fxDidH4bqPZyxTBqPrUFuo+EfUVEqiGF94Ppq6ZUvrBGOVo1V1+Ifm9CGEK597c
aevcGc1RFlgxIgN84UpuDjPR9/zSndwJ7XsXYvZ6HXcKGagRKsfYDWGPkA5cOL/e
f+yObOnC43yPUvpggQ4KaNJ6+SMTZOKikM8yciyBwLqwrjo8FlJgkv8Vfag/2UR7
JINbyqHHoLUhQ2m6HXSwK4YjtwidF9EUkaBZWrrskYR3IRZLXlWqeOi/+ezYOW0m
vufrkcvsh+TKlVVnuwmEPjJ8mwUSpsLdfPJo1DHsd8FS03SCKPaXFdD7ePfEjiYk
nHpQaKE01aWVSLUiygn7F7rYemGqV9Vt7tBw5pz0vqSC72a5E3zFzIIuHx6aANry
Gat3aqU3qtBXOrA/dPkX9cWE+UR5wo/A2UdKJZLlGhM2WRJ3ltmGT48V9CeS6N9Y
m4CKdzvg7EWjlTlFrd/8WJ2KoqOE9leDPeXRPncubJfJ6LLIHyG09h9kKQARAQAB
tDpDZW50T1MgKENlbnRPUyBPZmZpY2lhbCBTaWduaW5nIEtleSkgPHNlY3VyaXR5
QGNlbnRvcy5vcmc+iQI3BBMBAgAhBQJczFsZAhsDBgsJCAcDAgYVCAIJCgsDFgIB
Ah4BAheAAAoJEAW1VbOEg8ZdjOsP/2ygSxH9jqffOU9SKyJDlraL2gIutqZ3B8pl
Gy/Qnb9QD1EJVb4ZxOEhcY2W9VJfIpnf3yBuAto7zvKe/G1nxH4Bt6WTJQCkUjcs
N3qPWsx1VslsAEz7bXGiHym6Ay4xF28bQ9XYIokIQXd0T2rD3/lNGxNtORZ2bKjD
vOzYzvh2idUIY1DgGWJ11gtHFIA9CvHcW+SMPEhkcKZJAO51ayFBqTSSpiorVwTq
a0cB+cgmCQOI4/MY+kIvzoexfG7xhkUqe0wxmph9RQQxlTbNQDCdaxSgwbF2T+gw
byaDvkS4xtR6Soj7BKjKAmcnf5fn4C5Or0KLUqMzBtDMbfQQihn62iZJN6ZZ/4dg
q4HTqyVpyuzMXsFpJ9L/FqH2DJ4exGGpBv00ba/Zauy7GsqOc5PnNBsYaHCply0X
407DRx51t9YwYI/ttValuehq9+gRJpOTTKp6AjZn/a5Yt3h6jDgpNfM/EyLFIY9z
V6CXqQQ/8JRvaik/JsGCf+eeLZOw4koIjZGEAg04iuyNTjhx0e/QHEVcYAqNLhXG
rCTTbCn3NSUO9qxEXC+K/1m1kaXoCGA0UWlVGZ1JSifbbMx0yxq/brpEZPUYm+32
o8XfbocBWljFUJ+6aljTvZ3LQLKTSPW7TFO+GXycAOmCGhlXh2tlc6iTc41PACqy
yy+mHmSv
=kkH7
-----END PGP PUBLIC KEY BLOCK-----

2. Check and verify the fingerprint of the downloaded public key.

Using gpg, check the fingerprint of the downloaded public key file using the following command:

gpg --dry-run --import --import-options import-show  ./RPM-GPG-KEY-CentOS-Official
pub   rsa4096 2019-05-03 [SC]
      99DB70FAE1D7CE227FB6488205B555B38483C65D
uid                      CentOS (CentOS Official Signing Key) <[email protected]>

gpg: Total number processed: 1

From the output, the fingerprint is 99DB70FAE1D7CE227FB6488205B555B38483C65D.

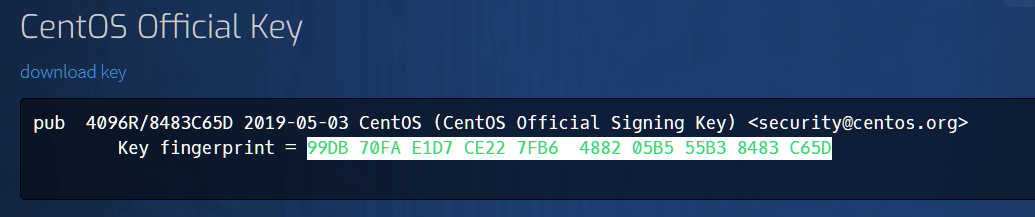
Now, we need to verify if the fingerprint matches the one documented in official CentOS page.

So, go to https://www.centos.org/keys/ and search for the above fingerprint.


verify fingerprint matches from centos official keys documentation page

[Note: You could split the fingerprint into blocks of four characters as shown below: 99DB 70FA E1D7 CE22 7FB6 4882 05B5 55B3 8483 C65D ]

If the fingerprint matches the one documented in the official CentOS key documentation page, then the public key is untampered and can be trusted.

[Note: If you are using a newer version of gpg, then you can use “gpg –quiet –with-fingerprint ./RPM-GPG-KEY-CentOS-Official“. I did not use the –with-fingerprint flag as the version of gpg installed in my machine does not show the fingerprints with the –with-fingerprint flag.]

3. Import the Public key to your GNUPG keyring

Now, import the downloaded key to your gnupg keyring.

gpg --import ./RPM-GPG-KEY-CentOS-Official
gpg: key 05B555B38483C65D: public key "CentOS (CentOS Official Signing Key) <[email protected]>" imported
gpg: Total number processed: 1
gpg:               imported: 1

The above shows that it processed and imported 1 key to you local store.

To list the keys currently in your gnupng keyring, you can use the following:

gpg --list-keys
/home/r3con/.gnupg/pubring.kbx
------------------------------
pub rsa4096 2019-05-03 [SC]
99DB70FAE1D7CE227FB6488205B555B38483C65D
uid [ unknown] CentOS (CentOS Official Signing Key) <[email protected]

4. Download the CentOS ISO image

Download the CentOS ISO file:

wget http://mirrors.piconets.webwerks.in/centos-mirror/8.1.1911/isos/x86_64/CentOS-8.1.1911-x86_64-dvd1.iso

5. Download the CHECKSUM.asc file and verify that it is not tampered with.

Once the download is complete, download the “CHECKSUM.asc” file from the CentOS website:

wget http://mirror.centos.org/centos/8/isos/x86_64/CHECKSUM.asc

If you read the contents of the CHECKSUMS.asc file, you will see that it contains a PGP signed message with the checksums for the CentOS ISO image.

cat CHECKSUM.asc
-----BEGIN PGP SIGNED MESSAGE-----
Hash: SHA256

# CentOS-8.1.1911-x86_64-boot.iso: 625999872 bytes
SHA256 (CentOS-8.1.1911-x86_64-boot.iso) = 7fea13202bf2f26989df4175aace8fdc16e1137f7961c33512cbfad844008948
# CentOS-8.1.1911-x86_64-dvd1.iso: 7554990080 bytes
SHA256 (CentOS-8.1.1911-x86_64-dvd1.iso) = 3ee3f4ea1538e026fff763e2b284a6f20b259d91d1ad5688f5783a67d279423b
-----BEGIN PGP SIGNATURE-----
Version: GnuPG v1

iQIVAwUBXh3OvAW1VbOEg8ZdAQihSxAArC0gfNTr0bWPOT/k40lTSoxgDF0qGn4+
d5j9noV3c0Xqd4Um/hxs7ha/qTg82DISYC8+5XHRvU3k156Mxh7dy4FoPopwItoc
lpMjnXwDYC/Iptp1XHiD2sun+z+omC2B+DcZergDwrrJzb7CZzxGr84Ztl6Wd54s
jCI3dQEsakQUEEuekr3mHtB1R4QHHaRwVwUJSzRQYLF3XiCq788IUaI2sf5kHXsg
BxWhzHsBCPG4/FC0ev9ujp5OP/j2FZq4S0cp1+53t/BauyGPOdbvQw71xKsHZQ3J
G9TNaFzlAqZJDKpz+XgjQ1V/7kKaFY3dCbxITxbOdSGAMh25cbWd2AamnCFuTzIq
vpWY8xWgx6kQ8aLI+VekOYYl4zZswmJBBogXDURCJTqRY6efkT8qhuWVS/obWjBL
L3uLL6w4ZkkatUZwglcj2+BhXefAGZgfBExI/xUHFzyXdB8Jv/YwYTTEsREZhf+T
8ggDOOznlUvrNz/atYKwNqAWbC2oY5UXL2OhDznm3lXwQPJG9vZ2Hx6UFpEuuBOR
m407o8rfosEbnHgxh9qQ2gnlk+m30VZqhr2dQnOibdY7YtHqk++5snr+yDmXKWDU
r08BLy0qGdI8CDxOS0DDb5MmIa5xc2c3w0Jt5q+H9tD7VAlg5uJBju0GwXSsiWHf
PlXTxMDETyY=
=TBYO
-----END PGP SIGNATURE-----

To verify that downloaded “CHECSUMS.asc” file is not tampered and is indeed from CentOS, use the –verify flag.

gpg --verify CHECKSUM.asc
gpg: Signature made Tue Jan 14 19:52:52 2020 IST
gpg: using RSA key 05B555B38483C65D
gpg: Good signature from "CentOS (CentOS Official Signing Key) <[email protected]>" [unknown]
gpg: WARNING: This key is not certified with a trusted signature!
gpg: There is no indication that the signature belongs to the owner.
Primary key fingerprint: 99DB 70FA E1D7 CE22 7FB6 4882 05B5 55B3 8483 C65D

The above outputs shows the the signature is good and CHECSUM.asc file is good and not tampered.

At this point, you should have the following files in the directory:

ls -l
total 7377932
-rwxrwxrwx 1 r3con r3con 1179 Jun 3 11:10 CHECKSUM.asc
-rwxrwxrwx 1 r3con r3con 7554990080 Jan 4 03:17 CentOS-8.1.1911-x86_64-dvd1.iso
-rwxrwxrwx 1 r3con r3con 1683 Sep 12 2019 RPM-GPG-KEY-CentOS-Official

6. Verifying the checksum of the downloaded image using the CHECKSUM.asc file.

To verify the checksums of the downloaded ISO image using the following command:

sha256sum -c CHECKSUM.asc 2>&1 | grep OK
CentOS-8.1.1911-x86_64-dvd1.iso: OK

succesfull sha256 checksum verification

This shows that the checksum matches and the downloaded ISO file is intact or not tampered with.

Hope this helps. Cheers

Source/Credits/References:

CentOS Documentation

GNUPG Fingerprint workaround

Update CA certificate store in Fedora to trust a root CA certificate

Lets assume you have a CA certificate “ca.crt” that you want your system or utilities like curl to trust then you can do the following:

Copy the CA certificate to /etc/pki/ca-trust/source/anchors/

sudo cp ca.crt /etc/pki/ca-trust/source/anchors/

Then you can run the following command to update Fedora’s local CA store.

sudo update-ca-trust

Now you system and tools like curl will trust certificates signed by this CA.

Verify that SSL connection is trusted using curl :

Lets say you have a webserver server whose certificate was signed by the above root CA and the signed certificate is already uploaded to the webserver. You can verify that your Fedora client trusts the certificate using curl.

curl -vvv https://test-server-fqdn.com

In the above curl command, I am passing the verbose flag -vvv which is optional. It is handy for troubleshooting purposes SSL issues.

If the connection is trusted, the SSL connection should work and you would see a message such as below from the curl outputs:

* server certificate verification OK

Note: This was tested on Fedora 31.

Source/References:

https://serverfault.com/questions/394815/how-to-update-curl-ca-bundle-on-redhat
https://www.linux.org/docs/man8/update-ca-trust.html

Check partition information in Linux

To show currently mounted partition in human readable format, use:

df -h

df -h sample output screenshot

Another way to check partition information using parted.

sudo parted /dev/sda print

parted sample output screenshot

Here, we can see that the disk size is 120GB along with the partition information.

To view the list of partitions using fdisk, use:

fdisk -l

To view the list of block devices:

lsblk

Hope this helps! Cheers 🙂

How to pass arguments to an alias in bash

Lets look at passing arguments to an alias by looking at an example.

The below command will open duckduckgo.com in a new tab in firefox.

firefox --new-window duckduckgo.com

Lets say, I want to create an alias but I want to pass the URL as a parameter to the alias.

For example, if I run the following command in the terminal, it should look at the first argument (which is the URL) and open it in a newtab in firefox.

ff duckduckgo.com

To achieve this, you can do the following:

Edit your ~/.bashrc or ~/.bash_profile using your favorite editor.

vim ~/.bashrc

Create a function inside the ~/.bashrc  with the following content. [Copy/paste the below inside your bashrc]

alias ff='function _ff()
{
firefox --new-window $1
};_ff'

Here, $1 is the first argument.

Once you save and close the bashrc file, you can source your bashrc for changes to take affect.

source ~/.bashrc

Now, if you enter the following command in the terminal, it will take “duckduckgo.com” which is the 1st parameter and open it in a new tab in firefox.

ff duckduckgo.com

Hope this helps. If you like my content, do share and subscribe for more content.

Source: StackOverFlow

How to get real time currency exchange rates in your Linux terminal

This a tutorial on how to get real time currency exchange rates directly from your Linux terminal (+ lots of screenshots).

Requirements:

-A computer (  *facepalm* 😛 )
-Any Linux/Windows machine with curl installed.
-Free account with openexchangerates.org

We will be using the “curl” utility to perform the API requests which usually comes pre-installed in most Linux systems.

In case, yours does not have it installed, you can install it using the following:

[You can run “apt install curl” for Ubuntu based systems, or “yum install curl” for RHEL/CentOS/Fedora based systems or “dnf install curl” for newer Fedora systems.]

Step 1: Sign up for a free account in openexchange. You can use the below link:

https://openexchangerates.org/signup/free

I would suggest to create an account with a new password that you have never used before.

[Note: The free account has restrictions but should be sufficient to get latest conversion rates with base currency set as USD. With the free account we cannot change the base currency. This means with the free account you can translate 1USD to any other currency. I will create a different tutorial describing another method to get ]

Step 2: Get your APP ID

-Once you sign up for the account, you would receive an email with a verification email which will have your “APP ID”. Below is a screenshot:

APP ID for currency conversion

You would need to get this ID when performing the API call.

-Alternatively, once you have signed up you get your API key once you login to your account. Below is a screenshot:

API ID / API key from account to be used for getting currency exchange rates

Step 3: Get exchange rates:

-Open your terminal and run the following command:

curl -X GET https://openexchangerates.org/api/latest.json?app_id=enteryourAPIKEYhere

Enter your app ID after “=”. For example, if your APP ID is 1234, them you would run the following:

curl -X GET https://openexchangerates.org/api/latest.json?app_id=1234

Below is a sample output which displays the different currencies and its conversion values.

currency exchange rates in Linux terminal using API

You would notice the output is in JSON format which has values in keypairs. (For example: the “currency name”:  “value”.)

The data that is pulled is in realtime and it also displays the “timestamp” for which the currency converstions are in linux EPOC time.

Additional Information:

To know the current EPOC time in your system, you can command “date +%s” in your terminal. This is the number of seconds since 1970-01-01 00:00:00 UTC.

For simplicity, If you are looking to convert USD to a particular currency, you can simply grep the output with the currency you need to convert to.

For example: If you convert 1 USD to INR, you can simply grep the currency name to filter out the output.

curl -s -X GET https://openexchangerates.org/api/latest.json?app_id=1234 | grep INR

Below is a screenshot of the outputs.

Output for filtered currency rates in Linux terminal. USD to INR and USD CAD currency exchange rates example outputs.


Thats it folks! Hope this helps! If you liked this tutorial, leave a comment down below and follow to get future updates ! 🙂

Spectre Vulnerability Proof of Concept

You must have heard the tech industry has been blowing up about Spectre and Meltdown for the past week. Here is a POC for Spectre that you can run in your Server/PC to check if you are vulnerable.

-Open up your Linux terminal and run the following:

mkdir exploit
cd exploit
git clone https://github.com/crozone/SpectrePoC.git
cd SpectrePoC

[Note: You would need packages gcc, make, build-essential to test the exploit. You could use “sudo apt-get install gcc make git build-essential -y” to install the packages.]

spectre exploit git POC git

[Optional: Review the spectre.c file and optionally modify the character string.

Spectre POC code - change string

[Optional: You can change the string between the double quotes. I have changed to the one below for this test]
Spectre POC modified string example

-Finally, compile and run the exploit:

gcc -o spectre spectre.c
./spectre

If you see the output which contains the characters that was stored in the *secret variable, then you are vulnerable to this exploit.Below is a sample output which indicates that the system is vulnerable to the Spectre vulnerability.

Code + Output Screenshot[Please click on the below image and open in a new tab/enarlge for better viewing]: Here, you can see the data (top to bottom in the red box) was read from a address space which the program was actually not allowed to read from.

Spectre POC exploit result and output

Output:

Spectre exploit POC output

Details of test system:

Kernel Version: 4.10.0-38-generic
Distro: Linux Mint 18.3 Sylvia – 64 bit
CPU Details:
Model: i7-4610M
cache size: 4096 KB
fpu: yes
fpu_execution: yes
clflush_size: 64
cache_alignment: 64
address sizes: 39 bits physical, 48 bits virtual

All credits go to the researchers who discovered and reported this issue => Jan Horn and Paul Kocher (along with Daniel Genkin, Daniel Gruss, Werner Haas, Mike Hamburg,Moritz Lipp, Stefan Mangard, Thomas Prescher, Michael Schwarz and Yuval Yarom).

A white paper on the exploit can be downloaded by clicking here.

If you liked this article, click on the ‘Like” button and Subscribe to my blog to get future updates. Cheers!

Sources, Credits & References:

Erik August
crozone github
Google Project Zero
SpectreAttack

How to check if a partition is primary in CentOS+Screenshots

This is a guide on how to check if a partition is primary in centos or not? Use the following command:

# parted /dev/sda print

parted /dev/sda print centos

Alternative:

# cfdisk /dev/sda

centos cfdisk sample output

As shown above, the field under “Part Type” would suggest if that partition is Primary/Secondary.

To exit out of the cfdisk menu, use your arrow keys and move the selection to “Quit” and hit Enter in your keyboard.

Source: Link

As always stay Happy! Happy Blogging! 🙂

ΞXΤЯ3МΞ

Make CentOS virtual machine in VirtualBox use the host’s VPN Connection

If your host PC (in my case Windows 10) is connected to a VPN but your CentOS 6.x VM is not using the VPN, then do the following:

1: Power off your CentOS VM.

2: Right click your centos machine in virtualbox and then click “Settings“.

right click your centos virtual machine and click settings (Screenshot)

3: Click “Network” and change the Adapter Settings to “NAT“.

change virtualbox network settings to NAT (Screenshot)

4: Now power on your centos virtual machine.

5: Once your VM boots up, login and then restart the network service. You can use the following CLI command “service network restart“.

Your CentOS virtual machine should now to able to use the VPN connection and use it accordingly. Do verify the same in your virtual machine. Hope this helps!

Do like and subscribe if this guide helped you. Cheers!

Protect against vulnerability CVE-2016-5696 in CentOS 6.8

This guide on how to protect against Off-path TCP vulnerability CVE-2016-5696 in a CentOS 6.8 machine.

Run the following command to check the kernel version that your box is running:

uname -r

Run the following to verify your Centos version details:

cat /etc/redhat-release

Below is a screenshot for the outputs for the above commands from my CentOS 6.8 box.

release information screenshot CentOS 6.8

Workaround against the attack:

Open your sysctl.conf file:

vi /etc/sysctl.conf

edit config file command CentOS 6.8

Below is a screenshot of my default sysctl.conf file which does not contain “net.ipv4.tcp_challenge_ack_limit”.

default sysctl.conf in CentOS 6.8

Now add the following line at the end of the config file:

net.ipv4.tcp_challenge_ack_limit = 999999999

Below is a screenshot after editing the config file.

edited-config-file screenshot in CentOS 6.8

Save and exit the file. (Press ESC and then type :wq and hit Enter in your keyboard).

Use the command below to verify if the value of net.ipv4.tcp_challenge_ack_limit is 999999999.

sysctl -p

sysctl -p in CentOS 6.8

If you are able to see the line in the above screenshot, this means that it will make the exploit extremely hard to perform (practically impossible). The above is a workaround to mitigating the Off-Path TCP attack in a CentOS 6.8 machine and will also work for redhat 6.8.

The Fix:

If you are not looking for the workaround but for a permanent fix, then you can upgrade your Linux kernel to 4.6 or above.

If this article helped you, do leave a comment below and like us on Twitter and Facebook. Cheers!

Source: Bobcares

References: Redhat Portal, Redhat Shared Ack Vulnerability

Use netcat to chat over LAN

This is quick guide on how to use netcat (nc) to chat between two PCs over LAN.

VM 1: CentOS 6.6

My CentOS machine did not have netcat (nc) preinstalled so I had to manually install it.

# yum install nc -y

VM 2: Kali Linux 2016.1 | IP: 192.168.1.11 |

The Kali Linux 2016.1 had netcat tools were pre-installed so i didn’t have to install it. Here, we take any one of the 2 Pcs as the chat server and the other as the chat client.

Here, I am selecting the Kali Linux to listen for connections on a random port 12345.  [Note: The port you select must be higher than the standard port 1024.]

In this case, I will make Kali as the chat server and set it to listen on port 12345.

# nc -lvp 12345

nc listening on port 12345

Now from the 2nd PC i.e. the CentOS machine, we will make a connection to the Kali machine on port 12345.

# nc 192.168.1.11 12345

Once connected, Kali’s terminal would show as message such as shown below:

nc accepting remote connection from LAN

Now, to start chatting type the text and hit ENTER in your keyboard to send chat messages between the two PCs. Pretty sweet uh?

nc output showing chat

FYI, There are practically tons of uses of netcat (nc) other than sending messages.

Other uses of netcat:

  • File Transfer: You can use to transfer file from one PC to another.
  • Port Scanning: Use netcat with the -z flag to run a port scan of the desired IP.
  • Clone & transfer entire partitions: This comes handy if you need to take a backup and transfer it to another PC in your LAN. You can use the dd command to clone a partition or an entire hard disk and then transfer it across to another PC.
  • Run a simple Web server.

Have you found any another use with netcat? Post it in the comment section down below. If your on a Linux machine, check out the man page for netcat for more info. Happy exploring!

If you liked this article, don’t forget to subscribe and follow us on Twitter and Facebook.

Source: Cybrary.it