How to fix “mysqld dead but subsys locked” EC2

My webserver’s mysqld service went down with the error message “mysqld dead but subsys locked”. The wordpress website was displaying the error “error establishing a database connection”. This is how I fixed it.

Upon visiting my website, I got the error message as shown below.

error establishing database connection ec2

Verify Issue – Check mysqld status:

To check the status of the mysqld database service, connect to your Amazon EC2 instance and then type the following command.

sudo service mysqld status
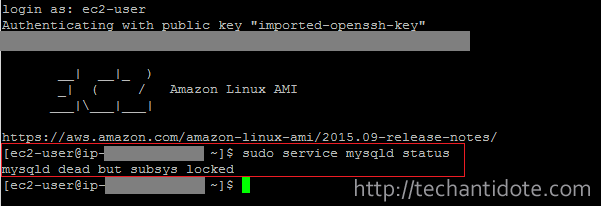
mysqld dead but subsys locked ec2

Investigate log files:

I checked my mysqld log files and found that the mysqld service was malfunctioning due to low memory.

sudo cat /var/log/messages | grep mysqld | less

check mysqld events in /var/log/messages
To check further events of mysqld , you can check mysqld.log using the following command:

sudo cat /var/log/mysqld.log | less

In my case, I found the mysqld service was panicking and got shutdown due to memory problems. [Note: The above outputs would differ from mine.]

Check if swap is present or not:

Run the below command to check if you have swap on your EC2 instance.

free -m

check if swap is present in ec2 using 'free -m' command

You can see here that Swap is 0. [Note: Swap is by default not created in your Amazon EC2 micro instance (free tier).]

Solution:

To resolve this issue, we need to create a swap file, mount it and make it persistent on boot.

Create swap file (1GB):

Type the following commands to create and activate the swap.

sudo dd if=/dev/zero of=/swapfile bs=1M count=1024

create swap file ec2

sudo mkswap /swapfile

mkswap command

Secure the swapfile:

To secure the swapfile from unauthorized access, type the following commands:

sudo chown root:root /swapfile

sudo chmod 600 /swapfile

chmod command to set swap file permission ec2


Finally, type the following command to load the swapfile and hit Enter.

sudo swapon /swapfile

Make swap persistent on boot:

To make the swap persistent on boot, edit the file /etc/fstab using the following command:

sudo vi /etc/fstab

Add the following at the end of the fstab file:

/swapfile swap swap defaults 0 0

Save and exit the file. Press ESC  and then type :wq and hit Enter.

Check if swap is active:

You can run the command below to check if swap is active or not.

free -m

check if swap is active free -m

As you can see highlighted section, the swap of size 1023MB is activated. It would use the swap file whenever necessary.

Restart / Start mysqld service:

You can type the following command to start the mysql service.

sudo service mysqld start

service mysqld start

Voila! You should now be able to access your website.

Change swappiness (Optional):

This step is purely optional. I would like my EC2 to use the RAM majority of the time and use the swap file when necessary. As you may know, its faster to access data from in the RAM rather than switching to the swap file which is stored in a mechanical drive in cloud.

sudo sysctl vm.swappiness=10

change swappiness

And that’s it folks, this should resolve the problem with the mysqld service crashing in your EC2 instance.

If this article helped you, do leave a comment below and follow us on Twitter, Facebook and Tumbler. You can also subscribe to our email subscription list to get latest updates right to your email. Cheers!

References: isitablog

Install Kali Linux in virtualbox (using ova file)

This is how I installed Kali Linux in virtualbox using the ova file method in my windows 10 PC along with its screenshots.

Requirements:

  1. Kali Linux 2019.1 Preinstalled ImageDownload Link (Torrent)  (~3.2 GB) [Updated link o latest Kali Version]
  2. VirtualBox: Download Link (~200 MB)
  3. CPU that supports Virtualization.
  4. Atleast 8GB of free disk space
  5. 7-zip: Download Link (~1.4 MB) [ Note: Winrar is another alternative you could use instead of 7-zip.]
  6. Virtual Box Extension Pack: Download Link (~22 MB) [Optional]

Installation Procedure:

The first thing you need to do is go ahead download and install Virtualbox in your system. Then download the Kali Linux ova file mentioned above and extract it using 7-zip or Winrar. The extracted file would be a .ova file format which is a pre-installed Kali Linux machine. Using a pre-installed file saves us a lot of time as we don’t have to go through the whole installation process.

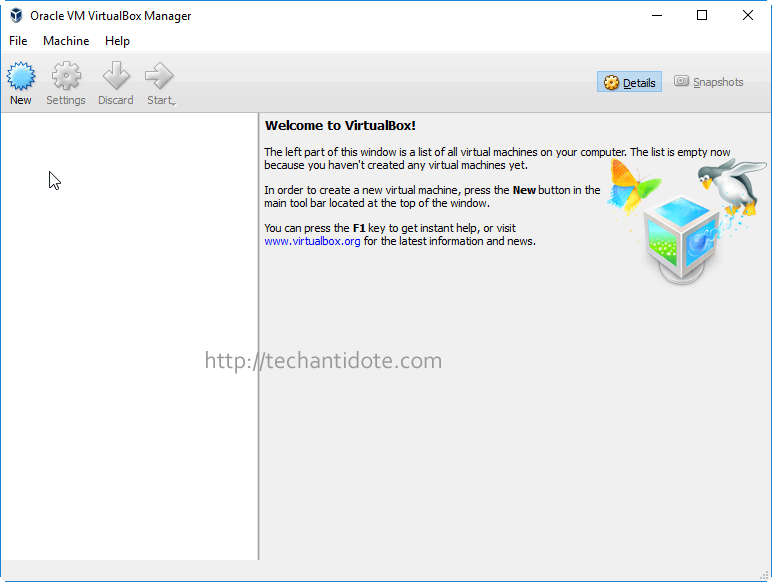
Now, open VirtualBox:

open virtualbox

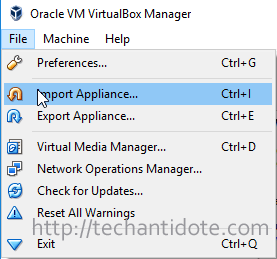
Then click on “File” and then click on “Import Appliance“.

click file import appliance

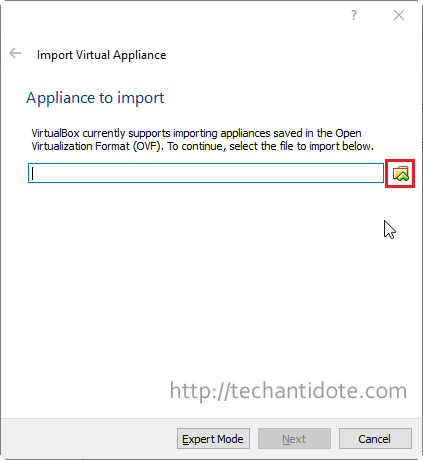
Click on the folder icon as shown below.

import ova file window

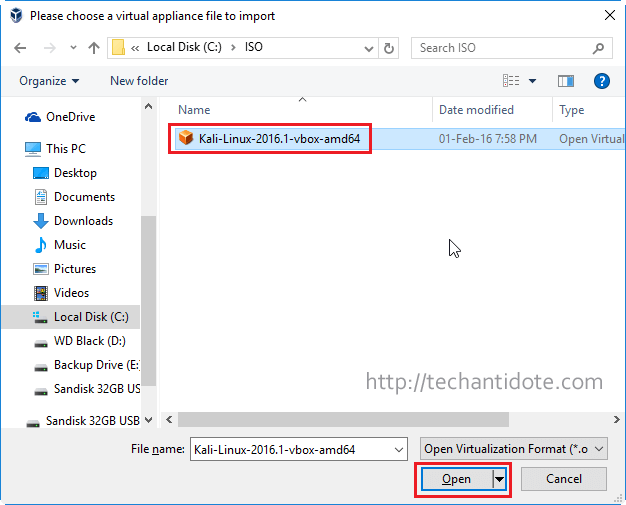
Now, browse to and select the extract .ova Kali Linux image file and click on “Open“.

select kali linux ova file

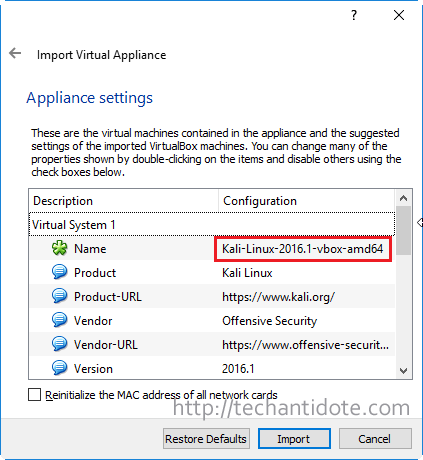
You would now see a window called “Appliance settings” where you can configure stuff like the name of your VM, the amount of RAM to be allocated to your Kali Linux VM etc.

kali linux appliance settings

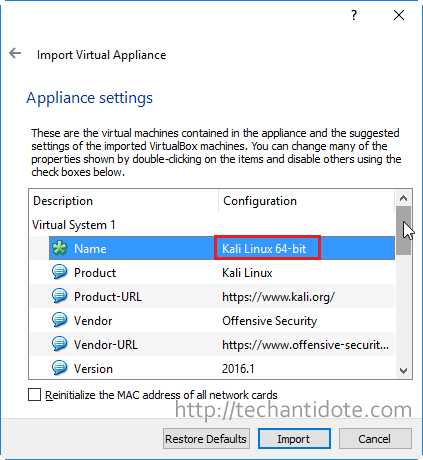
If you want to change the name of the VM, simply click on the text and you can change it according to your will.

changing vm name

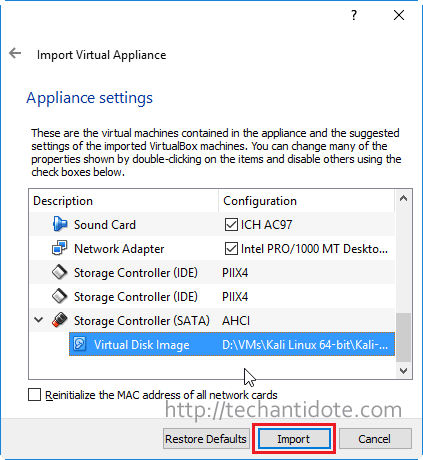
Finally, click on “Import” and wait for a few moments to import the Kali Linux Appliance.

click import to load kali linux appliance

importing kali linux appliance progress bar

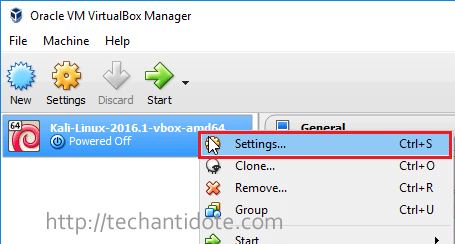
Now, right click on your Kali Linux Virtual machine as shown below and click on “Settings“.

open kali linux virtual machine Settings

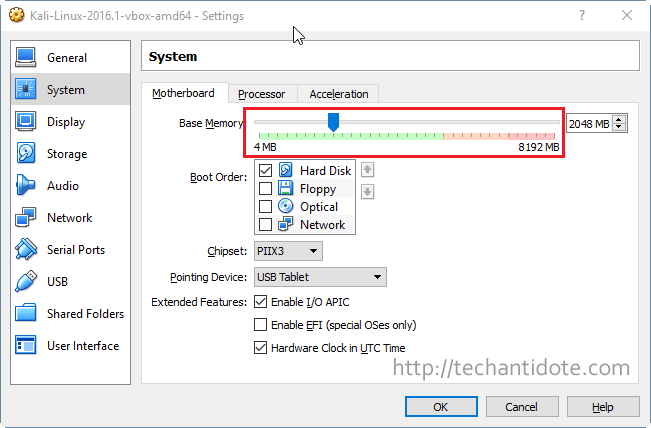
If you need to adjust the amount of RAM, click on “System” and you can move the slider accordingly. I would suggest atleast a minimum of 2048 MB (2GB) of RAM.

select ram for your Kali Linux VM

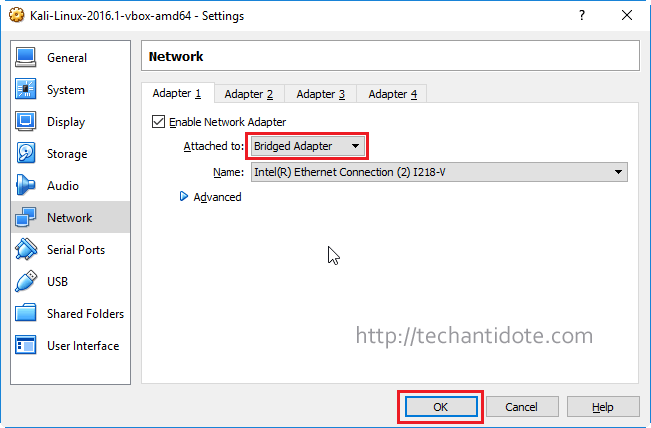
Now, click on “Network” as shown below and select “Bridged Adapter” and then click on “OK“.

Select Kali Linux network mode to Bridged Adapter

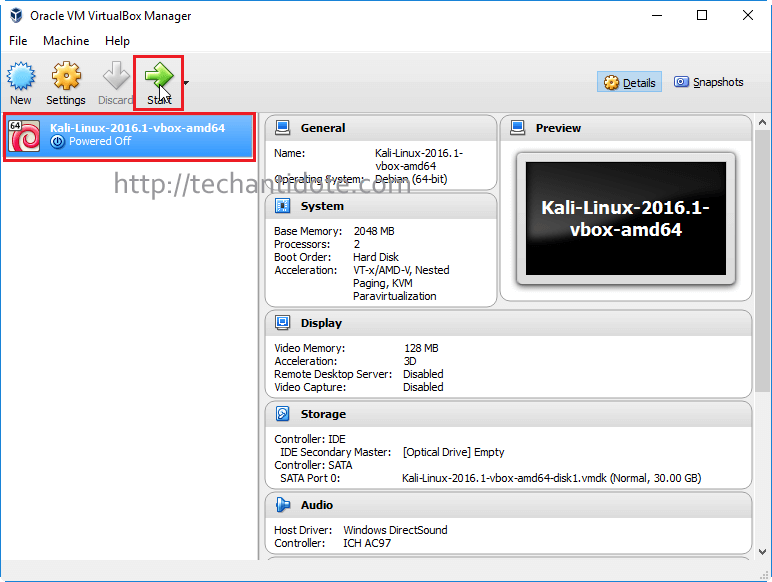
Click on your Kali Linux VM and then click on Start as shown below.

start kali linux in virtualbox

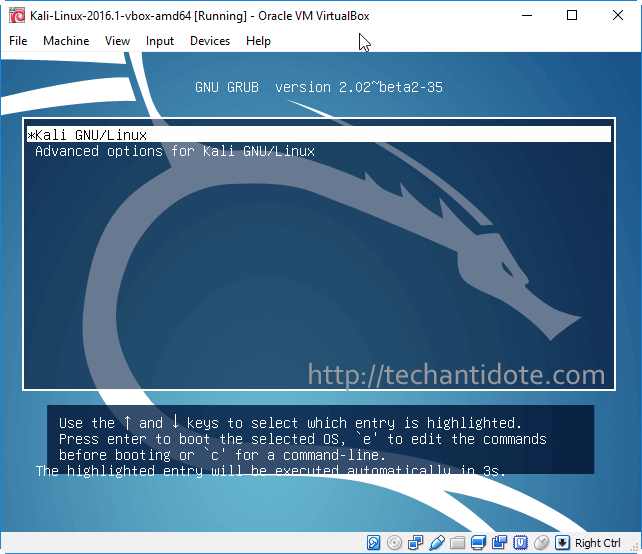
You should now be able to see the grub menu. Hit “Enter” in your keyboard.

kali linux grub menu

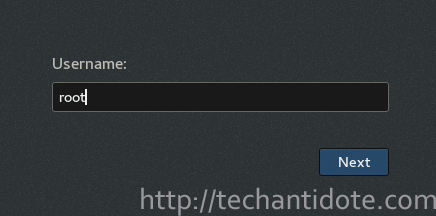
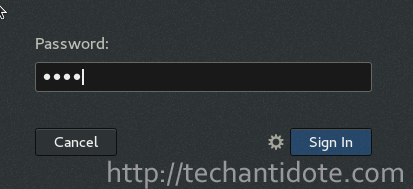
Now, login to your Kali Linux machine with the default username as root and password toor.

Note: If you are using newer Kali versions (from year 2020 ), the username and password is “kali”.

Ref: https://www.kali.org/docs/introduction/default-credentials/

kali username

kali password

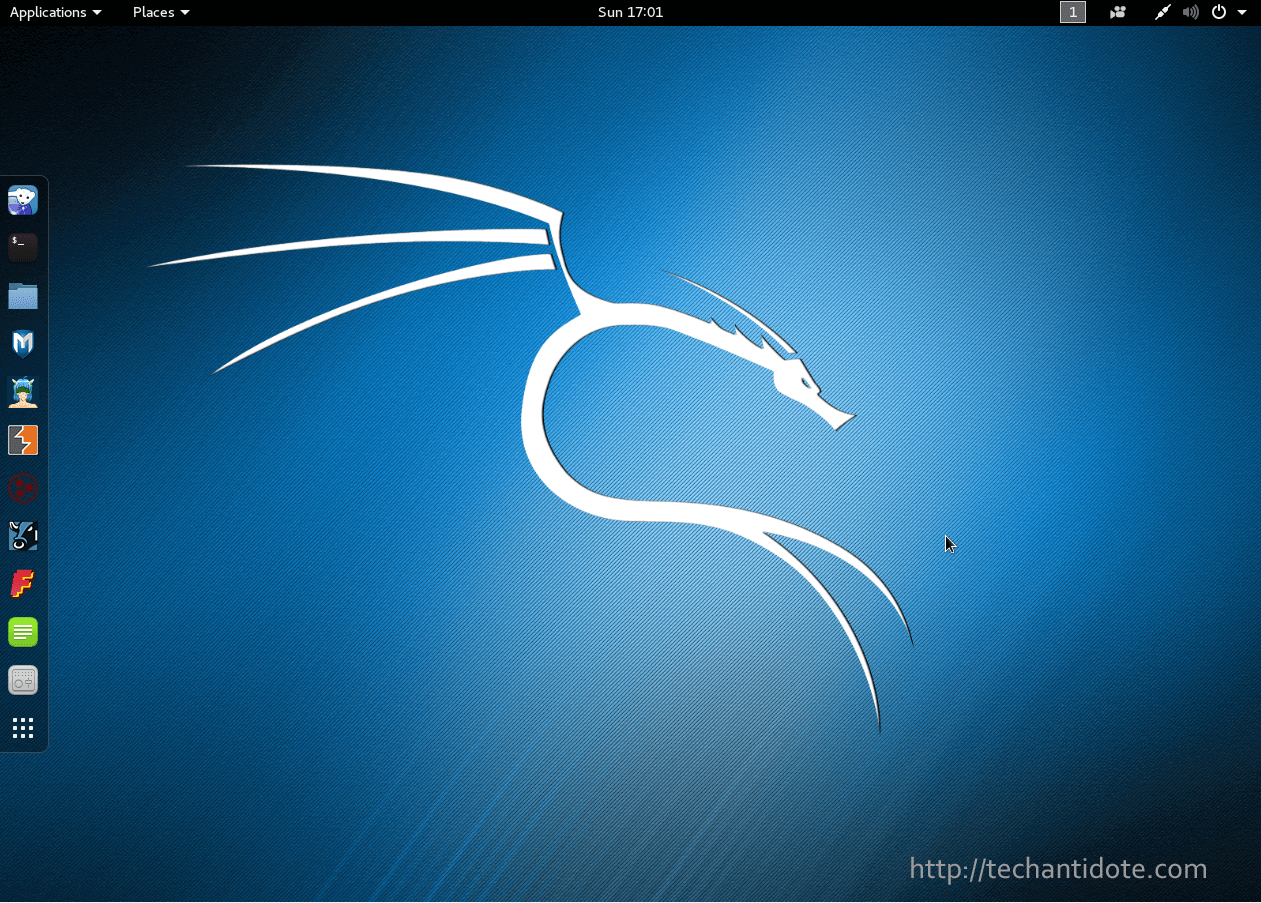
You should now be booted into your Kali Linux desktop.

kali linux logged in

Customize Kali (Optional): 

I would like to make some minor changes to make sure the VM is not interrupted during pen testing. This section is purely optional, you can skip to the next section if you don’t want to customize it.

Click on the triangle pointing downwards in the upper right corner and then click on the “Settings” icon.

Kali Linux drop down menu

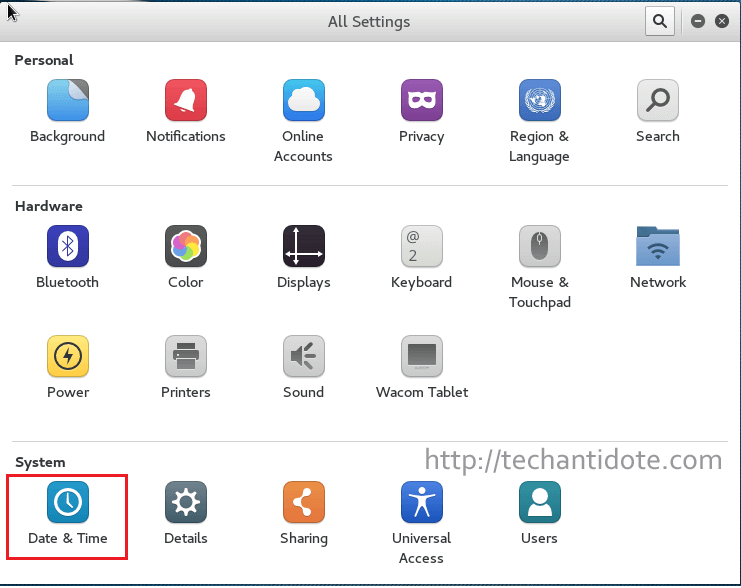
This will bring you the “All Settings” window as shown below. Click on “Date & Time“.

all settings menu

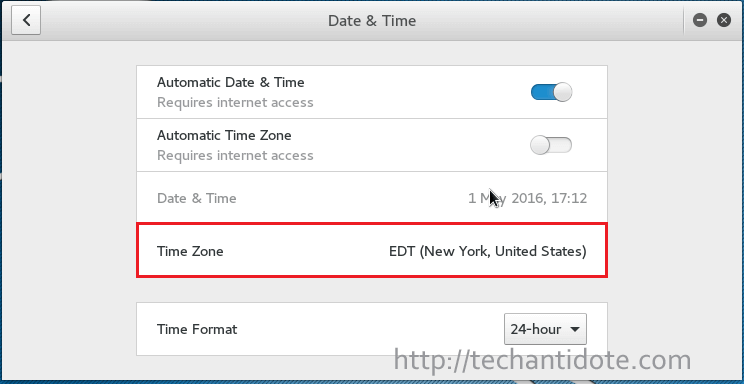
You can change the time zone to your time zone.

change time zone

Now, go back to the “All Settings” window and then click on “Privacy“.

select privacy in all setting menu

You would see a screen similar to the one below:

default privacy settings

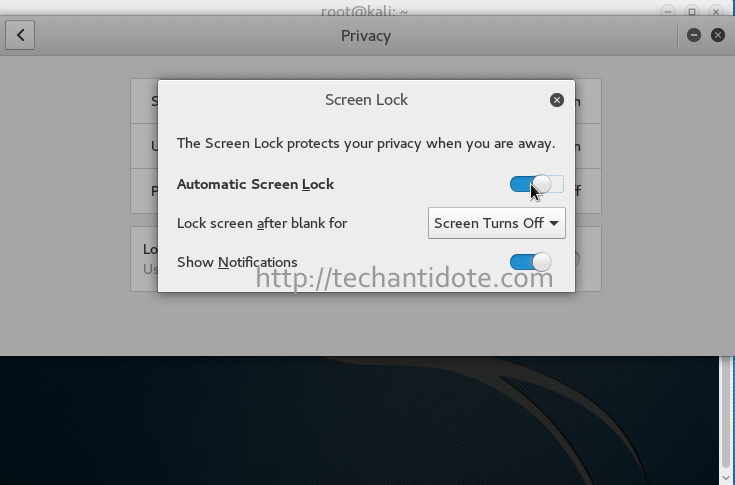
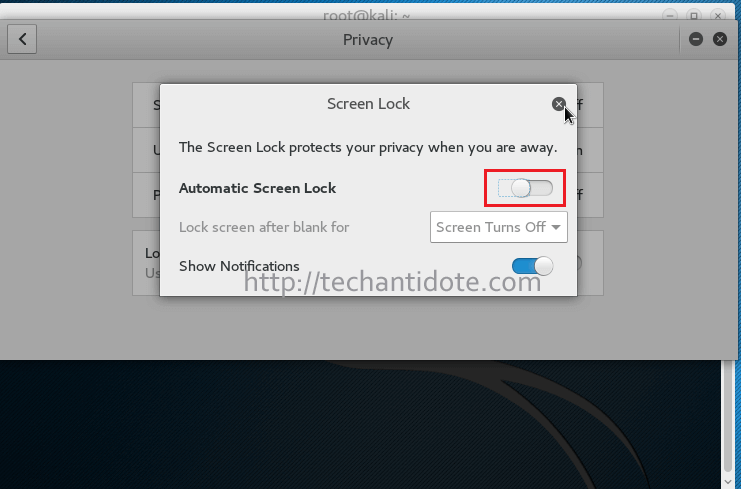
Now, disable “Automatic Screen Lock” by moving the slider.

disable auto screen lock

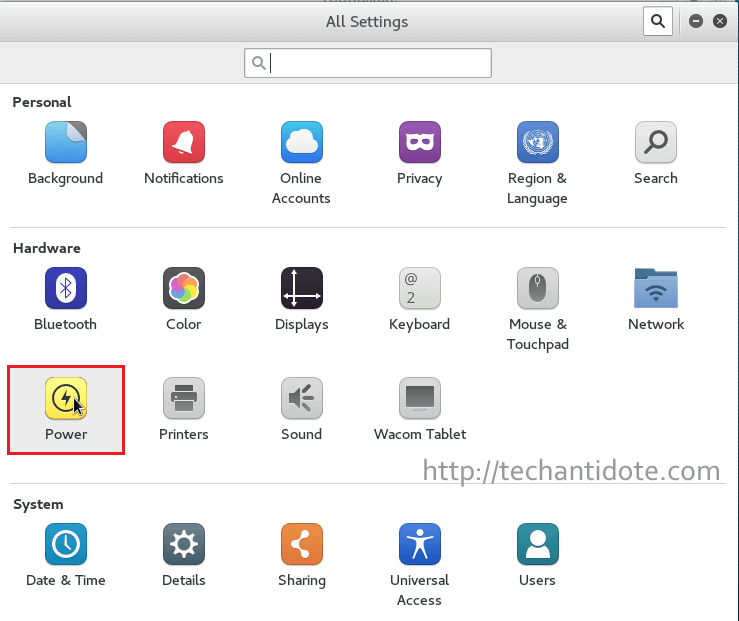
Go back to “All Settings“, then click on “Power“.

click on power in all settings

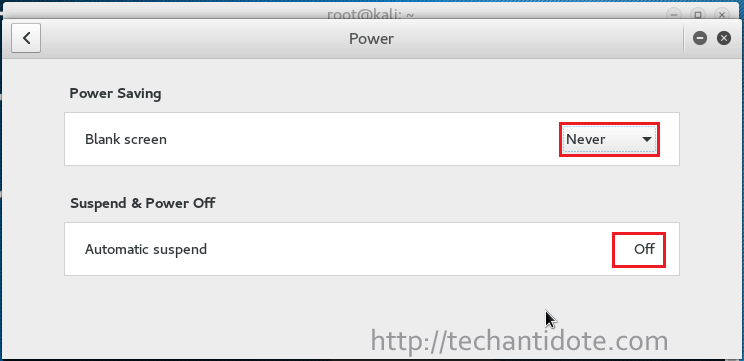
Now, select Blank Screen option as “Never” and turn off  “Automatic Suspend” as shown below.

disable blank screen and automatic suspend

Update Kali Linux:

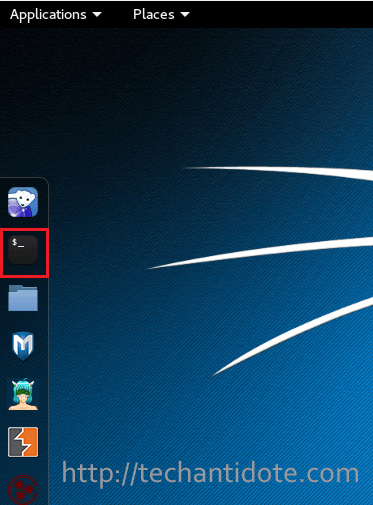
Open the terminal window by clicking on the icon as shown below:

open terminal

This is what the terminal window would look like in a Kali Linux system.

Kali Linux Terminal

Enter the following commands in the terminal to update your Kali Linux system.

apt-get clean && apt-get update -y
apt-get upgrade -y && apt-get dist-upgrade -y

This may take a while depending on your internet connection for the update to complete.

And that is it for setting up Kali Linux in virtualbox to get started with pentesting (only for ethical hacking and for purely educational purposes).

If you have any sort of queries regarding this installation, just leave a comment and will get back to you. I will be posting some ethical hacking tutorials in the future, so stay tuned.

WordPress 4.5 released! Here’s whats new

WordPress 4.5 has been released and some of the new features.

Logo Support in Theme Customizer:

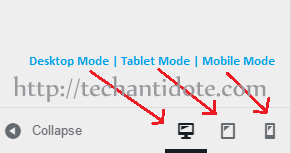
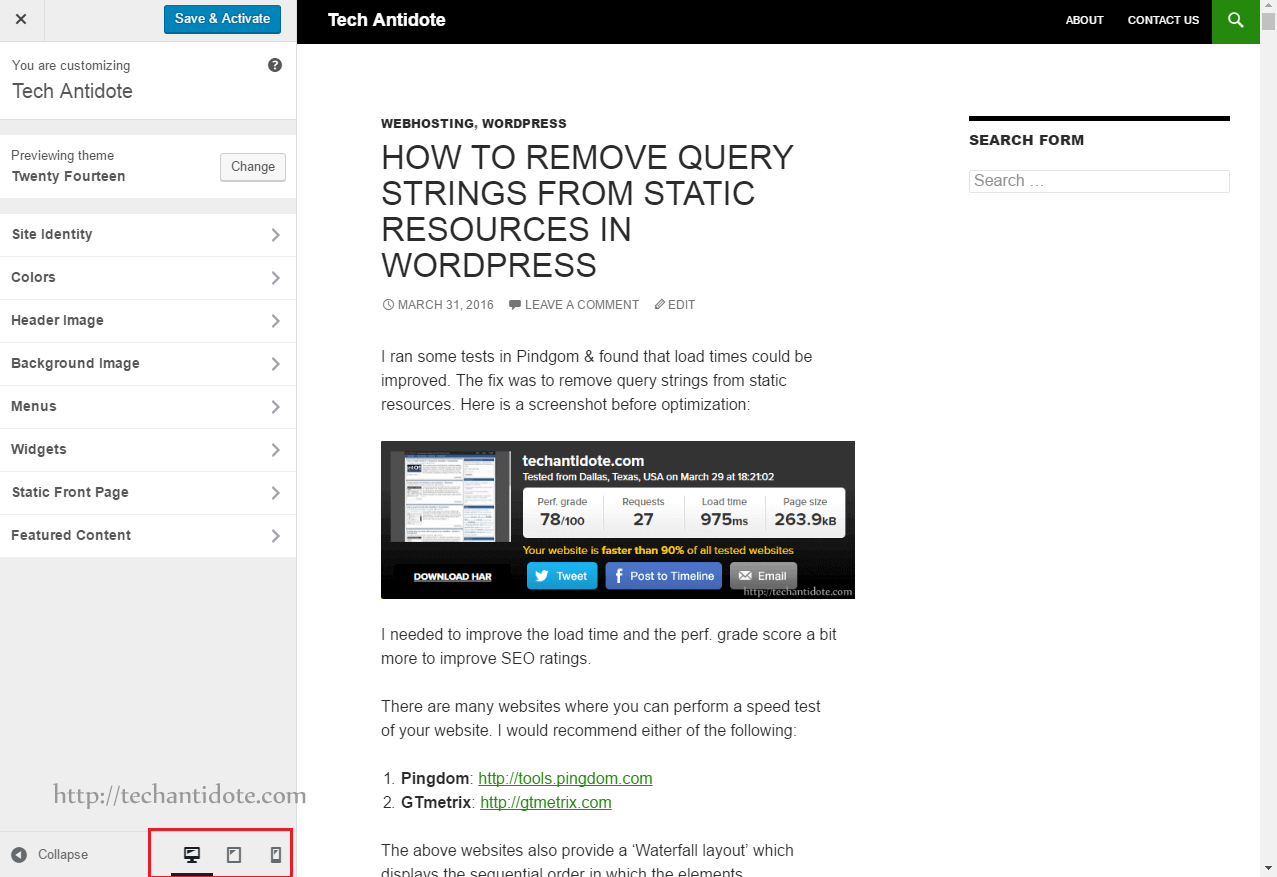
With wordpress 4.5, you can now see how the theme will look in a PC, tablet and mobile within the theme customizer itself. I have added a screenshot of how to check the different modes below.

wordpress 4.5 desktop, tablet and mobile mode selection

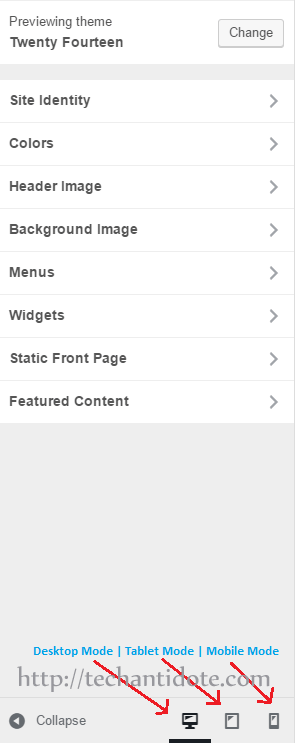
I have added some screenshots of theme customizer in different modes below.

WordPress customizer in Desktop Mode:

wordpress 4.5 customizer displaying theme in desktop mode

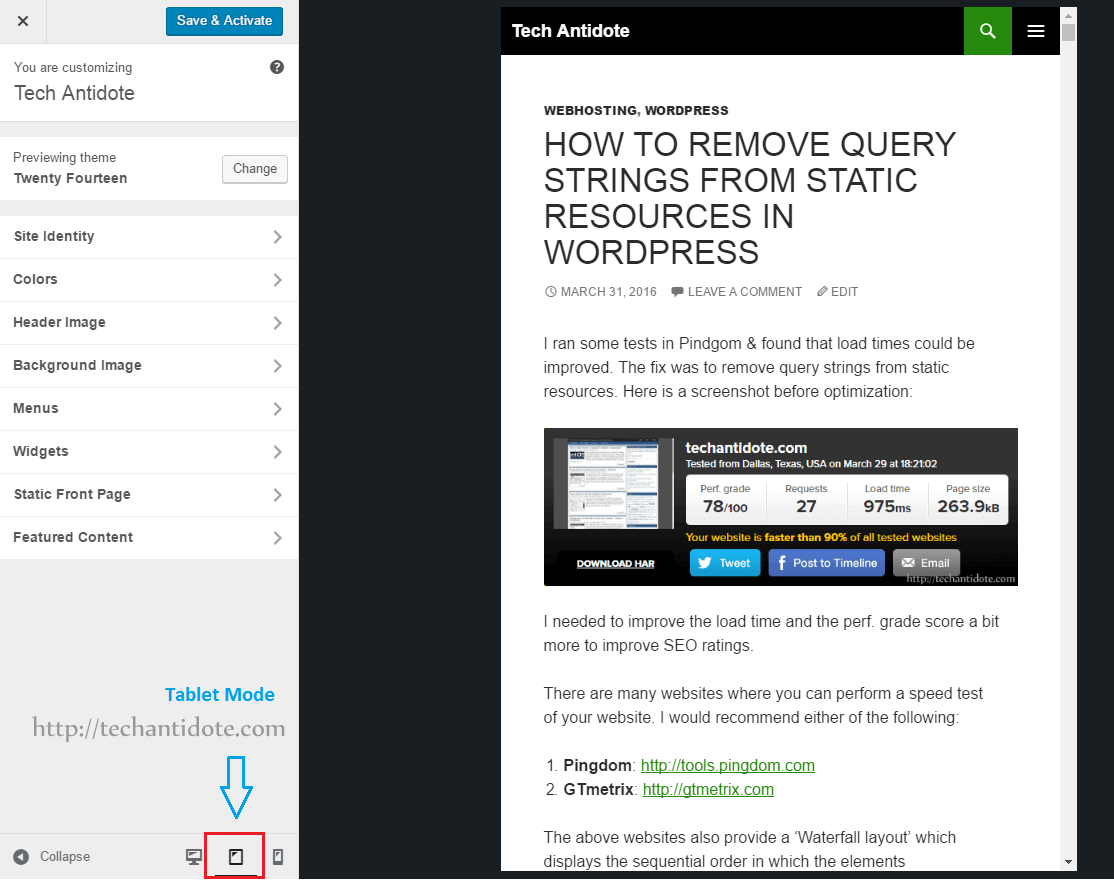
WordPress customizer in Tablet Mode:

wordpress 4.5 customizer displaying theme in tablet mode

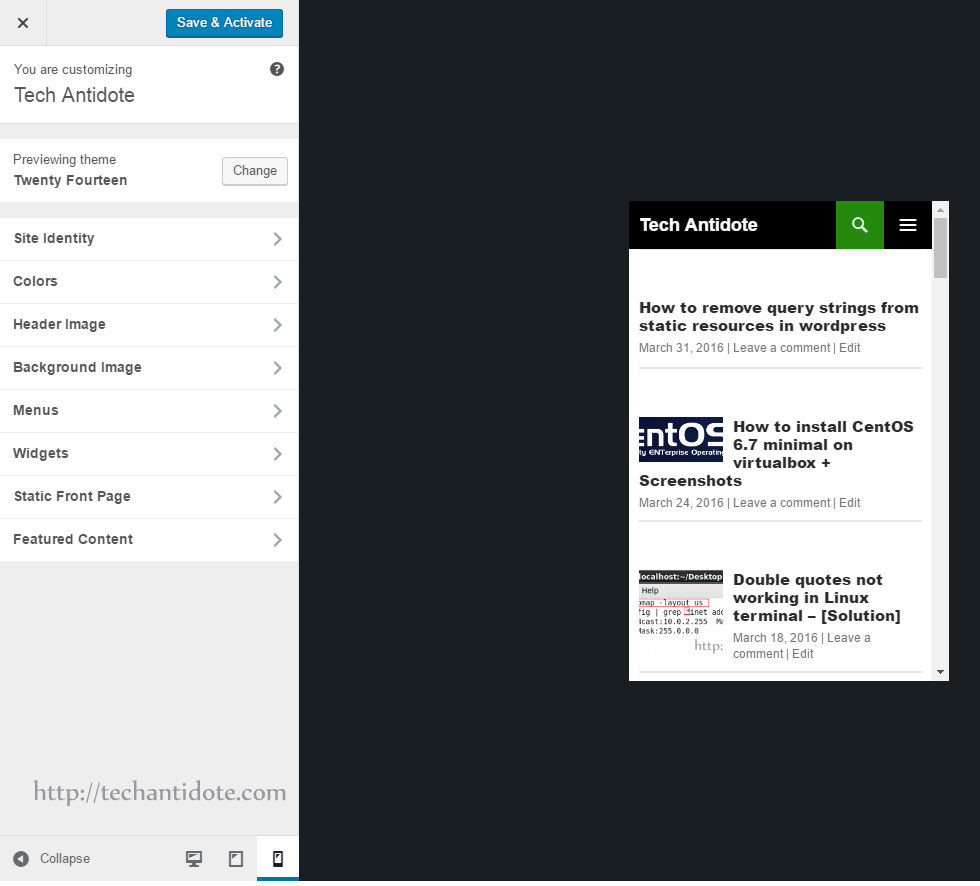
WordPress customizer in Mobile Mode:

wordpress 4.5 customizer displaying theme in mobile mode

Theme Logo upload feature:

You can upload a theme logo and add it using customizer itself. You can find in under the “Site Identity” section. [Note: Not all themes will have this capability. If your theme supports it, you will be able to use this feature. The theme ‘twenty sixteen’ wordpress theme supports adding theme logo, do check it out.]

wordpress 4.5 site logo upload option

New Visual Editor features:

Now, you can easily link to your previous articles by using the searching while you are in the visual editor page. To use this feature, click on the ‘Insert/Edit link‘ button then start typing to search for your previously published articles. Finally click on the desired article and it would be linked. Now that a sweet feature. I love it! What do think?

add link

Other Inline Text Shortcuts:

There are a few new shortcuts added with the new wordpress update. You can either choose to use them or disable shortcuts completely. According to the wordpress website, some of the shortcuts include:

— transforms to <hr />

Use `your code` to transform <code>my code</code>

Optimized Images:

WordPress 4.5 can now optimize images and reduce image size by almost 50% without reducing quality.  Personally, I use http://tinypng.com to optimize my images before uploading to wordpress to get the best possible results while preserving the original quality.

Comment Refinement:

In the new comment moderation for wordpress include several bug fixes and new features. Comment content will now be formatted for display instead of a block of escaped text. Other improvements for comment moderation include updated message styles.

There are also limits specified for the comment fields such as a comment can have a max 65525 characters. Similarly, name can be max up to 254 characters, email of 100 characters and URL of 200 characters.

Security during Installation:

Now wordpress 4.5 installations will generate keys and salts locally rather than using the wordpress.org API.

New Developer Features:

Selective Refresh:

This feature allows only specific portions to be refreshed rather than the whole page in the customizer. This makes live previews a whole lot faster.

Script Loader:

With wordpress 4.5, you can now add inline scripts using the wp_add_inline_script() function. Also according to wordress changelog, support for scripts with depenedincies in different groups have been added.

To see the entire list of change, bug fixes, features and other improvements you can visit wordpress blog post mentioned in the source down below.

If you liked this article, please share this article. Do like us on Facebook and follow us on Twitter to show your support. Feel free to leave a comment down below. Happy Blogging! Cheers!

Source: WordPressJoe McGill (WordPress)

How to remove query strings from static resources in wordpress

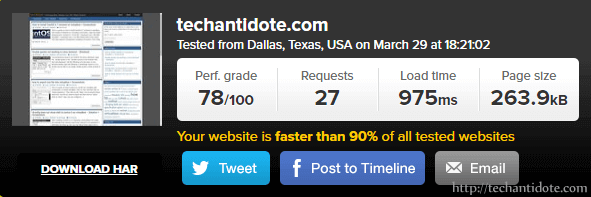
I ran some tests in Pindgom & found that load times could be improved. The fix was to remove query strings from static resources. Here is a screenshot before optimization:

before remove query strings from static resources - pingdom

I needed to improve the load time and the perf. grade score a bit more to improve SEO ratings.

There are many websites where you can perform a speed test of your website. I would recommend either of the following:

  1. Pingdom: http://tools.pingdom.com
  2. GTmetrix: http://gtmetrix.com

The above websites also provide a ‘Waterfall layout’ which displays the sequential order in which the elements are loaded(starting from the DNS query, the wait times, load times etc). I used pingdom instead of Gtmetrix as I was able to select the server location from which the test was being conducted which made it more flexible. Now, lets gets started!

[Disclaimer: Only attempt this if you know what you are doing and make sure you have a full backup of your website just incase something goes wrong.]

To remove query strings from static resources:

Add the following to your wordpress theme’s functions.php file and save it.

/*** Remove Query String from Static Resources ***/
function remove_cssjs_ver( $src ) {
 if( strpos( $src, '?ver=' ) )
 $src = remove_query_arg( 'ver', $src );
 return $src;
}
add_filter( 'style_loader_src', 'remove_cssjs_ver', 10, 2 );
add_filter( 'script_loader_src', 'remove_cssjs_ver', 10, 2 );

After adding the above code, I ran a speed test in pingdom to check if there was any performance improvement. As expected, the perf. grade score increased from 78/100 to 84/100 and the load time reduced to 286ms from 975ms. Yaay!!

after- remove query strings from static resources - pingdom

Also, note that if in the future you update your wordpress theme, the functions.php may also be updated/replaced. So you may need to verify and re-do this step again to make sure its persistent after the theme update.

There are plugins that do the same procedure to make things easier, but I prefer the manual way as installing a lot of plugins can slow down your website.

Have you optimized your wordpress site? Feel free to leave a comment below. Do subscribe for future updates. Happy Blogging!

[Source: Technumero, WordPress forums ]

How to install CentOS 6.7 minimal on virtualbox + Screenshots

This is a guide on how to install CentOS 6.7 minimal on virtualbox (text mode) in Windows 8.1 including screenshots. Hope this helps!

Requirements:

  1. CentOS 6.7 32-bit ISO : Download Link (~354 MB) {Note: Download the minimal version.}
  2. VirtualBox : Download Link (~114 MB)
  3. Atleast 8GB of free space
  4. CPU that supports Virtualization

Installation Procedure:

First, thing we need to  do is to set up Virtual Box. Go ahead download and install Virtual Box (the download link is given above in the requirements).

Open VirtualBox and click on “New“.

Click on "New" to create VM

Type in “Name” as anything you like. I have named mine as “CentOS 6.7 minimal (32-bit)“. Make sure that the “Type” is “Linux” and the “Version” is “Redhat (32-bit)” as we have downloaded the 32-bit version of CentOS. Then click on “Next“.

select type as "Linux" and Version as "Red Hat (32-bit)"

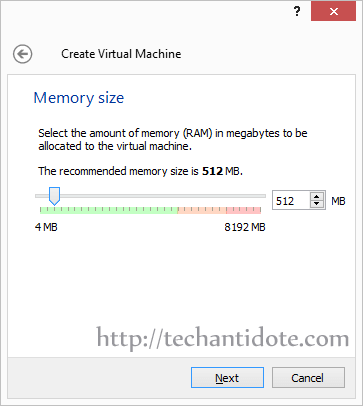
Now, select the amount of memory /RAM you need to allocate to your CentOS virtual machine. For this installation, allocate 512 MB of RAM for text mode installation and then click on “Next“.

select 512mb RAM

You can now click on “Create a virtual hard disk now” and then click “Create“.

Click "Create a virtual hard disk now"

Now, select the first option “VDI (VirtualBox Disk Image)” and then click on “Next“.

Select VDI

Select “Dynamically Allocated” and then click on “Next“.

Select "Dynamically allocated"

You can now select the size of the hard disk you need to allocate for your CentOS virtual machine and then click on “Create“. I would suggest a minimum of “8 GB”.

[Optional: If you need to change where the hard disk file is to be saved, you can click on the folder icon in the green box and change it accordingly.]

Provide atlease 8gb hard disk space

Now, click on the CentOS virtual machine that you created and then click on “Start” as shown below.

Select CentOS VM and click Start

We need to provide the CentOS ISO file we downloaded earlier to Virtualbox for the VM to boot from the ISO image. You can do this by clicking on the folder icon as shown below and then selecting the CentOS ISO file and then clicking on “Open“.

Click on folder icon

Select ISO file and click Open

Once, you have selected the ISO file, you can click on “Start“.

click start

The virtual machine will now boot from the provided CentOS ISO image and you will be presented with the boot menu as shown below. Select the first option “Install or upgrade and existing system” and hit Enter in your keyboard.

Select "Install or upgrade and existing system"


booting progress

[Note: In this mode (i.e the text mode), you can use the arrow keys in your keyboard or the TAB key in your keyboard to move through different options and Enter to confirm selection.]

Now, use your arrow key/ TAB key to select option “Skip” and hit ENTER in your keyboard.

select "Skip" and hit Enter

Installation starting

You will see a message “Welcome to CentOS!” with an “OK” button. Hit Enter in your keyboard.

hit Enter

Select the language as “English” and hit Enter.

Select "English" and hit Enter

Select the keyboard layout as “us” and hit Enter.

select us keyboard

Now, you will get a Warning message “Error processing drive“. Select the last option “Re-initialize all” using arrow/ TAB keys and hit Enter.

Select "Re-initialize all" and hit Enter

Now, make sure you select the right time zone. You can use the arrow keys to cycle down each entry or you can use the Page UP/ Page Down key in your keyboard to cycle through the list quickly. After you have selected the Time Zone, select “OK” and hit Enter in your keyboard.

Select "Time Zone"

Now you need to create a root password for your CentOS virtual machine. Finally select “OK” and hit Enter.

Enter password for root account

Select the first option “Use entire drive“, then select “OK” and hit Enter in your keyboard.

Select "Use entire drive"

Hit Enter

Select “Write changes to disk” and hit Enter.

Select "Write changes to disk"

This will now install all the required packages. It would take a few minutes depending on the speed of your computer.

Installation progress

Once installation is complete you will be prompted with a “Reboot” button. Hit Enter for the CentOS virtual machine to restart.

Select "Reboot"

centos virtual machine rebooting

You should see the CentOS booting progress as shown below.centos boot screen

You will now be prompted with the login screen.

centos login prompt

Now, type the username as “root” and hit ENTER in your keyboard. Then type in the root password that you created during installation and hit Enter. Upon successful login, you will see the bash prompt with # symbol at the end.

succesfully logged in as root

And Voila! You have successfully installed CentOS 6.7 minimal in VirtualBox using text based installation method. I will be creating another post on how to configure the network manually in CentOS 6.7 using the terminal.

If you have any queries regarding this installation, feel free to leave a comment below and will get back to you. Do subscribe to my blog get future updates! 🙂

Double quotes not working in Linux terminal – [Solution]

I encountered an issue in my CentOS VM where whenever I type the  (single quote) or the  (double quotes) in the terminal, they don’t get displayed. I did the following to fix the issue:

In your terminal window, type the following:

# setxkbmap -layout us

You should now be able to use single, double quotes or tilde symbols in your terminal.

The above command simply changes the keyboard layout to English (US) and this is under the assumption that you are actually using a English (US) keyboard in your PC.

[Note: English (US) layout is different from English (US) International keyboard layout].

You can check the screenshot below for reference.

setxkbmap -layout us

Thanks and credits to this post that helped me resolve this issue.

Feel free to leave a comment in the comments section down below. Happy troubleshooting! Cheers!

how to import ova file into virtualbox + Screenshots

This is a guide on how to import an ova file into virtualbox with screenshots.

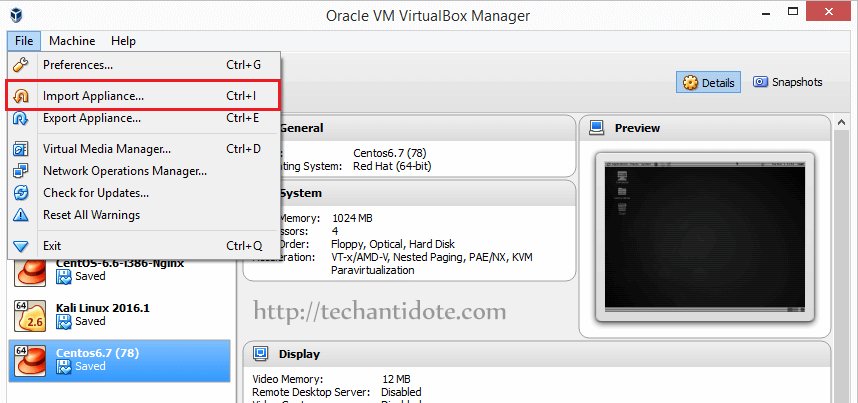
In Oracle virtualbox, click on “File” and then click on “Import Appliance“.

import ovi file into virtualbox

Then click on the “folder” icon as shown below:

select ovi file

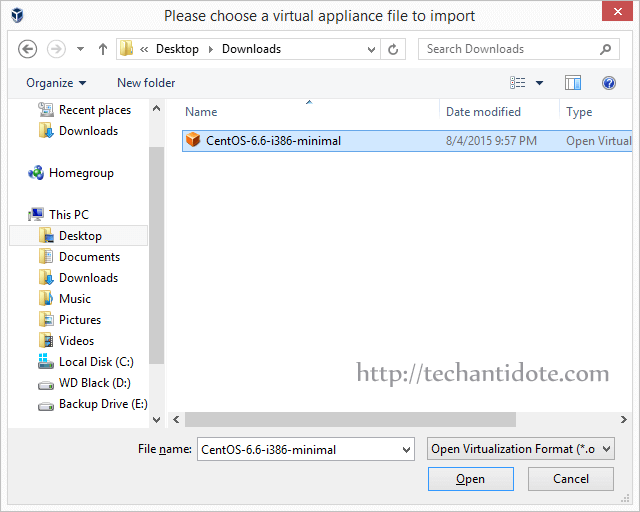
Select the .ova file you need to import and then click on “Open“.

browse to ovi location

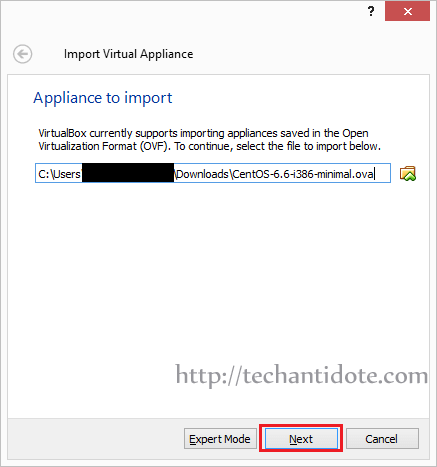
Click on “Next“:

ovi file selected, click next

importing

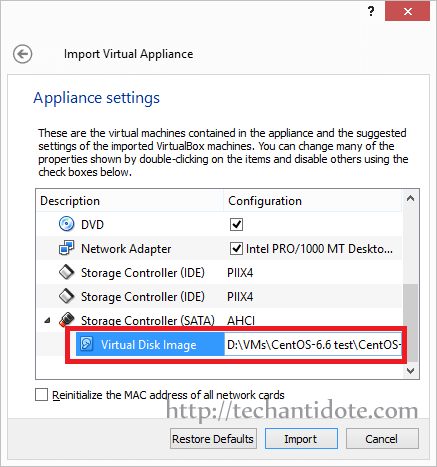
Now, you can configure the options, such as change the virtual machine’s name which is optional as show below:

change VM name if needed

You can also change the location of your virtual machine’s hard disk if needed by changing the location field.

change virtual machine's hard disk location if needed

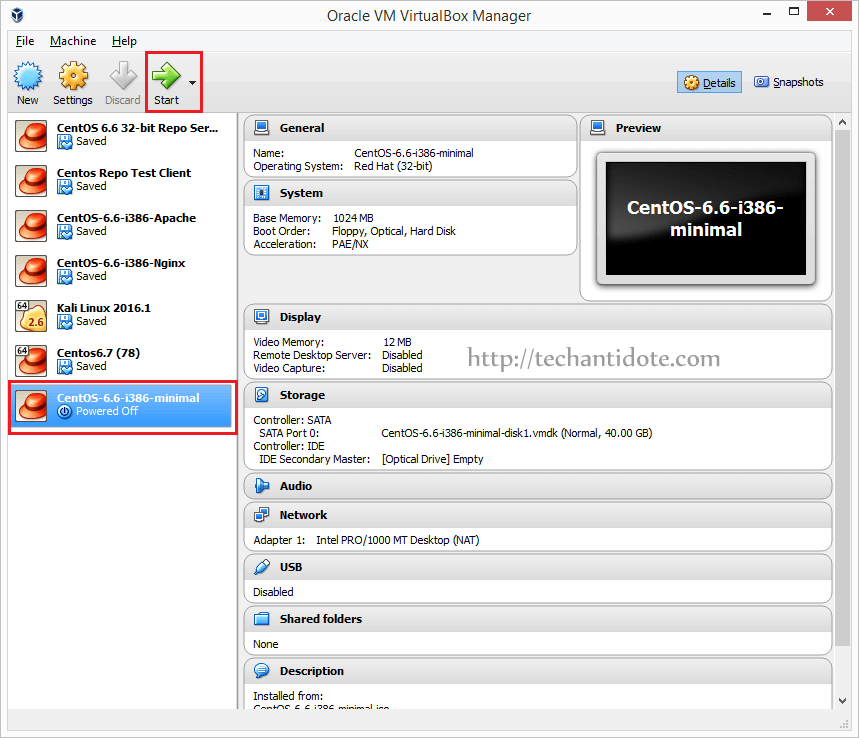
Now, you can go ahead and start you VM.

VM created, select and then click start

Wohoo! You have successfully imported your ova file into virtualbox.

If this article helped you, do share this by clicking on the share buttons you see in this page. If you have any queries feel free to leave a comment below and I will get back to you! Happy Virtualization!

Source: Link

ifconfig does not show eth0 in centos 6 on virtualbox – Solution + Screenshots

After installing CentOS 6.x or importing a preinstalled VDI image (for example from osboxes.org) if your network is not working or if eth0 does not show up, then you can follow these steps to fix it:

Step 1Inspect ifconfig output

Run the following command:

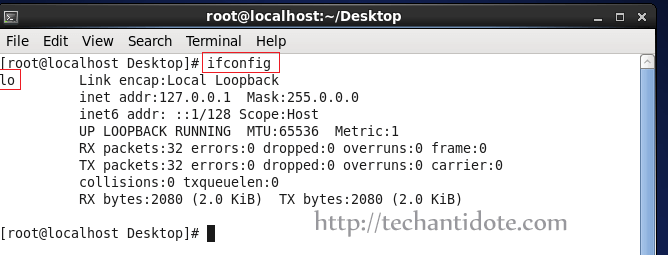
ifconfig

ifconfig no eth0

As you can see it shows only the output for loopback interface lo.

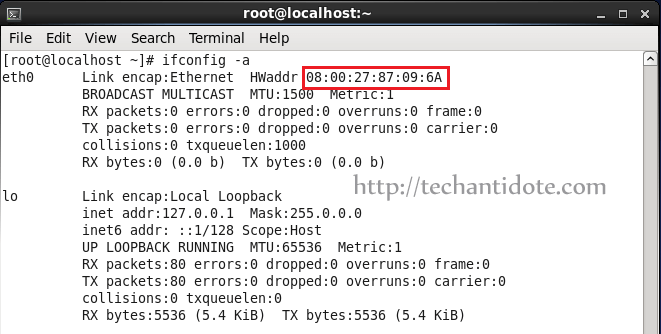
To find all interface information and MAC for eth0, run the following command:

ifconfig -a

Now, take a note of the MAC Address that you see in your screen as you will need it soon.

eth0 mac address

Step 2: Manually configure eth0 and network settings:

Type the following in your terminal:

vi /etc/sysconfig/network-scripts/ifcfg-eth0

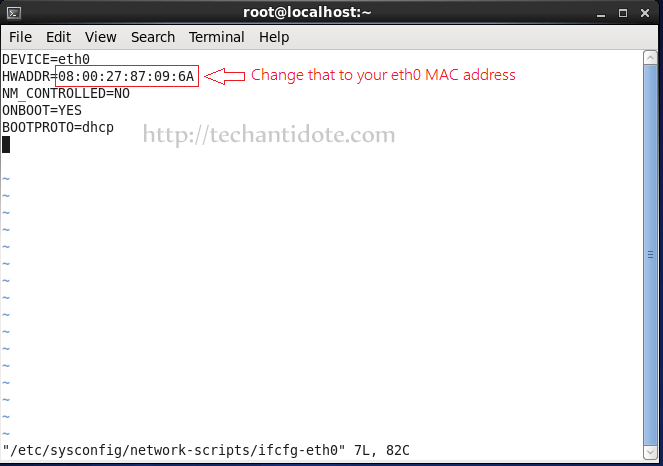
Change/edit the ifcfg-eth0 as the following, and make sure the HWADDR value is the MAC address that you took a note earlier.

DEVICE=eth0
HWADDR=08:00:27:87:09:6A
NM_CONTROLLED=NO
ONBOOT=YES
BOOTPROTO=dhcp

So, it will finally look something like picture attached below.

ifcfg-eth0 configuration fileTo edit your network file, type the following command:
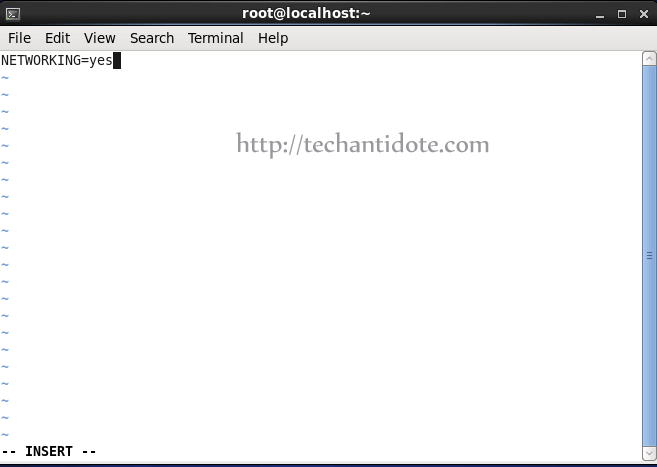
vi /etc/sysconfig/network

Now, add the following line if its not already present to the file:

NETWORKING=yes

/etc/sysconfig/network file

Save the file and exit.

Step 3. Restart network service

service network restart

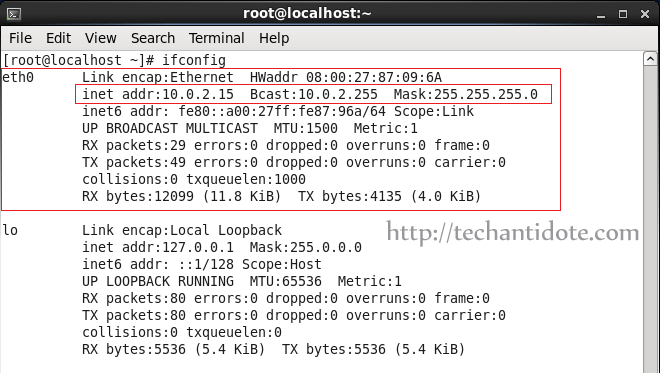
This should fix the issue and your eth0 interface should popup in no time as shown below.

service network restart no output fixed

You can also check the IP address information using ifconfig to check the assigned IP address.

ifconfig

eth0 ifconfig output solved

Hope this helps! If you found this article helpful, do share this article by clicking on the sharing icons you see in your screen.

Feel free to leave a comment below if need any further help and will get back to you as soon as possible. Subscribe for future updates!

Source: Link

How to install apache from source in Centos 6.7

This is a simple guide on how to configure Apache from source in Centos 6.7 + installing APR, APR-UTIL and PCRE to make it work.

Step 1. Install gcc:

Open up your terminal window and type the following command:

yum install gcc gcc-c++

Now, change to following directory:

cd /usr/src/

Step 2: Download and configure APR :

To download the APR file, use the below command:

wget http://a.mbbsindia.com//apr/apr-1.5.2.tar.gz

Now extract the downloaded file:

tar -zxvf apr-1.5.2.tar.gz

Change to the extracted folder and run the following commands to configure apr:

cd apr-1.5.2
./configure –prefix=/usr/src/apr
make
make install

Step 3. Download and configure apr-utils:

Change to following /usr/src/ directory:

cd /usr/src/

To download the APR-UTIL file, use the below command:

wget http://mirror.fibergrid.in/apache//apr/apr-util-1.5.4.tar.gz

To extract file, change to extracted folder and to configure apr, run the following commands:

tar -zxvf apr-util-1.5.4.tar.gz

cd apr-util-1.5.4
./configure –prefix=/usr/src/apr-util –with-apr=/usr/src/apr/
make
make install

Step 4. Download and config PCRE:

Change to /usr/src/ directory:

cd /usr/src/

To download pcre2-10.21.tar.gz type the following your terminal:

wget ftp://ftp.csx.cam.ac.uk/pub/software/programming/pcre/pcre2-10.21.tar.gz

To extract file, change to extracted folder and to configure pcre2-10.21, run the following commands:

tar -zxvf pcre2-10.21.tar.gz

cd pcre2-10.21
./configure –prefix=/usr/src/pcre2
make
make install

Step 5. Download Apache / httpd:

Now, change to following directory:

cd /usr/src/

To download httpd tar ball type the following your terminal:

wget http://a.mbbsindia.com//httpd/httpd-2.4.18.tar.gz

To extract file, change to extracted folder and to configure httpd, run the following commands:

tar -zxvf httpd-2.4.18.tar.gz

cd httpd-2.4.18
./configure –prefix=/usr/local/apache2 –with-apr=/usr/src/apr –with-apr-util=/usr/src/apr-util –with-pcre=/usr/src/pcre2/bin/pcre2-config
make
make install

Step 6. Start and test your apache server 

service httpd start
httpd -v

You can also open your browser and go to:

http://localhost/

And it should give you the Apache Welcome page.

And Voila! You have successfully configured apache from source. Hope this helps!

[DISCLAIMER: This guide is strictly for the purpose of learning how to configure apache from source for beginners. This should not to be used in a real production server as no security measures has been discussed or implemented in this tutorial.]

If you liked this article, do leave a comment below. You can also share this article by clicking on the social media buttons below. 

Source: ApacheTroubleshooting source: APR troubleshooting

Most powerful Ubuntu phone: Meizu PRO 5 Ubuntu Edition

The world’s most powerful Ubuntu phone “Meizu PRO 5 Ubuntu Edition” has just been launched with some serious hardware. Take a look at the specs below:

  • 8 core Exynos 7420 processor and MALI T760 GPU.
  • 32GB of internal memory.
  • 3GB LPDDR4 RAM.
  • 5.7 inch 1080p screen with a re-tuned delta cool color AMOLED screen.
  • Corning Gorilla Glass 3 with improved damage resistance and toughness.
  • 21.16 megapixel rear-facing camera with PDAF phase laser-assisted focusing and LARGAN 6P lenses for improved resolution.
  • 5 megapixel front-facing camera.
  • Hi-Fi Sound.
  • Slots for two micro-SIM cards.

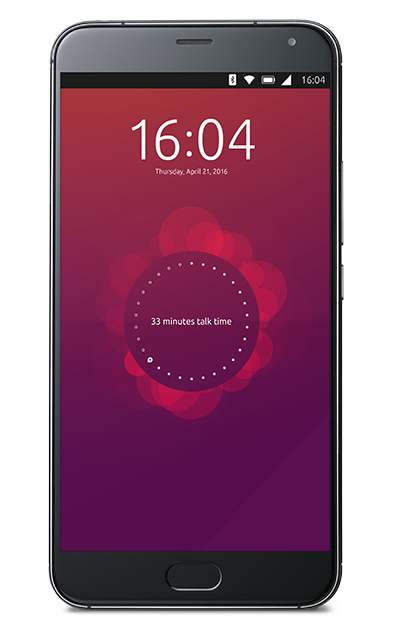
meizu Pro 5 ubuntu phone picture
Image: Meizu Pro 5 Ubuntu Edition [Credits: Ubuntu.com]
This device as you all know is joint initiative of Canonical and Meizu and have had successful launches of Ubuntu phones in the past. The launch of the device will definitely conquer hearts of all Linux lovers (myself included).

The company states that the phone is running the latest code and is capable of providing a desktop experience (which basically allows you to connect your phone to a monitor and use it as a normal desktop). This phone weights about 168 grams with dimensions of 156.7x78x7.5 mm. Also, the Meizu Pro 5 ubuntu phone does not support MHL output. It does come with applications such as Instagram, Twitter, Telegram and Soundcloud.

The phone is available for pre-order during the Mobile Congress 2016 event.

What do I think of this?:

  • Dayyymmm!! I need me one of those!!!

If you are an Android or Apple user, would you switch to the Ubuntu phone? Feel free to leave a comment below!

Do share this article on Facebook, Twitter, Google+ by clicking on share buttons in this page. And don’t forget to subscribe to get latest updates! Stay Tuned! 🙂

Source: Ubuntu, Image Source & Credits: Ubuntu Phones

‎ | LINUX | Tech | Security |