How to check if a partition is primary in CentOS+Screenshots

This is a guide on how to check if a partition is primary in centos or not? Use the following command:

# parted /dev/sda print

parted /dev/sda print centos

Alternative:

# cfdisk /dev/sda

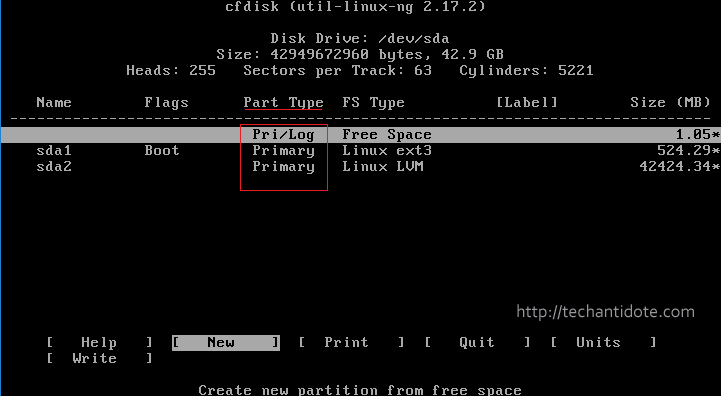
centos cfdisk sample output

As shown above, the field under “Part Type” would suggest if that partition is Primary/Secondary.

To exit out of the cfdisk menu, use your arrow keys and move the selection to “Quit” and hit Enter in your keyboard.

Source: Link

As always stay Happy! Happy Blogging! 🙂

ΞXΤЯ3МΞ

Make CentOS virtual machine in VirtualBox use the host’s VPN Connection

If your host PC (in my case Windows 10) is connected to a VPN but your CentOS 6.x VM is not using the VPN, then do the following:

1: Power off your CentOS VM.

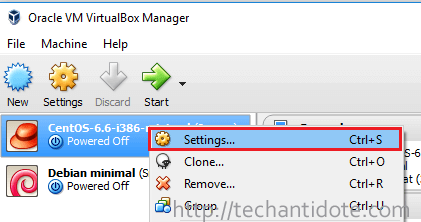
2: Right click your centos machine in virtualbox and then click “Settings“.

right click your centos virtual machine and click settings (Screenshot)

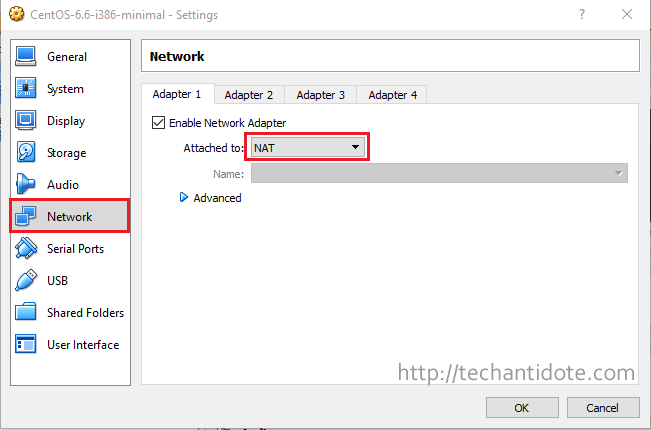
3: Click “Network” and change the Adapter Settings to “NAT“.

change virtualbox network settings to NAT (Screenshot)

4: Now power on your centos virtual machine.

5: Once your VM boots up, login and then restart the network service. You can use the following CLI command “service network restart“.

Your CentOS virtual machine should now to able to use the VPN connection and use it accordingly. Do verify the same in your virtual machine. Hope this helps!

Do like and subscribe if this guide helped you. Cheers!

Protect against vulnerability CVE-2016-5696 in CentOS 6.8

This guide on how to protect against Off-path TCP vulnerability CVE-2016-5696 in a CentOS 6.8 machine.

Run the following command to check the kernel version that your box is running:

uname -r

Run the following to verify your Centos version details:

cat /etc/redhat-release

Below is a screenshot for the outputs for the above commands from my CentOS 6.8 box.

release information screenshot CentOS 6.8

Workaround against the attack:

Open your sysctl.conf file:

vi /etc/sysctl.conf

edit config file command CentOS 6.8

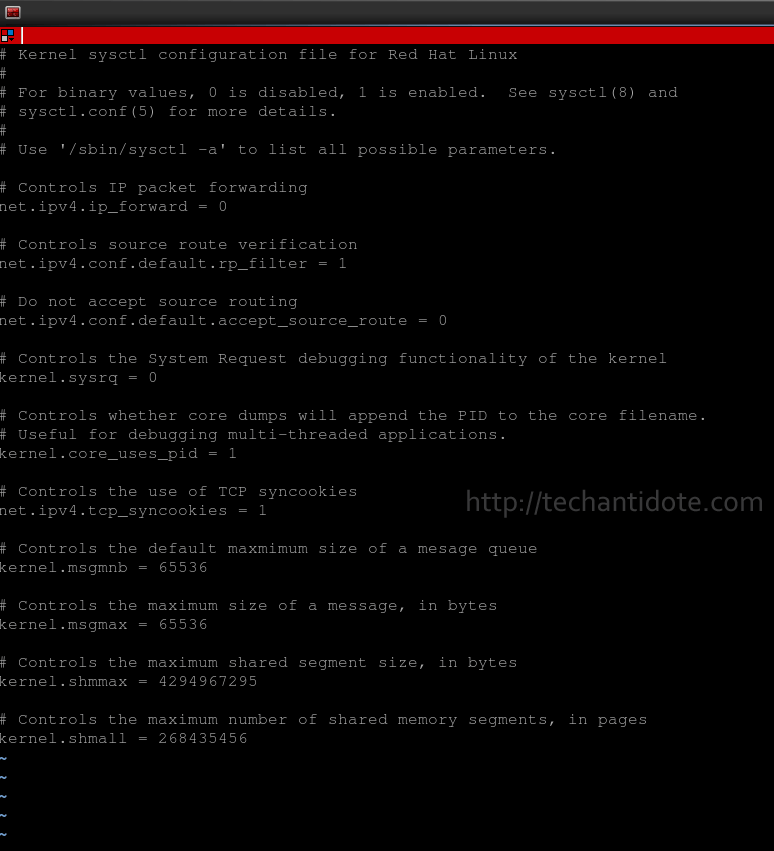
Below is a screenshot of my default sysctl.conf file which does not contain “net.ipv4.tcp_challenge_ack_limit”.

default sysctl.conf in CentOS 6.8

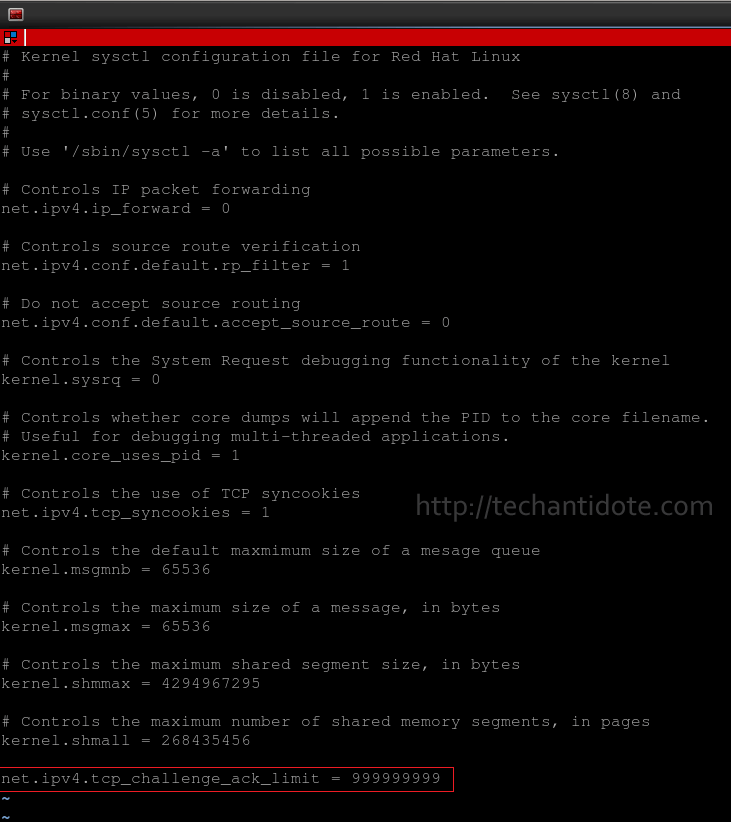
Now add the following line at the end of the config file:

net.ipv4.tcp_challenge_ack_limit = 999999999

Below is a screenshot after editing the config file.

edited-config-file screenshot in CentOS 6.8

Save and exit the file. (Press ESC and then type :wq and hit Enter in your keyboard).

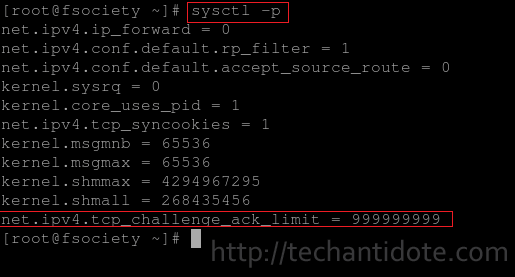
Use the command below to verify if the value of net.ipv4.tcp_challenge_ack_limit is 999999999.

sysctl -p

sysctl -p in CentOS 6.8

If you are able to see the line in the above screenshot, this means that it will make the exploit extremely hard to perform (practically impossible). The above is a workaround to mitigating the Off-Path TCP attack in a CentOS 6.8 machine and will also work for redhat 6.8.

The Fix:

If you are not looking for the workaround but for a permanent fix, then you can upgrade your Linux kernel to 4.6 or above.

If this article helped you, do leave a comment below and like us on Twitter and Facebook. Cheers!

Source: Bobcares

References: Redhat Portal, Redhat Shared Ack Vulnerability

Useful Linux Terminal shortcuts

Here are some useful Linux Terminal Shortcuts:

Shortcut 1: Run previous typed command

In your Linux terminal, type:

# ls -l

Now, if you want to run this command again i.e the (previous command), type the following and hit ENTER:

# !!

This will run the command which was previously typed i.e ‘ls -l’.

Shortcut 2: Run command with last argument from previous command

For this example, lets create an empty file one.txt:

# touch one.txt

Now, lets use the following command:

# cp one.txt one.bak

Lets break down this command according to its arguments:

1st argument – one.txt

2nd argument / last argument – one.bak

[ Note: We can logically say that the 0th argument is the command cp itself. ]

Lets say we want to edit the file “one.bak” (which is the last argument for command cp, we can use:

# vi !$

The above command is same as running ‘vi one.back‘. Also note that the !$ passes the last argument of the previous command to the current command vi.

Shortcut 2 (Alternative):

Now, lets use the following command:

# cp one.txt one.bak

An alternative way to provide an argument from the previous command to another command is by using !:<argument number>. For example, to pass the 2nd argument of the last command, we use !:2 as follows:

# vi !:2

Here !:2 means that we are passing the 2nd argument of the previous command.

Shortcut 3 : Linux Terminal Keyboard shortcuts

To get the previous command: Press the UP arrow in the keyboard.

To kill a process when you are in the Linux terminal: Press <CTRL> + C in your keyboard.

Shortcut 4 : Autocomplete:

Trust me when I say this, this shortcut makes your life easier. If you need to auto complete a command, you can use the TAB key in your keyboard. This is one the shortcuts that is used by most Linux users.

Example:

If you want to type ifconfig in your Linux terminal, you can start typing the command and then press the TAB key to auto complete it. In this case, type ifcf and then press TAB and it will autocomplete the command.

The TAB feature can also be used to autocomplete known information such as file names which are passed as arguments.

For example: Lets assume in the current directory that you are on has only two files first.txt and second.txt. Now, if you need to type this command ‘cat first.txt second.txt‘, then you can use the TAB shortcut to auto-complete it by following these steps:

Type cat and then type f and then press TAB to autocomplete it to:

 cat first.txt

Then type the first letter of the next argument i.e. type s and then press TAB, which it autocomplete the command to:

cat first.txt second.txt

Shortcut 5: Move between words

  • Navigate to the next word from current position:

Press <CTRL> and <Right Arrow key> in your keyword to move to the next word(towards the right side of current cursor position) in your terminal. This is also applicable in Linux editors such as vi or vim.

  • Move to previous word in terminal from current position:

Press <CTRL> and <Left Arrow key> in your keyword to move to the previous word/the word to the left side from current cursor position in your Linux terminal (or most editors). You can press it again accordingly, if you need to move the cursor one word at a time towards the left direction.

The above two shortcuts are useful when you are entering commands in the Linux terminal and need to correct a particular word in the command. This helps navigating back and forth between words/parameters in the command with ease.

Other Bash Shortcuts:

To go to the 1st terminal, press CTRL, ALT and the function key F1 in your keyboard.

To go the nth terminal, press CTRL, ALT and Fn (where Fn can be function keys F1, F2, F3 etc).

To paste previously copied text to your Linux terminal/editor, you can press the middle button in your mouse. Now, How cool is that uh? 🙂

To lock your Linux machine press <CTRL> <ALT> and the letter l in your keyboard.

And that’s it for now, hope its been informative. I will be updating this article in the future with more Linux terminal shortcuts  as soon as I find new ones, so stay tuned! If this article helped you, do leave a comment below and like us on Twitter and Facebook. Cheers!

Hope this helps!

Double quotes not working in Linux terminal – [Solution]

I encountered an issue in my CentOS VM where whenever I type the  (single quote) or the  (double quotes) in the terminal, they don’t get displayed. I did the following to fix the issue:

In your terminal window, type the following:

# setxkbmap -layout us

You should now be able to use single, double quotes or tilde symbols in your terminal.

The above command simply changes the keyboard layout to English (US) and this is under the assumption that you are actually using a English (US) keyboard in your PC.

[Note: English (US) layout is different from English (US) International keyboard layout].

You can check the screenshot below for reference.

setxkbmap -layout us

Thanks and credits to this post that helped me resolve this issue.

Feel free to leave a comment in the comments section down below. Happy troubleshooting! Cheers!

How To fix “This kernel requires an x86-64 CPU, but only detected an i686 CPU. This processor is unsupported in RHEL 7.” when booting from VirtualBox

Error: This kernel requires an x86-64 CPU, but only detected an i686 CPU.
This processor is unsupported in RHEL 7. 

centos-boot-error

[Note: This tutorial is under the assumption that your physical CPU is 64-bit and your installed host OS is 64-bit and will only work in these circumstances.]

Cause:

This mainly happens due two reasons:

  1. If you have a 64-bit OS installed but the VirtualBox OS type is accidentally changed/set to 32-bit after installation.
  2. If Vt-X (Virtualization) is disabled in the BIOS. (This can happen if you reset your BIOS to default settings which may have disabled Vt-X  bit).

Solution:

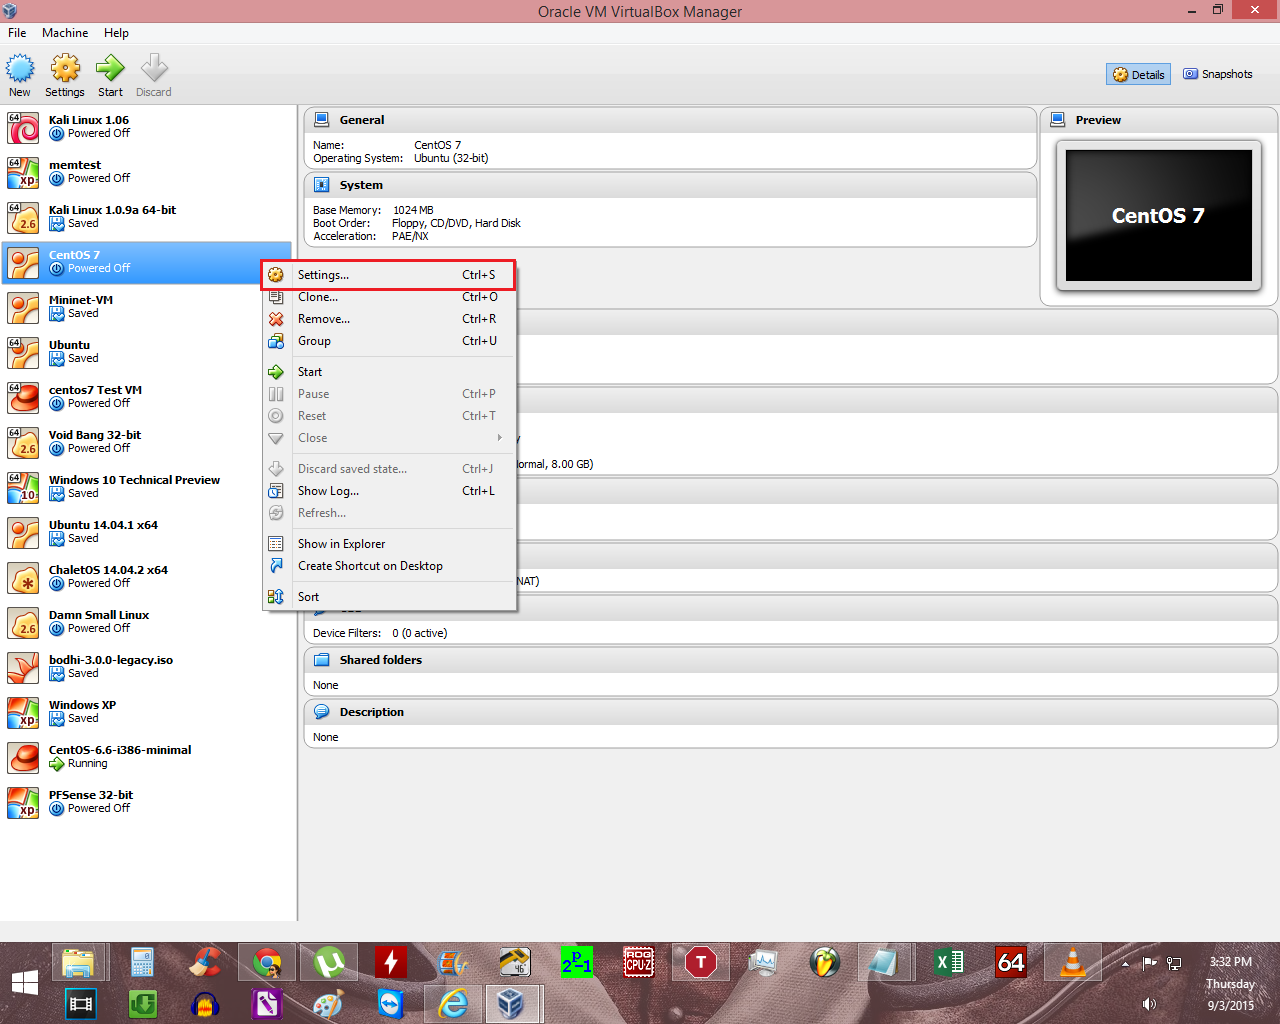
Step 1: Right Click on the Centos/RHEL OS which is giving you the error and then click on “Settings“.

virtualbox settings

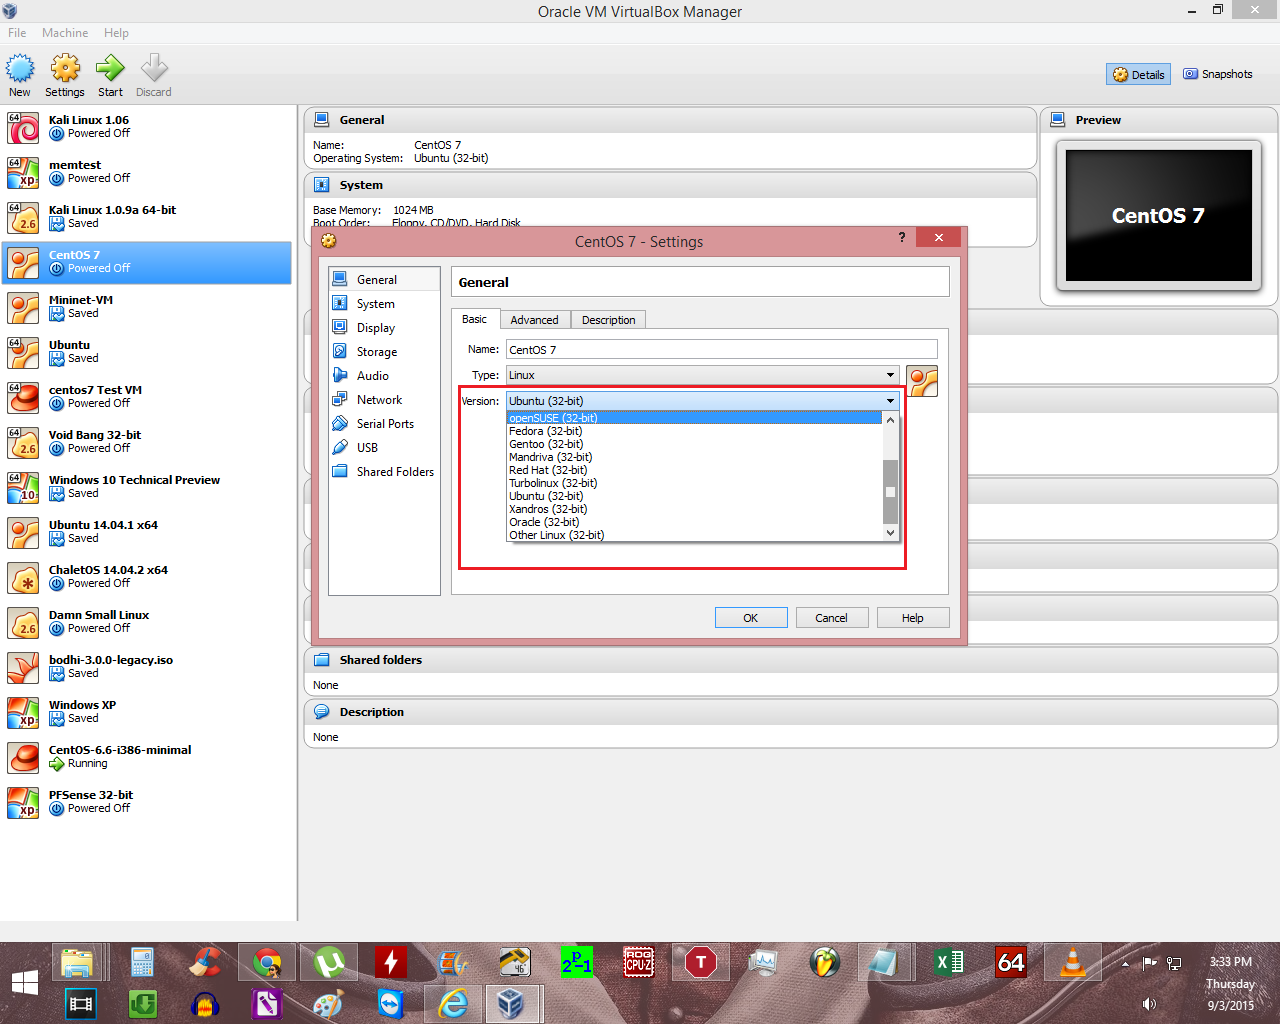
Step 2: In General Tab, check the OS Type and see if you are able to change to “Redhat 64-bit” and follow step 4.

change os type

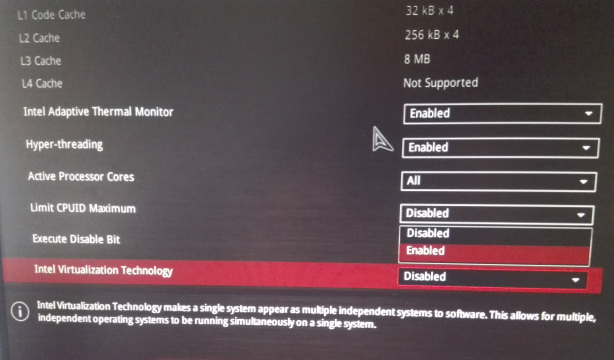
Step 3: If you are only able to see 32-bit entries in the OS type list and your physical CPU supports 64-bit, this means that Vt-X is disabled in your BIOS. So, restart your PC and boot into your BIOS, enable Vt-X.

For reference, I have a Asus Maximus VII Ranger Motherboard and here is how I enabled Vt-X in my BIOS.

enable vt-x

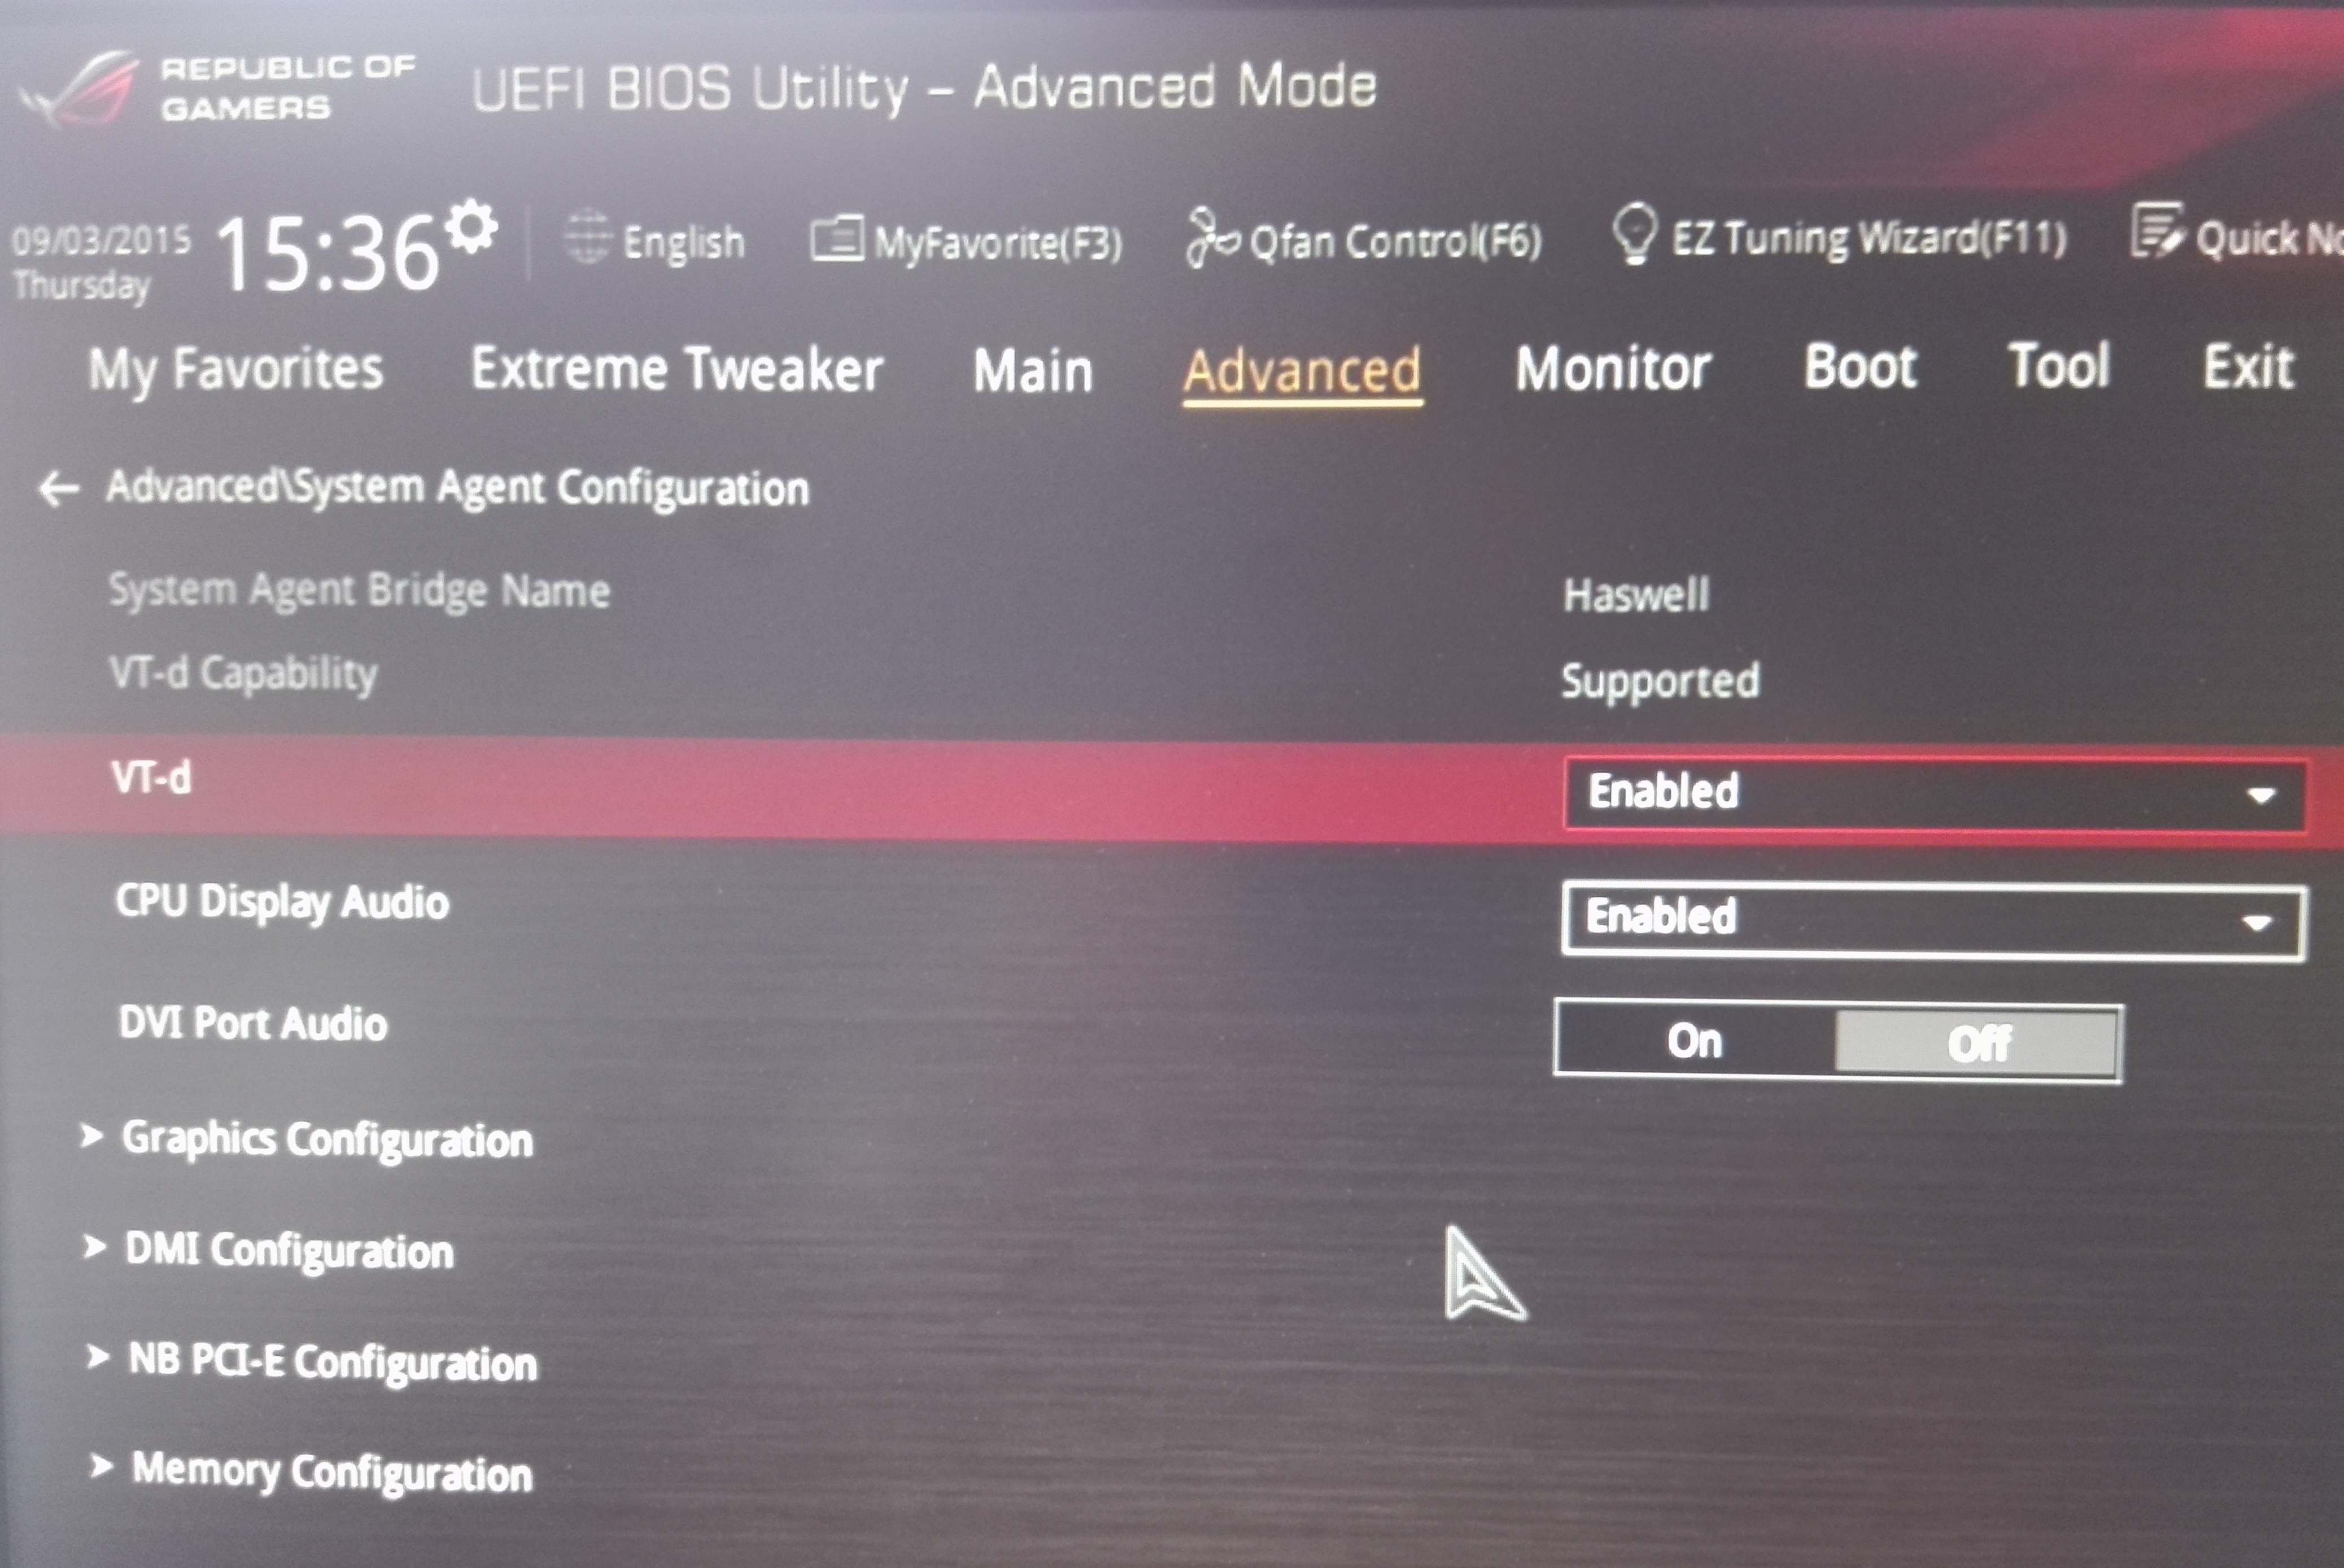
[Optional: If your CPU supports Vt-d, enable that too, it will improve functionality and performance of your Virtual Machine. Some CPUs will not have the Vt-d function, if you dont have it then you can ignore it]

optional step to enabled vt-d

Step 4: Restart your computer and boot back your CentOS/RHEL VM and it should come right up.

centos boot error fixed

Hope this fixed the issue. If this tutorial helped you,do  leave a thumbs up a comment below. Hope this helps! 🙂

If you have any sort of queries,  just leave a comment below and will get back to you. Don’t forget to follow my blog to get future updates! 😀

Regards,
ΞXΤЯ3МΞ