This is a guide on how to configure and install MacOS Ventura on Promox 8.x.x. (This was tested in my lab which runs Proxmox 8.0.3 and 8.0.4. It should work for other versions as well)
Requirements:
- Proxmox 8.x.x
- Opencore ISO [ Link: https://github.com/thenickdude/KVM-Opencore/releases . https://github.com/thenickdude/KVM-Opencore/releases/tag/v20]
- MacOS Ventura ISO (You can get this from archive.org)
- Root access to Proxmox to edit config
Steps to configure:
Download the OpenCore-v20.iso.gz from KVM-Opencore and extract it. [Link: https://github.com/thenickdude/KVM-Opencore/releases/tag/v20 ].
Create a VM in Proxmox with the below settings:
- Select ISO Image as Opencore iso
- Set Guest OS type to “Other”
- Set Graphics card as “Vmware compatible”, Machine type “q35“
- Set BIOS to OMVF UEFI, add EFI Disk and select disk. Un-select Pre-enroll keys. Select SCSI Controller to “VirtIO SCSI”
- Set hard disk as “VirtIO Block” , size = 64GB, cache = Write back unsafe
- CPU: Set 1 Socket, 4 Cores, Type as “Host”
- 4GB Min RAM
- Set NIC to Vmware vmxnet3
- Then add second cd, select Bus/Device as defaults(IDE) and add MAC OS ISO.
- Change boot order so that opencore is first and then second is macos
Minor Changes needed for it to work:
- SSH into the Proxmox host and edit the VM config: (the VM ID = 100 for my newly created VM. It may be different in yours)
/vim /etc/pve/qemu-server/100.conf
- If your Proxmox server is running on an Intel CPU, then below line in top of the file:
args: -device isa-applesmc,osk="ourhardworkbythesewordsguardedpleasedontsteal(c)AppleComputerInc" -smbios type=2 -device usb-kbd,bus=ehci.0,port=2 -global nec-usb-xhci.msi=off -global ICH9-LPC.acpi-pci-hotplug-with-bridge-support=off -cpu host,vendor=GenuineIntel,+invtsc,+hypervisor,kvm=on,vmware-cpuid-freq=on
- If your Proxmox host is running on an AMD CPU, use the below line instead:
args: -device isa-applesmc,osk="ourhardworkbythesewordsguardedpleasedontsteal(c)AppleComputerInc" -smbios type=2 -device usb-kbd,bus=ehci.0,port=2 -global nec-usb-xhci.msi=off -global ICH9-LPC.acpi-pci-hotplug-with-bridge-support=off -cpu Haswell-noTSX,vendor=GenuineIntel,+invtsc,+hypervisor,kvm=on,vmware-cpuid-freq=on
Now, change the media=cdrom to cache=unsafe. Here is a sed command to do so:
sed -i 's/media=cdrom/cache=unsafe/g' /etc/pve/qemu-server/100.conf
Below is my config for reference (/etc/pve/qemu-server/100.conf):
args: -device isa-applesmc,osk="ourhardworkbythesewordsguardedpleasedontsteal(c)AppleComputerInc" -smbios type=2 -device usb-kbd,bus=ehci.0,port=2 -global nec-usb-xhci.msi=off -global ICH9-LPC.acpi-pci-hotplug-with-bridge-support=off -cpu host,vendor=GenuineIntel,+invtsc,+hypervisor,kvm=on,vmware-cpuid-freq=on

balloon: 0

bios: ovmf

boot: order=ide2;ide0;virtio0;net0

cores: 4

cpu: host

efidisk0: local-lvm:vm-100-disk-0,efitype=4m,size=4M

ide0: local:iso/macOS Ventura 13.0.1.iso,cache=unsafe,size=13073658K

ide2: local:iso/OpenCore-v20.iso,cache=unsafe,size=150M

machine: q35

memory: 8096

meta: creation-qemu=8.0.2,ctime=1690969304

name: MAC-OS

net0: vmxnet3=D6:41:D1:8F:B5:49,bridge=vmbr0,firewall=1

numa: 0

ostype: other

scsihw: virtio-scsi-pci

smbios1: uuid=57a6ce4a-a710-483a-8577-28c1feae47d4

sockets: 1

vga: vmware

virtio0: local-lvm:vm-100-disk-1,cache=unsafe,iothread=1,size=64G

vmgenid: a9dee6c6-376d-48b9-bc20-3c586856ffb4
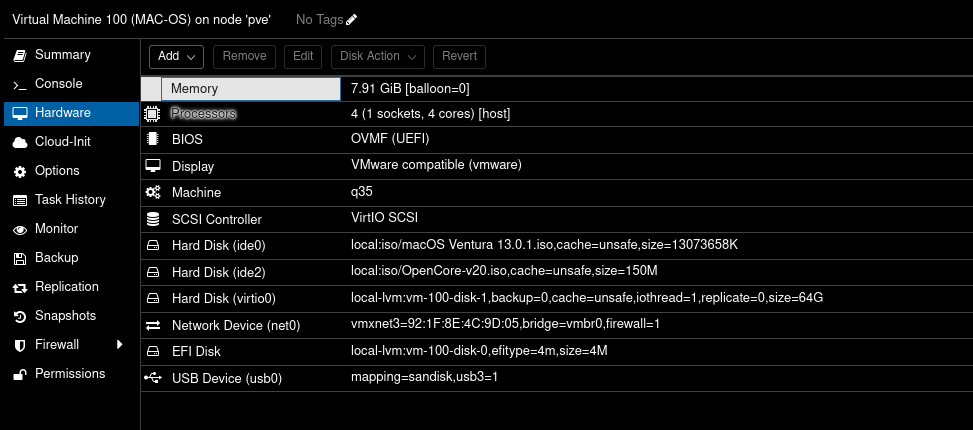
Here is a screenshot for reference of the settings page in Proxmox for the MacOS VM:
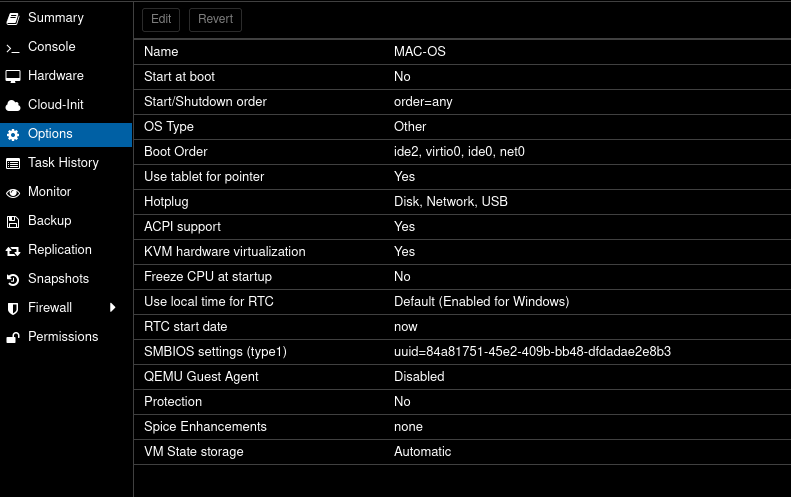
– Here is a screenshot of the boot order settings:
– Now Boot the MacOS VM, and select UEFI boot when prompted.
– At boot prompt, run the below:
System\Library\CoreServices\Boot.efi
Installation:
– Open Disk Utility
– Click “View” => Show All Devices.
– Select the First option that shows 64GB disk and click on “Erase”. Once done, close disk utility and click option to start installer.
– Select the disk and continue the install on it
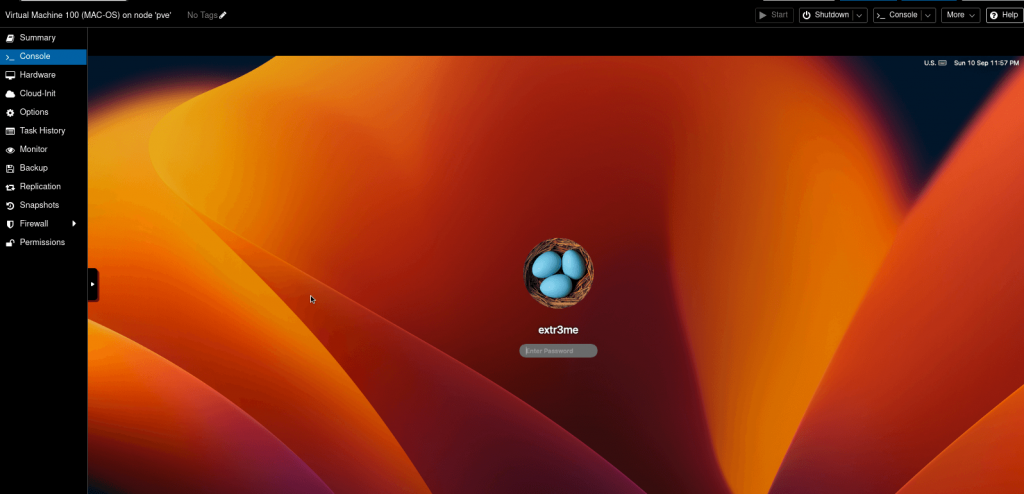
The rest of the installation is pretty straightforward. It did take a very long time for the install to complete along with a few restarts. But, at the end you should be able to boot into the Proxmox VM.
-Here is a screenshot of my VM post install.
Hope this helps! Cheers
Credits/References:
https://github.com/thenickdude/KVM-Opencore/releases/tag/v20
https://i12bretro.github.io/tutorials/0775.html