My webserver’s mysqld service went down with the error message “mysqld dead but subsys locked”. The wordpress website was displaying the error “error establishing a database connection”. This is how I fixed it.
Upon visiting my website, I got the error message as shown below.

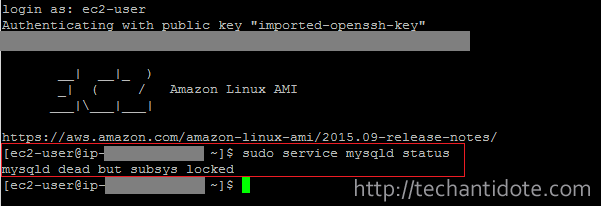
Verify Issue – Check mysqld status:
To check the status of the mysqld database service, connect to your Amazon EC2 instance and then type the following command.
sudo service mysqld status
Investigate log files:
I checked my mysqld log files and found that the mysqld service was malfunctioning due to low memory.
sudo cat /var/log/messages | grep mysqld | less

To check further events of mysqld , you can check mysqld.log using the following command:
sudo cat /var/log/mysqld.log | less
In my case, I found the mysqld service was panicking and got shutdown due to memory problems. [Note: The above outputs would differ from mine.]
Check if swap is present or not:
Run the below command to check if you have swap on your EC2 instance.
free -m

You can see here that Swap is 0. [Note: Swap is by default not created in your Amazon EC2 micro instance (free tier).]
Solution:
To resolve this issue, we need to create a swap file, mount it and make it persistent on boot.
Create swap file (1GB):
Type the following commands to create and activate the swap.
sudo dd if=/dev/zero of=/swapfile bs=1M count=1024

sudo mkswap /swapfile

Secure the swapfile:
To secure the swapfile from unauthorized access, type the following commands:
sudo chown root:root /swapfile

sudo chmod 600 /swapfile

Finally, type the following command to load the swapfile and hit Enter.
sudo swapon /swapfile
Make swap persistent on boot:
To make the swap persistent on boot, edit the file /etc/fstab using the following command:
sudo vi /etc/fstab
Add the following at the end of the fstab file:
/swapfile swap swap defaults 0 0
Save and exit the file. Press ESC and then type :wq and hit Enter.
Check if swap is active:
You can run the command below to check if swap is active or not.
free -m

As you can see highlighted section, the swap of size 1023MB is activated. It would use the swap file whenever necessary.
Restart / Start mysqld service:
You can type the following command to start the mysql service.
sudo service mysqld start

Voila! You should now be able to access your website.
Change swappiness (Optional):
This step is purely optional. I would like my EC2 to use the RAM majority of the time and use the swap file when necessary. As you may know, its faster to access data from in the RAM rather than switching to the swap file which is stored in a mechanical drive in cloud.
sudo sysctl vm.swappiness=10
![]()
And that’s it folks, this should resolve the problem with the mysqld service crashing in your EC2 instance.
If this article helped you, do leave a comment below and follow us on Twitter, Facebook and Tumbler. You can also subscribe to our email subscription list to get latest updates right to your email. Cheers!
References: isitablog