How to improve WordPress load times

Step 1. Perform a speed test

Go to https://tools.pingdom.com and enter your website to test your current load time. This is to get a idea the load time and performance score for reference.

Step 2. Configure Cloudflare CDN for your wordpress

You can configure cloudflare CDN for your wordpress website for free which will reduce latency and hence improve page load speeds. Create an account at http://www.cloudflare.com and change your name servers to the ones provided by cloudflare. For a more detailed guide with screenshots on how to configure cloudflare CDN for your website, you can find it here. (Link opens in new tab)

Step 3. Optimize your images

If your wordpress blog has a ton of images, then its best you optimize them so that your blog would load faster. You can either use plugins such as ‘WP Smush‘ (Plugin Link) or “Compress JPEG & PNG images” (Plugin Link) to optimize images. You can also manually optimize it and upload them if your an expert.

I also did notice that if the image are of .PNG format, then its best to use Tiny PNG (https://tinypng.comor use their plugin “Compress JPEG & PNG images” as it is more efficient than ‘WP Smush’.

Step 4. Remove Google Fonts

If your theme loads google fonts, you may find few requests going out to the google server which can slow down your site. Disabling it is easy and all you have to do is install plugin named ‘Remove Google Fonts References.

Step 5: Disable Gravatar Hoovercards

This step is only needed if you have installed and configured Jetpack for your wordpress blog.

Go to your wordpress dashboard, click on Settings>Discussion.  Uncheck the option “View people’s profiles when you mouse over their Gravatars” next to “Gravatar Hovercards”.

If ‘Gravator Hovercards’ section is greyed out, then click on “Shows Avatars”, uncheck “View people’s profiles when you mouse over their Gravatarsand then uncheck “Shows Gravatar” and save changes.

Step 6. Remove query strings from static resources

This have a huge impact on your performance score in pingdom and Gtmetrics. I have written an article on how to remove query strings from static resources to improve load times here. (Link opens in new tab)

Step 7. Remove unwanted plugins

Like the title suggests, if you don’t use a plugin its best to remove them.

Once done, re-run the speed tests https://tools.pingdom.com to compare before and after performance results.

Sources: Link

Check partition information in Linux

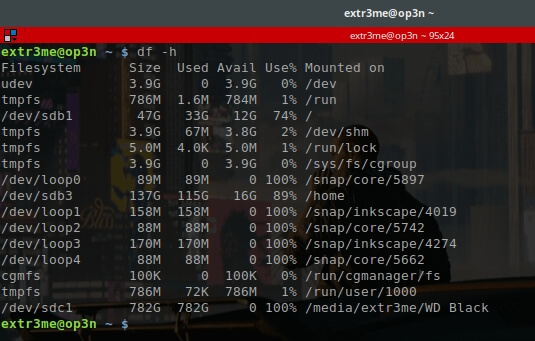
To show currently mounted partition in human readable format, use:

df -h

df -h sample output screenshot

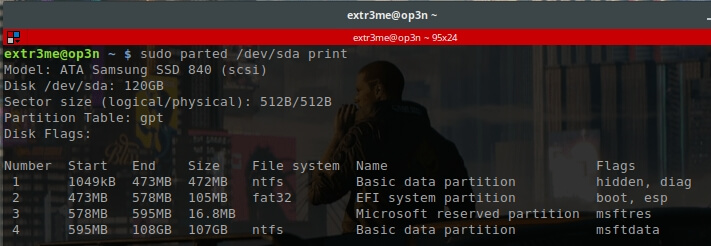
Another way to check partition information using parted.

sudo parted /dev/sda print

parted sample output screenshot

Here, we can see that the disk size is 120GB along with the partition information.

To view the list of partitions using fdisk, use:

fdisk -l

To view the list of block devices:

lsblk

Hope this helps! Cheers 🙂

How to check if a partition is primary in CentOS+Screenshots

This is a guide on how to check if a partition is primary in centos or not? Use the following command:

# parted /dev/sda print

parted /dev/sda print centos

Alternative:

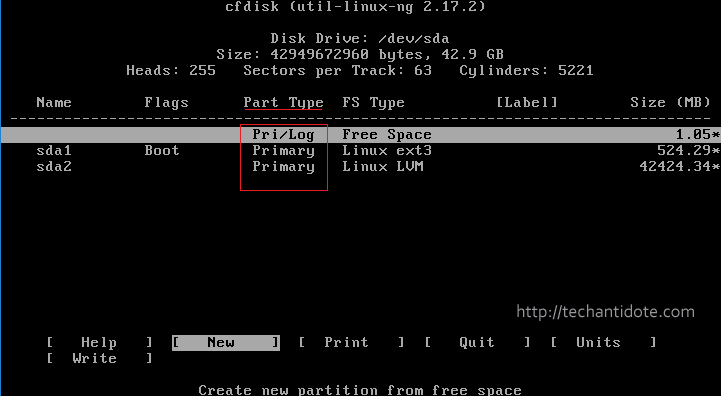
# cfdisk /dev/sda

centos cfdisk sample output

As shown above, the field under “Part Type” would suggest if that partition is Primary/Secondary.

To exit out of the cfdisk menu, use your arrow keys and move the selection to “Quit” and hit Enter in your keyboard.

Source: Link

As always stay Happy! Happy Blogging! 🙂

ΞXΤЯ3МΞ

How to display a file from one line number to another in Linux

If you need to read a file and print from a range of line numbers (including the last one), you can use the command as shown below.

cat <filename> | awk 'NR >=linenumber1 && NR <=linenumber2'

To read and display a file along with the line numbers, you can use the following format:.

cat -n <filename>

Example:

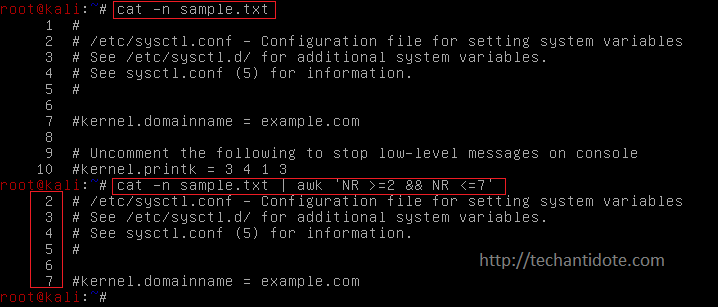
cat -n sample.txt

display line number
For example:

To print lines starting from line 2 to line 7, then you can use the following command.

cat sample.txt | awk 'NR >=2 && NR <=7'

Sample Output:

use cat and awk to print range of line numbers in linux
If for any reason you need to display the line numbers along with the output, then you can pass the -n argument to cat before piping it to awk as shown below.

cat -n sample.txt | awk 'NR >=2 && NR <=7'

Sample Output:

print with line numbers

[Note: There are multiple methods to do the same procedure. This method is intended for beginners who are just getting started in Linux.]

Hope this helps!

If this article helped you, do leave a comment below and like us on Twitter and Facebook. Cheers!

Source: Link

How to remove query strings from static resources in wordpress

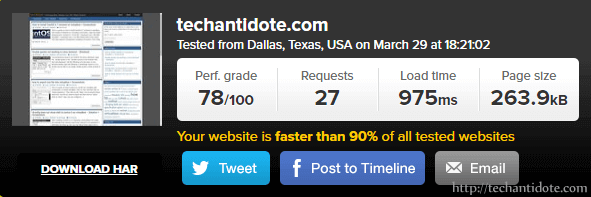
I ran some tests in Pindgom & found that load times could be improved. The fix was to remove query strings from static resources. Here is a screenshot before optimization:

before remove query strings from static resources - pingdom

I needed to improve the load time and the perf. grade score a bit more to improve SEO ratings.

There are many websites where you can perform a speed test of your website. I would recommend either of the following:

  1. Pingdom: http://tools.pingdom.com
  2. GTmetrix: http://gtmetrix.com

The above websites also provide a ‘Waterfall layout’ which displays the sequential order in which the elements are loaded(starting from the DNS query, the wait times, load times etc). I used pingdom instead of Gtmetrix as I was able to select the server location from which the test was being conducted which made it more flexible. Now, lets gets started!

[Disclaimer: Only attempt this if you know what you are doing and make sure you have a full backup of your website just incase something goes wrong.]

To remove query strings from static resources:

Add the following to your wordpress theme’s functions.php file and save it.

/*** Remove Query String from Static Resources ***/
function remove_cssjs_ver( $src ) {
 if( strpos( $src, '?ver=' ) )
 $src = remove_query_arg( 'ver', $src );
 return $src;
}
add_filter( 'style_loader_src', 'remove_cssjs_ver', 10, 2 );
add_filter( 'script_loader_src', 'remove_cssjs_ver', 10, 2 );

After adding the above code, I ran a speed test in pingdom to check if there was any performance improvement. As expected, the perf. grade score increased from 78/100 to 84/100 and the load time reduced to 286ms from 975ms. Yaay!!

after- remove query strings from static resources - pingdom

Also, note that if in the future you update your wordpress theme, the functions.php may also be updated/replaced. So you may need to verify and re-do this step again to make sure its persistent after the theme update.

There are plugins that do the same procedure to make things easier, but I prefer the manual way as installing a lot of plugins can slow down your website.

Have you optimized your wordpress site? Feel free to leave a comment below. Do subscribe for future updates. Happy Blogging!

[Source: Technumero, WordPress forums ]

How to install CentOS 6.7 minimal on virtualbox + Screenshots

This is a guide on how to install CentOS 6.7 minimal on virtualbox (text mode) in Windows 8.1 including screenshots. Hope this helps!

Requirements:

  1. CentOS 6.7 32-bit ISO : Download Link (~354 MB) {Note: Download the minimal version.}
  2. VirtualBox : Download Link (~114 MB)
  3. Atleast 8GB of free space
  4. CPU that supports Virtualization

Installation Procedure:

First, thing we need to  do is to set up Virtual Box. Go ahead download and install Virtual Box (the download link is given above in the requirements).

Open VirtualBox and click on “New“.

Click on "New" to create VM

Type in “Name” as anything you like. I have named mine as “CentOS 6.7 minimal (32-bit)“. Make sure that the “Type” is “Linux” and the “Version” is “Redhat (32-bit)” as we have downloaded the 32-bit version of CentOS. Then click on “Next“.

select type as "Linux" and Version as "Red Hat (32-bit)"

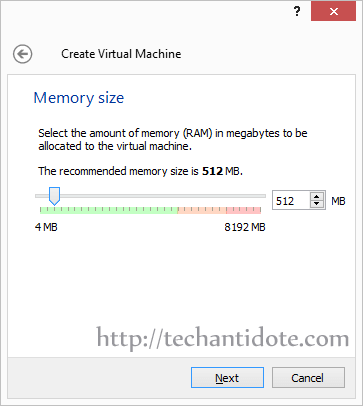
Now, select the amount of memory /RAM you need to allocate to your CentOS virtual machine. For this installation, allocate 512 MB of RAM for text mode installation and then click on “Next“.

select 512mb RAM

You can now click on “Create a virtual hard disk now” and then click “Create“.

Click "Create a virtual hard disk now"

Now, select the first option “VDI (VirtualBox Disk Image)” and then click on “Next“.

Select VDI

Select “Dynamically Allocated” and then click on “Next“.

Select "Dynamically allocated"

You can now select the size of the hard disk you need to allocate for your CentOS virtual machine and then click on “Create“. I would suggest a minimum of “8 GB”.

[Optional: If you need to change where the hard disk file is to be saved, you can click on the folder icon in the green box and change it accordingly.]

Provide atlease 8gb hard disk space

Now, click on the CentOS virtual machine that you created and then click on “Start” as shown below.

Select CentOS VM and click Start

We need to provide the CentOS ISO file we downloaded earlier to Virtualbox for the VM to boot from the ISO image. You can do this by clicking on the folder icon as shown below and then selecting the CentOS ISO file and then clicking on “Open“.

Click on folder icon

Select ISO file and click Open

Once, you have selected the ISO file, you can click on “Start“.

click start

The virtual machine will now boot from the provided CentOS ISO image and you will be presented with the boot menu as shown below. Select the first option “Install or upgrade and existing system” and hit Enter in your keyboard.

Select "Install or upgrade and existing system"


booting progress

[Note: In this mode (i.e the text mode), you can use the arrow keys in your keyboard or the TAB key in your keyboard to move through different options and Enter to confirm selection.]

Now, use your arrow key/ TAB key to select option “Skip” and hit ENTER in your keyboard.

select "Skip" and hit Enter

Installation starting

You will see a message “Welcome to CentOS!” with an “OK” button. Hit Enter in your keyboard.

hit Enter

Select the language as “English” and hit Enter.

Select "English" and hit Enter

Select the keyboard layout as “us” and hit Enter.

select us keyboard

Now, you will get a Warning message “Error processing drive“. Select the last option “Re-initialize all” using arrow/ TAB keys and hit Enter.

Select "Re-initialize all" and hit Enter

Now, make sure you select the right time zone. You can use the arrow keys to cycle down each entry or you can use the Page UP/ Page Down key in your keyboard to cycle through the list quickly. After you have selected the Time Zone, select “OK” and hit Enter in your keyboard.

Select "Time Zone"

Now you need to create a root password for your CentOS virtual machine. Finally select “OK” and hit Enter.

Enter password for root account

Select the first option “Use entire drive“, then select “OK” and hit Enter in your keyboard.

Select "Use entire drive"

Hit Enter

Select “Write changes to disk” and hit Enter.

Select "Write changes to disk"

This will now install all the required packages. It would take a few minutes depending on the speed of your computer.

Installation progress

Once installation is complete you will be prompted with a “Reboot” button. Hit Enter for the CentOS virtual machine to restart.

Select "Reboot"

centos virtual machine rebooting

You should see the CentOS booting progress as shown below.centos boot screen

You will now be prompted with the login screen.

centos login prompt

Now, type the username as “root” and hit ENTER in your keyboard. Then type in the root password that you created during installation and hit Enter. Upon successful login, you will see the bash prompt with # symbol at the end.

succesfully logged in as root

And Voila! You have successfully installed CentOS 6.7 minimal in VirtualBox using text based installation method. I will be creating another post on how to configure the network manually in CentOS 6.7 using the terminal.

If you have any queries regarding this installation, feel free to leave a comment below and will get back to you. Do subscribe to my blog get future updates! 🙂

Double quotes not working in Linux terminal – [Solution]

I encountered an issue in my CentOS VM where whenever I type the  (single quote) or the  (double quotes) in the terminal, they don’t get displayed. I did the following to fix the issue:

In your terminal window, type the following:

# setxkbmap -layout us

You should now be able to use single, double quotes or tilde symbols in your terminal.

The above command simply changes the keyboard layout to English (US) and this is under the assumption that you are actually using a English (US) keyboard in your PC.

[Note: English (US) layout is different from English (US) International keyboard layout].

You can check the screenshot below for reference.

setxkbmap -layout us

Thanks and credits to this post that helped me resolve this issue.

Feel free to leave a comment in the comments section down below. Happy troubleshooting! Cheers!

how to import ova file into virtualbox + Screenshots

This is a guide on how to import an ova file into virtualbox with screenshots.

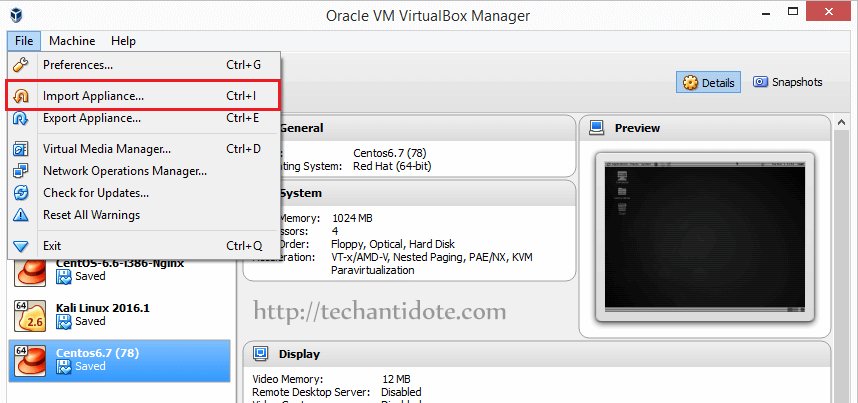
In Oracle virtualbox, click on “File” and then click on “Import Appliance“.

import ovi file into virtualbox

Then click on the “folder” icon as shown below:

select ovi file

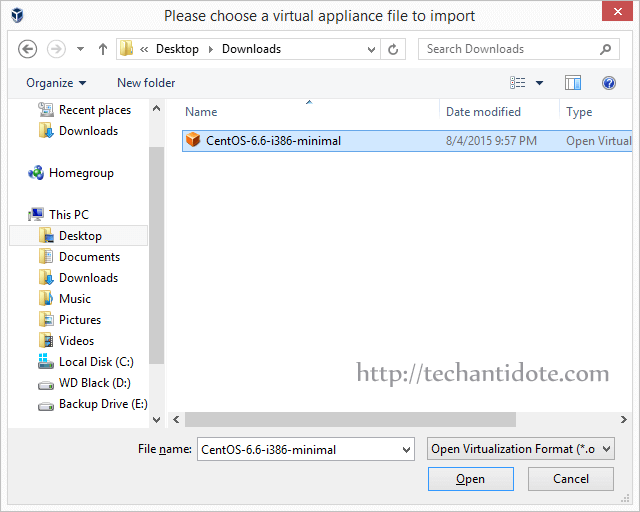
Select the .ova file you need to import and then click on “Open“.

browse to ovi location

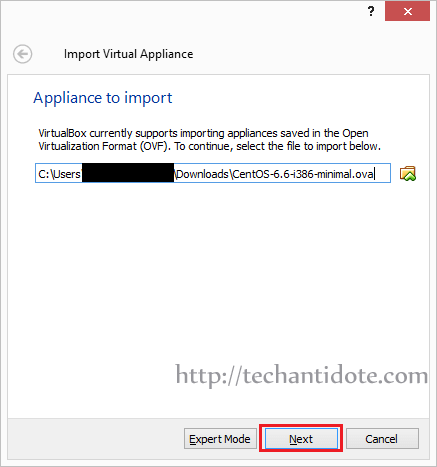
Click on “Next“:

ovi file selected, click next

importing

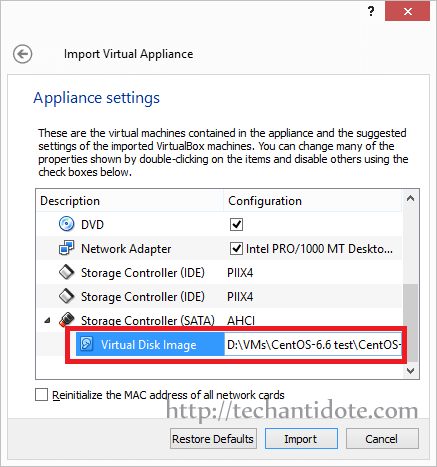
Now, you can configure the options, such as change the virtual machine’s name which is optional as show below:

change VM name if needed

You can also change the location of your virtual machine’s hard disk if needed by changing the location field.

change virtual machine's hard disk location if needed

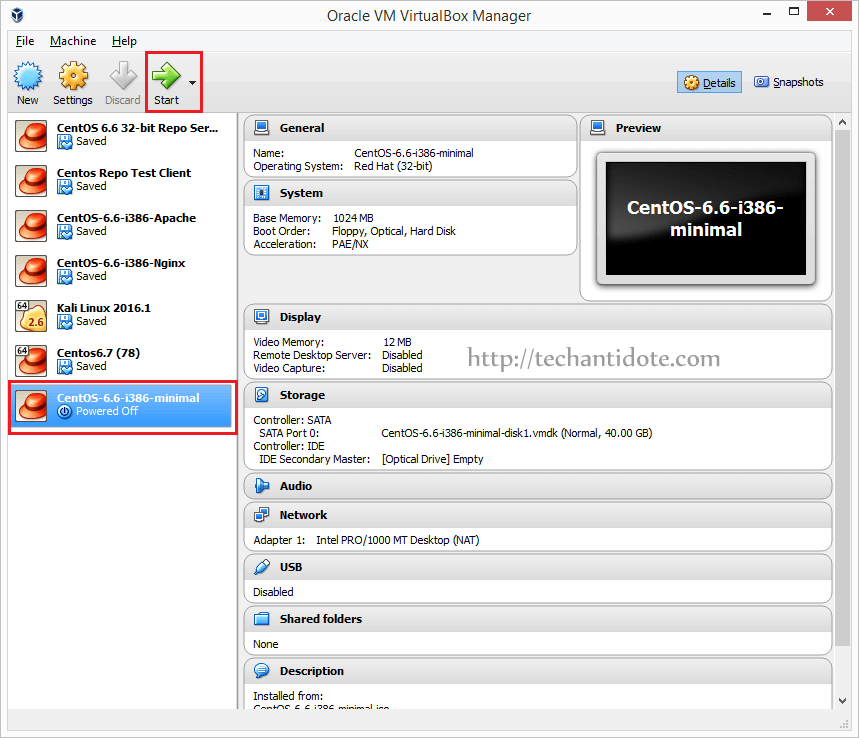
Now, you can go ahead and start you VM.

VM created, select and then click start

Wohoo! You have successfully imported your ova file into virtualbox.

If this article helped you, do share this by clicking on the share buttons you see in this page. If you have any queries feel free to leave a comment below and I will get back to you! Happy Virtualization!

Source: Link

ifconfig does not show eth0 in centos 6 on virtualbox – Solution + Screenshots

After installing CentOS 6.x or importing a preinstalled VDI image (for example from osboxes.org) if your network is not working or if eth0 does not show up, then you can follow these steps to fix it:

Step 1Inspect ifconfig output

Run the following command:

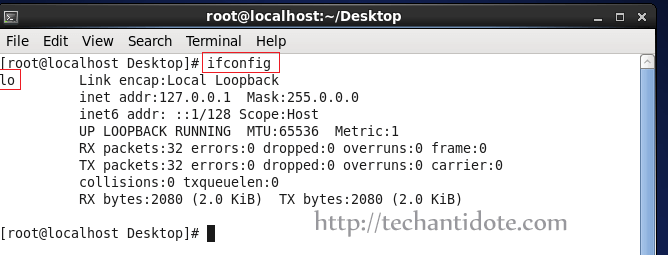
ifconfig

ifconfig no eth0

As you can see it shows only the output for loopback interface lo.

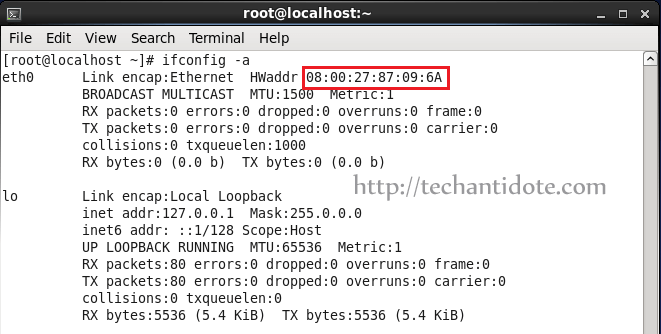
To find all interface information and MAC for eth0, run the following command:

ifconfig -a

Now, take a note of the MAC Address that you see in your screen as you will need it soon.

eth0 mac address

Step 2: Manually configure eth0 and network settings:

Type the following in your terminal:

vi /etc/sysconfig/network-scripts/ifcfg-eth0

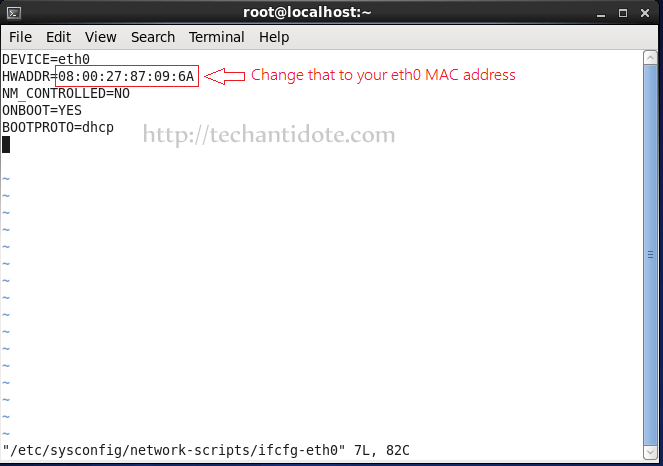
Change/edit the ifcfg-eth0 as the following, and make sure the HWADDR value is the MAC address that you took a note earlier.

DEVICE=eth0
HWADDR=08:00:27:87:09:6A
NM_CONTROLLED=NO
ONBOOT=YES
BOOTPROTO=dhcp

So, it will finally look something like picture attached below.

ifcfg-eth0 configuration fileTo edit your network file, type the following command:
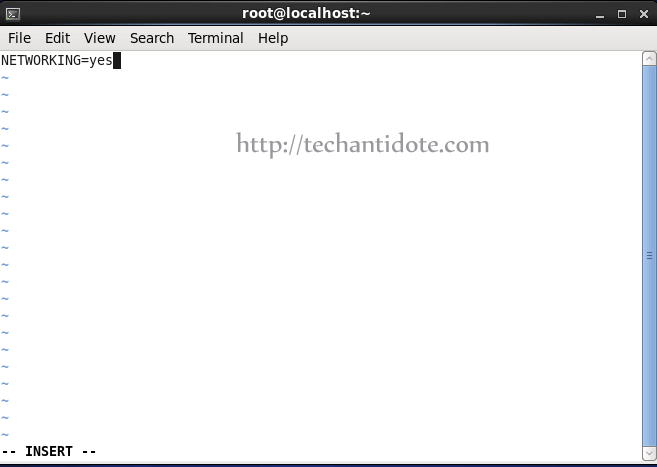
vi /etc/sysconfig/network

Now, add the following line if its not already present to the file:

NETWORKING=yes

/etc/sysconfig/network file

Save the file and exit.

Step 3. Restart network service

service network restart

This should fix the issue and your eth0 interface should popup in no time as shown below.

service network restart no output fixed

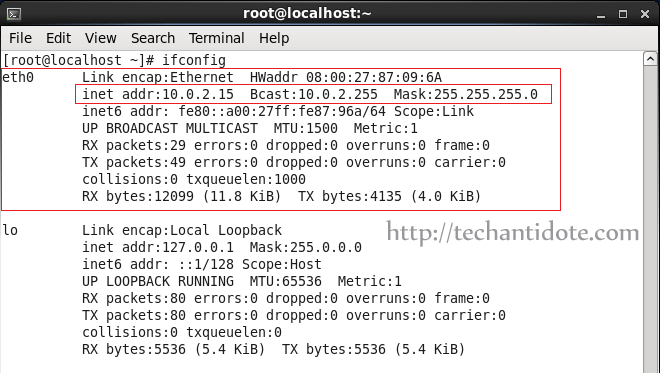
You can also check the IP address information using ifconfig to check the assigned IP address.

ifconfig

eth0 ifconfig output solved

Hope this helps! If you found this article helpful, do share this article by clicking on the sharing icons you see in your screen.

Feel free to leave a comment below if need any further help and will get back to you as soon as possible. Subscribe for future updates!

Source: Link

How to install apache from source in Centos 6.7

This is a simple guide on how to configure Apache from source in Centos 6.7 + installing APR, APR-UTIL and PCRE to make it work.

Step 1. Install gcc:

Open up your terminal window and type the following command:

yum install gcc gcc-c++

Now, change to following directory:

cd /usr/src/

Step 2: Download and configure APR :

To download the APR file, use the below command:

wget http://a.mbbsindia.com//apr/apr-1.5.2.tar.gz

Now extract the downloaded file:

tar -zxvf apr-1.5.2.tar.gz

Change to the extracted folder and run the following commands to configure apr:

cd apr-1.5.2
./configure –prefix=/usr/src/apr
make
make install

Step 3. Download and configure apr-utils:

Change to following /usr/src/ directory:

cd /usr/src/

To download the APR-UTIL file, use the below command:

wget http://mirror.fibergrid.in/apache//apr/apr-util-1.5.4.tar.gz

To extract file, change to extracted folder and to configure apr, run the following commands:

tar -zxvf apr-util-1.5.4.tar.gz

cd apr-util-1.5.4
./configure –prefix=/usr/src/apr-util –with-apr=/usr/src/apr/
make
make install

Step 4. Download and config PCRE:

Change to /usr/src/ directory:

cd /usr/src/

To download pcre2-10.21.tar.gz type the following your terminal:

wget ftp://ftp.csx.cam.ac.uk/pub/software/programming/pcre/pcre2-10.21.tar.gz

To extract file, change to extracted folder and to configure pcre2-10.21, run the following commands:

tar -zxvf pcre2-10.21.tar.gz

cd pcre2-10.21
./configure –prefix=/usr/src/pcre2
make
make install

Step 5. Download Apache / httpd:

Now, change to following directory:

cd /usr/src/

To download httpd tar ball type the following your terminal:

wget http://a.mbbsindia.com//httpd/httpd-2.4.18.tar.gz

To extract file, change to extracted folder and to configure httpd, run the following commands:

tar -zxvf httpd-2.4.18.tar.gz

cd httpd-2.4.18
./configure –prefix=/usr/local/apache2 –with-apr=/usr/src/apr –with-apr-util=/usr/src/apr-util –with-pcre=/usr/src/pcre2/bin/pcre2-config
make
make install

Step 6. Start and test your apache server 

service httpd start
httpd -v

You can also open your browser and go to:

http://localhost/

And it should give you the Apache Welcome page.

And Voila! You have successfully configured apache from source. Hope this helps!

[DISCLAIMER: This guide is strictly for the purpose of learning how to configure apache from source for beginners. This should not to be used in a real production server as no security measures has been discussed or implemented in this tutorial.]

If you liked this article, do leave a comment below. You can also share this article by clicking on the social media buttons below. 

Source: ApacheTroubleshooting source: APR troubleshooting