This is a guide on how to monitor a Linux device(s) using Telgraf, InfluxDB and Chronograph. To make things easier, we will be running all these components using Docker.
Requirements:
- Docker should be installed [Note: Docker version 19.03.08 was used in this tutorial]
- Internet connectivity to pull the docker images
- Custom docker network
- Sufficient Disk space to store data in InfluxDB
1. Create a custom docker network:
-Lets create a custom docker bridge network. Below, I have created a custom docker network with the name “influxdb”.
docker network create influxdb
You can name it whatever you want. You just need to make sure that name is passed in the –net flag in other docker commands.
You can verify that the network is created using the following command:
docker network ls
-Below are the sample outputs:
extr3me@op3n:~$ docker network ls
NETWORK ID NAME DRIVER SCOPE
0d72e4098315 bridge bridge local
e3808d2b4078 host host local
d2c5b3842508 influxdb bridge local
a25ec7e0c8a2 none null local
2. Run InfluxDB:
-InfluxDB is database where all the statistics of the host will be stored. To create an instance of InfluxDB, run the following command pass the network name as well as shown below:
docker run -d --name=influxdb --net=influxdb influxdb3. Run Telegraf:
-Before you run Telegraf, you would need to create Telegraf config file. Run the below commands to generate a sample Telegraf configuration file.
mkdir telegraf
docker run --rm telegraf telegraf config > telegraf/telegraf.conf
ls telegraf/
-Modify the above telegraf.conf as per your requirement. For starters, you can un-comment the outputs.influx block and the urls section. So, the config file would have the following:
[[outputs.influxdb]]
   urls = ["http://influxdb:8086"]
-The above output block tells Telegraf where the Influxdb database is located. Once this configuration file is passed to telegraph in the next section, then Telegraf will interact with InfluxDB (read and write data) via API.
-Now that we have the configuration file ready, we can run Telegraf and pass the configuration file.
-Below I am passing /sys /proc and /etc as readonly mounts inside the container. Optionally, I have passed the docker socket as well as a bind mount so that I can monitor the resource usage of docker and the running containers too.
docker run -d --restart=always --name telegraf \
--net=influxdb --hostname=telegraf \
-e "HOST_PROC=/rootfs/proc" \
-e "HOST_SYS=/rootfs/sys" \
-e "HOST_ETC=/rootfs/etc" \
-v $(pwd)/telegraf/telegraf.conf:/etc/telegraf/telegraf.conf:ro \
-v /var/run/docker.sock:/var/run/docker.sock:ro \
-v /sys:/rootfs/sys:ro \
-v /proc:/rootfs/proc:ro \
-v /etc:/rootfs/etc:ro \
telegraf
You can add/modify the source as you wish to monitor more data. You just need to make sure that the the necessary mounts/variables are passed as well.
4. Run Chronograf:
-Chronograf is used to visualize the data using a browser. It can talk to InfluxDB and display the data in forms of graphs etc.
-To run Chronograf, you can run the following docker command:
docker run -d --name chronograf -p 8888:8888 --net=influxdb chronograf --influxdb-url=http://influxdb:8086
-Verify all containers are running using “docker ps -a”
extr3me@op3n:~$ docker ps -a
CONTAINER ID        IMAGE               COMMAND                  CREATED             STATUS              PORTS                          NAMES
a9da408e41b0        chronograf          "/entrypoint.sh --in_"   39 seconds ago      Up 38 seconds       0.0.0.0:8888->8888/tcp         chronograf
326255e6d234        telegraf            "/entrypoint.sh tele_"   36 minutes ago      Up 36 minutes       8092/udp, 8125/udp, 8094/tcp   telegraf
51c95679a803        influxdb            "/entrypoint.sh infl_"   About an hour ago   Up About an hour    8086/tcp                       influxdb
The above output shows that all the three containers are up and running.
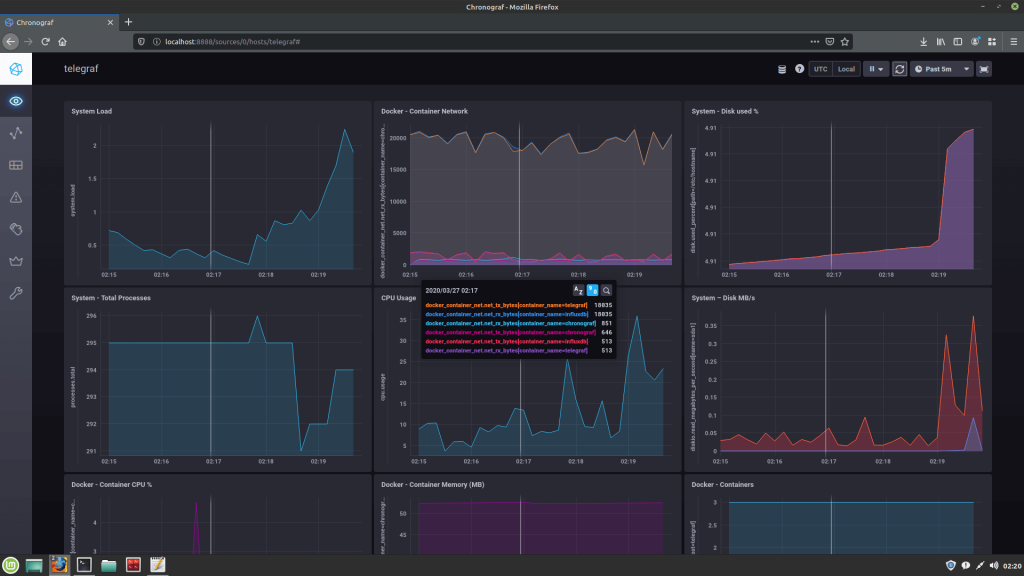
-Now, you can access the Chronograf Dashboard from your browser by visiting the following URL.
http://localhost:8888Once you are in the Chronograf UI, you can navigate to “Host Lists” and click on host to view the collected stats.
Below is a screenshot of Chronograf that is displays the host information:
Troubleshooting:
To troubleshoot API issues, you could create a sample container in same “influxdb” network and install curl in it.
For example: You could create an alpine container attached to the influxdb network.
docker run --net=influxdb -it alpine shThen install curl using “apk add curl”. Below is the sample outputs:
/ # apk add curl
fetch http://dl-cdn.alpinelinux.org/alpine/v3.11/main/x86_64/APKINDEX.tar.gz
fetch http://dl-cdn.alpinelinux.org/alpine/v3.11/community/x86_64/APKINDEX.tar.gz
(1/4) Installing ca-certificates (20191127-r1)
(2/4) Installing nghttp2-libs (1.40.0-r0)
(3/4) Installing libcurl (7.67.0-r0)
(4/4) Installing curl (7.67.0-r0)
Executing busybox-1.31.1-r9.trigger
Executing ca-certificates-20191127-r1.trigger
OK: 7 MiB in 18 packages
-Once curl is installed, Then try the following sample InfluxDB API calls pointing to the InfluxDB endpoint from within the Alpine container:
curl -i -XPOST http://influxdb:8086/query --data-urlencode "q=show databases"
-Below are sample outputs:
/ # curl -i -XPOST http://influxdb:8086/query --data-urlencode "q=show databases"
HTTP/1.1 200 OK
Content-Type: application/json
Request-Id: e58a61db-6fa6-11ea-85a3-0242ac120002
X-Influxdb-Build: OSS
X-Influxdb-Version: 1.7.10
X-Request-Id: e58a61db-6fa6-11ea-85a3-0242ac120002
Date: Thu, 26 Mar 2020 21:15:19 GMT
Transfer-Encoding: chunked

{"results":[{"statement_id":0,"series":[{"name":"databases","columns":["name"],"values":[["_internal"],["telegraf"]]}]}]}
-Here is another example on how to to check if you are able to create a database:
curl -i -XPOST http://influxdb:8086/query --data-urlencode "q=CREATE DATABASE telegraf"To troubleshoot issues related to Telegraf, you review the docker logs.
docker logs -f telegraf
To troubleshoot issues with InfluxDB, you can manually access InfluxDB’s shell/CLI and run commands (just like you would in other database servers such as MySQL.)
Below is an example on how to view the list of databases from InfluxDB shell.
docker exec -it influx sh
# influx
Connected to http://localhost:8086 version 1.7.10
InfluxDB shell version: 1.7.10
> show databases
name: databases
name
----
_internal
telegraf
I hope this helps. Do share, leave a like/comment below! Cheers!
Regards,
ΞXΤЯ3МΞ
Sources/References:
https://hub.docker.com/_/telegraf/
https://hub.docker.com/_/chronograf/
https://www.jacobtomlinson.co.uk/monitoring/2016/06/23/running-telegraf-inside-a-container/