Check partition information in Linux

To show currently mounted partition in human readable format, use:

df -h

df -h sample output screenshot

Another way to check partition information using parted.

sudo parted /dev/sda print

parted sample output screenshot

Here, we can see that the disk size is 120GB along with the partition information.

To view the list of partitions using fdisk, use:

fdisk -l

To view the list of block devices:

lsblk

Hope this helps! Cheers 🙂

How to pass arguments to an alias in bash

Lets look at passing arguments to an alias by looking at an example.

The below command will open duckduckgo.com in a new tab in firefox.

firefox --new-window duckduckgo.com

Lets say, I want to create an alias but I want to pass the URL as a parameter to the alias.

For example, if I run the following command in the terminal, it should look at the first argument (which is the URL) and open it in a newtab in firefox.

ff duckduckgo.com

To achieve this, you can do the following:

Edit your ~/.bashrc or ~/.bash_profile using your favorite editor.

vim ~/.bashrc

Create a function inside the ~/.bashrc  with the following content. [Copy/paste the below inside your bashrc]

alias ff='function _ff()
{
firefox --new-window $1
};_ff'

Here, $1 is the first argument.

Once you save and close the bashrc file, you can source your bashrc for changes to take affect.

source ~/.bashrc

Now, if you enter the following command in the terminal, it will take “duckduckgo.com” which is the 1st parameter and open it in a new tab in firefox.

ff duckduckgo.com

Hope this helps. If you like my content, do share and subscribe for more content.

Source: StackOverFlow

How to install AWS CLI in Linux + Auto command completion

This is a guide on how to install aws cli utlity in Linux along with screenshots.

Requirements:

– Linux.
– Python 2.6.5 or higher.

[Tested on Linux Mint with bash shell. should work on Ubuntu as well.]

Update your system and its packages:

sudo apt update && sudo apt upgrade -y

Install Pip:

sudo apt install python-pip -y
sudo pip install --upgrade pip

Install the following modules:

sudo pip install setuptools
sudo pip install wheel

Install AWS CLI:

sudo pip install awscli

To verify that the installation went well, you can run the following command.

aws --version

If the output shows the aws version, then you are all set.

Enable AWS commands Auto completion:

-To enable auto completion of sub commands, run the following to check where your “aws” and “aws_completer” are located.

which aws
which aws_completer

-Copy the output of “which aws_completer”. This would the path.

For example, if the output of “which aws_completer” was “/usr/local/bin/aws_completer”, then enter the following:

complete -C '/usr/local/bin/aws_completer' aws

Heres a screenshot reference:

setup aws awscli aws_completer setup for bash

Verify if AWS command auto completion works:

-Run the following command and press press TAB on your keyboard after typing “ec” and it should give you the possible options:

aws ec

aws awscli autocompletion installation on linux mint

Add path to your .bashrc or .bash_profile:

To make the changes persistant for aws command completion, you can add the following to your “.bashrc” or “.bash_profile.

echo "complete -C ‘/usr/local/bin/aws_completer’ aws" >> ~/.bashrc

Hope this helps! 🙂

Regards,
ΞXΤЯ3МΞ

Tmux not displaying bash prompt colors

Here is a screenshot of my terminal when I open tmux:

tmux PS1 prompt before

Note: Here, my shell displays my username@hostname but it does not display it in colors  🙁

To make tmux read your bash colors, edit your tmux configuration file:

vim ~/.tmux.conf

Add the following line to the tmux config file:

set -g default-terminal "screen-256color"

Exit and save the file. Close and re-open tmux.

Now, when you open tmux you should be able to get your regular bash prompt colors. Here is a screenshot after re-opening tmux:


tmux $PS1 bash prompt color after modying tmux.conf

Hope this helps! Cheers!


Source: Link

How to get real time currency exchange rates in your Linux terminal

This a tutorial on how to get real time currency exchange rates directly from your Linux terminal (+ lots of screenshots).

Requirements:

-A computer (  *facepalm* 😛 )
-Any Linux/Windows machine with curl installed.
-Free account with openexchangerates.org

We will be using the “curl” utility to perform the API requests which usually comes pre-installed in most Linux systems.

In case, yours does not have it installed, you can install it using the following:

[You can run “apt install curl” for Ubuntu based systems, or “yum install curl” for RHEL/CentOS/Fedora based systems or “dnf install curl” for newer Fedora systems.]

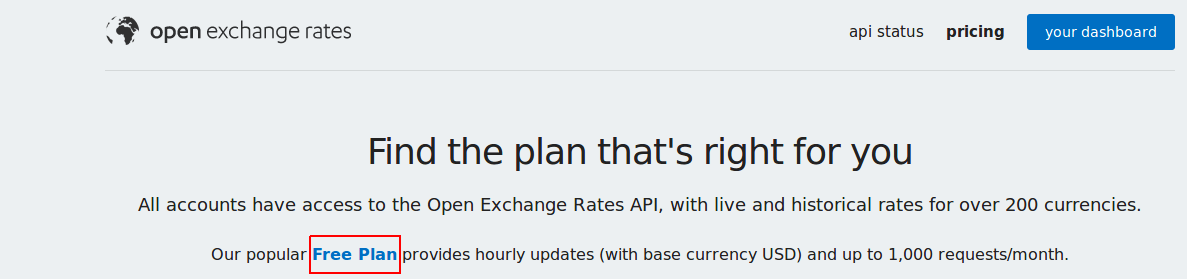
Step 1: Sign up for a free account in openexchange. You can use the below link:

https://openexchangerates.org/signup/free

I would suggest to create an account with a new password that you have never used before.

[Note: The free account has restrictions but should be sufficient to get latest conversion rates with base currency set as USD. With the free account we cannot change the base currency. This means with the free account you can translate 1USD to any other currency. I will create a different tutorial describing another method to get ]

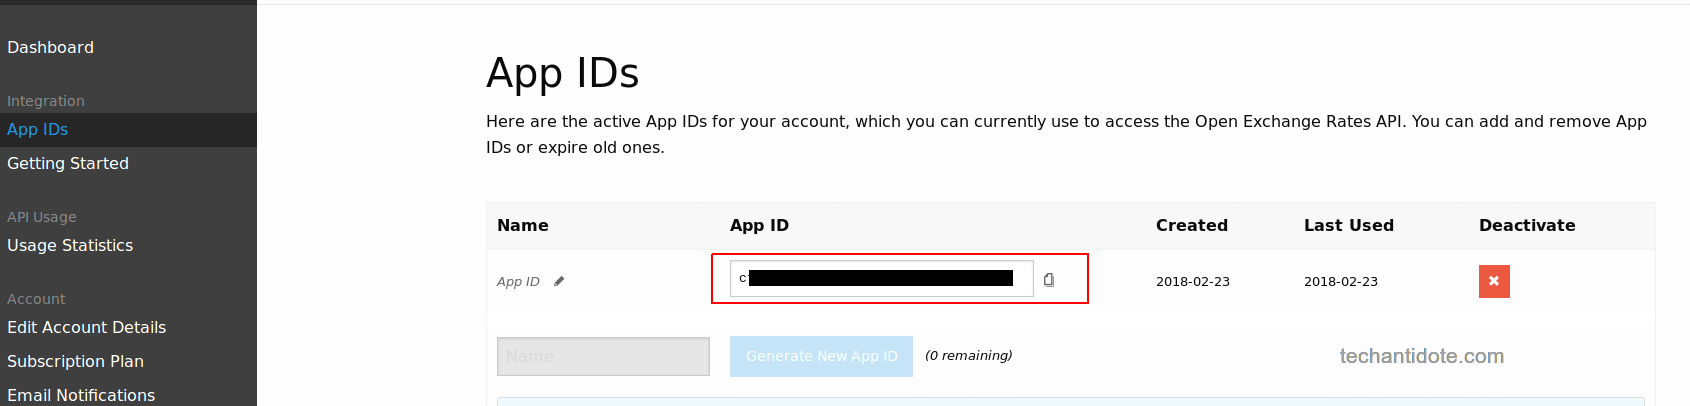
Step 2: Get your APP ID

-Once you sign up for the account, you would receive an email with a verification email which will have your “APP ID”. Below is a screenshot:

APP ID for currency conversion

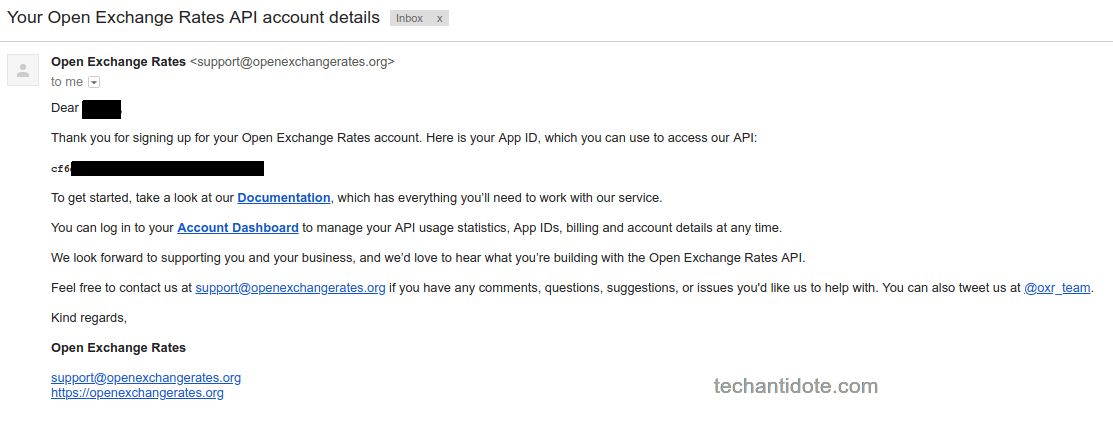
You would need to get this ID when performing the API call.

-Alternatively, once you have signed up you get your API key once you login to your account. Below is a screenshot:

API ID / API key from account to be used for getting currency exchange rates

Step 3: Get exchange rates:

-Open your terminal and run the following command:

curl -X GET https://openexchangerates.org/api/latest.json?app_id=enteryourAPIKEYhere

Enter your app ID after “=”. For example, if your APP ID is 1234, them you would run the following:

curl -X GET https://openexchangerates.org/api/latest.json?app_id=1234

Below is a sample output which displays the different currencies and its conversion values.

currency exchange rates in Linux terminal using API

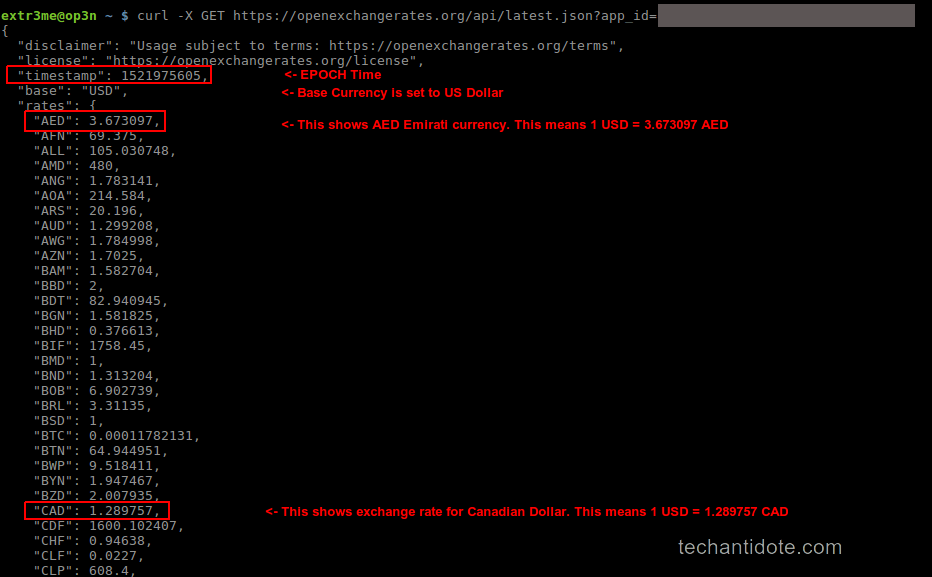
You would notice the output is in JSON format which has values in keypairs. (For example: the “currency name”:  “value”.)

The data that is pulled is in realtime and it also displays the “timestamp” for which the currency converstions are in linux EPOC time.

Additional Information:

To know the current EPOC time in your system, you can command “date +%s” in your terminal. This is the number of seconds since 1970-01-01 00:00:00 UTC.

For simplicity, If you are looking to convert USD to a particular currency, you can simply grep the output with the currency you need to convert to.

For example: If you convert 1 USD to INR, you can simply grep the currency name to filter out the output.

curl -s -X GET https://openexchangerates.org/api/latest.json?app_id=1234 | grep INR

Below is a screenshot of the outputs.

Output for filtered currency rates in Linux terminal. USD to INR and USD CAD currency exchange rates example outputs.


Thats it folks! Hope this helps! If you liked this tutorial, leave a comment down below and follow to get future updates ! 🙂

How to check if a partition is primary in CentOS+Screenshots

This is a guide on how to check if a partition is primary in centos or not? Use the following command:

# parted /dev/sda print

parted /dev/sda print centos

Alternative:

# cfdisk /dev/sda

centos cfdisk sample output

As shown above, the field under “Part Type” would suggest if that partition is Primary/Secondary.

To exit out of the cfdisk menu, use your arrow keys and move the selection to “Quit” and hit Enter in your keyboard.

Source: Link

As always stay Happy! Happy Blogging! 🙂

ΞXΤЯ3МΞ

Make CentOS virtual machine in VirtualBox use the host’s VPN Connection

If your host PC (in my case Windows 10) is connected to a VPN but your CentOS 6.x VM is not using the VPN, then do the following:

1: Power off your CentOS VM.

2: Right click your centos machine in virtualbox and then click “Settings“.

right click your centos virtual machine and click settings (Screenshot)

3: Click “Network” and change the Adapter Settings to “NAT“.

change virtualbox network settings to NAT (Screenshot)

4: Now power on your centos virtual machine.

5: Once your VM boots up, login and then restart the network service. You can use the following CLI command “service network restart“.

Your CentOS virtual machine should now to able to use the VPN connection and use it accordingly. Do verify the same in your virtual machine. Hope this helps!

Do like and subscribe if this guide helped you. Cheers!

Protect against vulnerability CVE-2016-5696 in CentOS 6.8

This guide on how to protect against Off-path TCP vulnerability CVE-2016-5696 in a CentOS 6.8 machine.

Run the following command to check the kernel version that your box is running:

uname -r

Run the following to verify your Centos version details:

cat /etc/redhat-release

Below is a screenshot for the outputs for the above commands from my CentOS 6.8 box.

release information screenshot CentOS 6.8

Workaround against the attack:

Open your sysctl.conf file:

vi /etc/sysctl.conf

edit config file command CentOS 6.8

Below is a screenshot of my default sysctl.conf file which does not contain “net.ipv4.tcp_challenge_ack_limit”.

default sysctl.conf in CentOS 6.8

Now add the following line at the end of the config file:

net.ipv4.tcp_challenge_ack_limit = 999999999

Below is a screenshot after editing the config file.

edited-config-file screenshot in CentOS 6.8

Save and exit the file. (Press ESC and then type :wq and hit Enter in your keyboard).

Use the command below to verify if the value of net.ipv4.tcp_challenge_ack_limit is 999999999.

sysctl -p

sysctl -p in CentOS 6.8

If you are able to see the line in the above screenshot, this means that it will make the exploit extremely hard to perform (practically impossible). The above is a workaround to mitigating the Off-Path TCP attack in a CentOS 6.8 machine and will also work for redhat 6.8.

The Fix:

If you are not looking for the workaround but for a permanent fix, then you can upgrade your Linux kernel to 4.6 or above.

If this article helped you, do leave a comment below and like us on Twitter and Facebook. Cheers!

Source: Bobcares

References: Redhat Portal, Redhat Shared Ack Vulnerability

Use netcat to chat over LAN

This is quick guide on how to use netcat (nc) to chat between two PCs over LAN.

VM 1: CentOS 6.6

My CentOS machine did not have netcat (nc) preinstalled so I had to manually install it.

# yum install nc -y

VM 2: Kali Linux 2016.1 | IP: 192.168.1.11 |

The Kali Linux 2016.1 had netcat tools were pre-installed so i didn’t have to install it. Here, we take any one of the 2 Pcs as the chat server and the other as the chat client.

Here, I am selecting the Kali Linux to listen for connections on a random port 12345.  [Note: The port you select must be higher than the standard port 1024.]

In this case, I will make Kali as the chat server and set it to listen on port 12345.

# nc -lvp 12345

nc listening on port 12345

Now from the 2nd PC i.e. the CentOS machine, we will make a connection to the Kali machine on port 12345.

# nc 192.168.1.11 12345

Once connected, Kali’s terminal would show as message such as shown below:

nc accepting remote connection from LAN

Now, to start chatting type the text and hit ENTER in your keyboard to send chat messages between the two PCs. Pretty sweet uh?

nc output showing chat

FYI, There are practically tons of uses of netcat (nc) other than sending messages.

Other uses of netcat:

  • File Transfer: You can use to transfer file from one PC to another.
  • Port Scanning: Use netcat with the -z flag to run a port scan of the desired IP.
  • Clone & transfer entire partitions: This comes handy if you need to take a backup and transfer it to another PC in your LAN. You can use the dd command to clone a partition or an entire hard disk and then transfer it across to another PC.
  • Run a simple Web server.

Have you found any another use with netcat? Post it in the comment section down below. If your on a Linux machine, check out the man page for netcat for more info. Happy exploring!

If you liked this article, don’t forget to subscribe and follow us on Twitter and Facebook.

Source: Cybrary.it

How to display a file from one line number to another in Linux

If you need to read a file and print from a range of line numbers (including the last one), you can use the command as shown below.

cat <filename> | awk 'NR >=linenumber1 && NR <=linenumber2'

To read and display a file along with the line numbers, you can use the following format:.

cat -n <filename>

Example:

cat -n sample.txt

display line number
For example:

To print lines starting from line 2 to line 7, then you can use the following command.

cat sample.txt | awk 'NR >=2 && NR <=7'

Sample Output:

use cat and awk to print range of line numbers in linux
If for any reason you need to display the line numbers along with the output, then you can pass the -n argument to cat before piping it to awk as shown below.

cat -n sample.txt | awk 'NR >=2 && NR <=7'

Sample Output:

print with line numbers

[Note: There are multiple methods to do the same procedure. This method is intended for beginners who are just getting started in Linux.]

Hope this helps!

If this article helped you, do leave a comment below and like us on Twitter and Facebook. Cheers!

Source: Link