This is project build using “motion” which a software based motion detector. I have created a docker image for this project for portability reasons inside my Pi Zero W.
So what does this project do?
– If you need a surveillance system for your home you can build it yourself pretty cheap using a Raspberry PI and a webcam.
– Configure webcam it to stream and record footage full time or record only when a motion is detected.
– Moreover, this a fun project to run docker on a Pi simply to test docker for Pi Zero.
– This could be run on Pi Zero W/Pi 3/Pi 3 Model B/Banna PI/Orange Pi as well.
What not to expect?
-Well, this is a Pi zero. So, don’t expect it to render 1080p at 60fps. 😛
Requirements:
- Raspberry Pi Zero W connected to your local Wifi network [Raspberry Pi 3 is recommended.]
- Docker 18.06.1-ce installed on Pi Zero.
- USB webcam.
- Sufficient disk space on your SD to store the footage.
- Lots of patience 🙂
Setting up your Raspberry PI:
First, we need to create a folder where we need to store the footage. So, SSH into your Raspberry Pi.
Create a folder where you would like to store the footage. We will be using this folder later to map inside the docker container. Example, create a folder called “surv”.
mkdir ~/surv
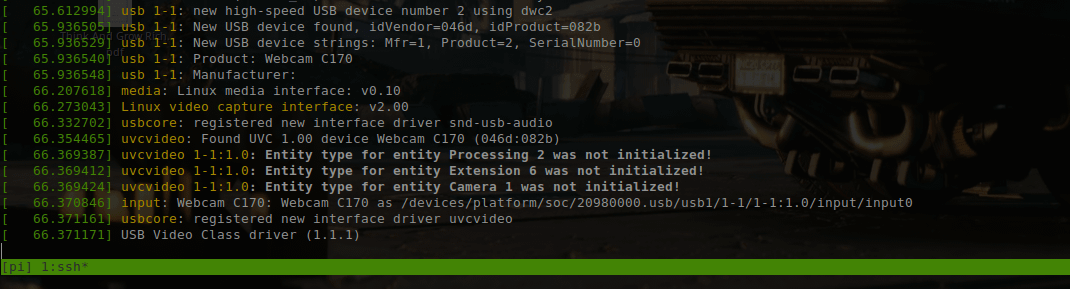
Unplug any USB devices connected to your Pi, then type in the following:
dmesg -w
Plug in your USB webcam to your Raspberry PI Zero, and you should see that the webcam is connected. Below are some sample logs, that I got once I connected the usb webcam:
Additionally, you could run the following to view connected video devices:
v4l2-ctl --list-devices
ls -l /dev/video0
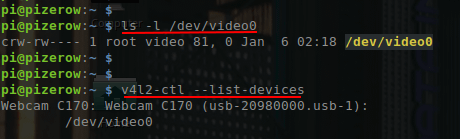
You should ideally see the USB webcam in the dmesg logs and in the lsusb outputs.
– Pull the docker image:
docker pull techantidote/motion
To run the docker container, run the following:
docker run -dit --net=host --privileged -v /dev/video0:/dev/video0 -v ~/surv:/footage --name watchtower techantidote/motion motion -nHere, we are passing the /dev/video0 which the camera attached to the rasbperry pi to /dev/video0.
To view the live stream, open a browser and go to:
http://ip-of-your-pi:8081
Alternative method:
If you are testing the configuration, you can try the following:
docker run -dit --net=host --privileged -v /dev/video0:/dev/video0 -v ~/surv:/footage --name watchtower techantidote/motionNow from inside the container, you can make changes to your configuration files and then start the motion service manually using the following:
service motion start
You can make now changes on the fly and then restart the motion service:
service motion restart
[Note: You may have to restart the docker container “docker start watchtower”]
I have already added the configuration files inside the docker image itself. If you need to tweak the settings such as the resolution/frame rates, you can edit the below two configuration files inside the docker container:
/etc/motion/motion.conf
/etc/default/motion
The log files for motion detection are stored in /var/log/motion/logs. If you would to view the log files real time, you run the following command:
docker exec -it watchtower tail -f /var/log/motion/logs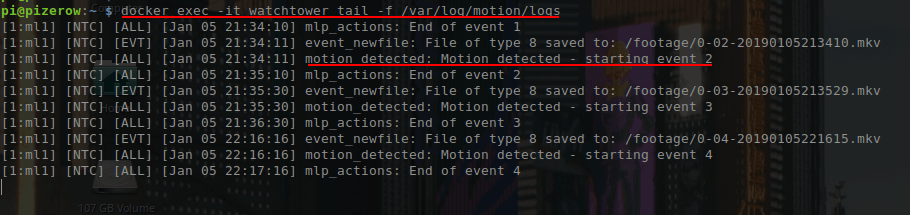
Conclusions:
-Running docker inside a Pi Zero for motion detection may not be the best idea.
-Flashing MotionEyeOS which is Video Surveillance OS designed to run on single board computers.
Want to contribute to this project?
If you would like to contribute to this project, feel free to reach out to me at twitter. @techantidote
Docker Image for Pi Zero W:
https://hub.docker.com/r/techantidote/motion
Credits/References:
Thanks to motion-project
Base image used for building the image => resin/rpi-raspbian:stretch
Accessing hardware device such as a camera from inside a container.