Happy new year to all my readers!!

Feel free to comment your new year’s resolutions. Hope you have a great one! Cheers! 🙂
Happy new year to all my readers!!

Feel free to comment your new year’s resolutions. Hope you have a great one! Cheers! 🙂
Just bought an Genuino Uno R3 and this is a quick look of the same.

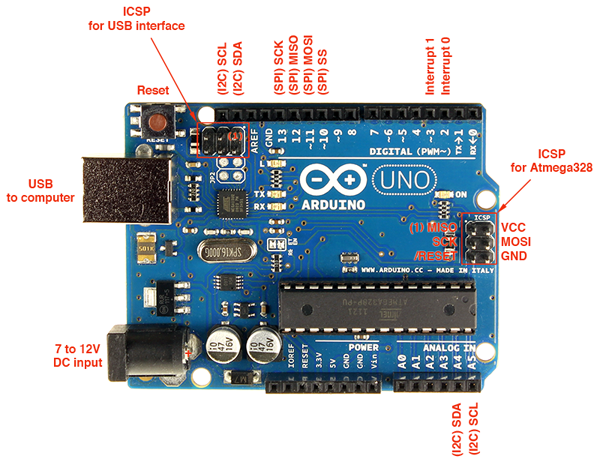
Pinout Diagram:
FYI, below is the pinout digram of the Arduino/Genuino UNO R3 from Nick Gammon’s website.
Just like the Arduino Uno, it comes with a Genuino Uno R3 board, ATMEGA microcontroller, some stickers and a “Thank you” booklet as shown above. All Arduino Uno units sold outside the US are named “Genuino UNO”.
I did install the Arduino IDE (Download Link ) in my Windows 10 machine and it was pretty straightforward. You can hook it to your PC/laptop and power it up using a “USB A to B” (printer cable). Alternatively, it can be powered via the DC jack using a 5v DC power supply (such as from an external battery pack).
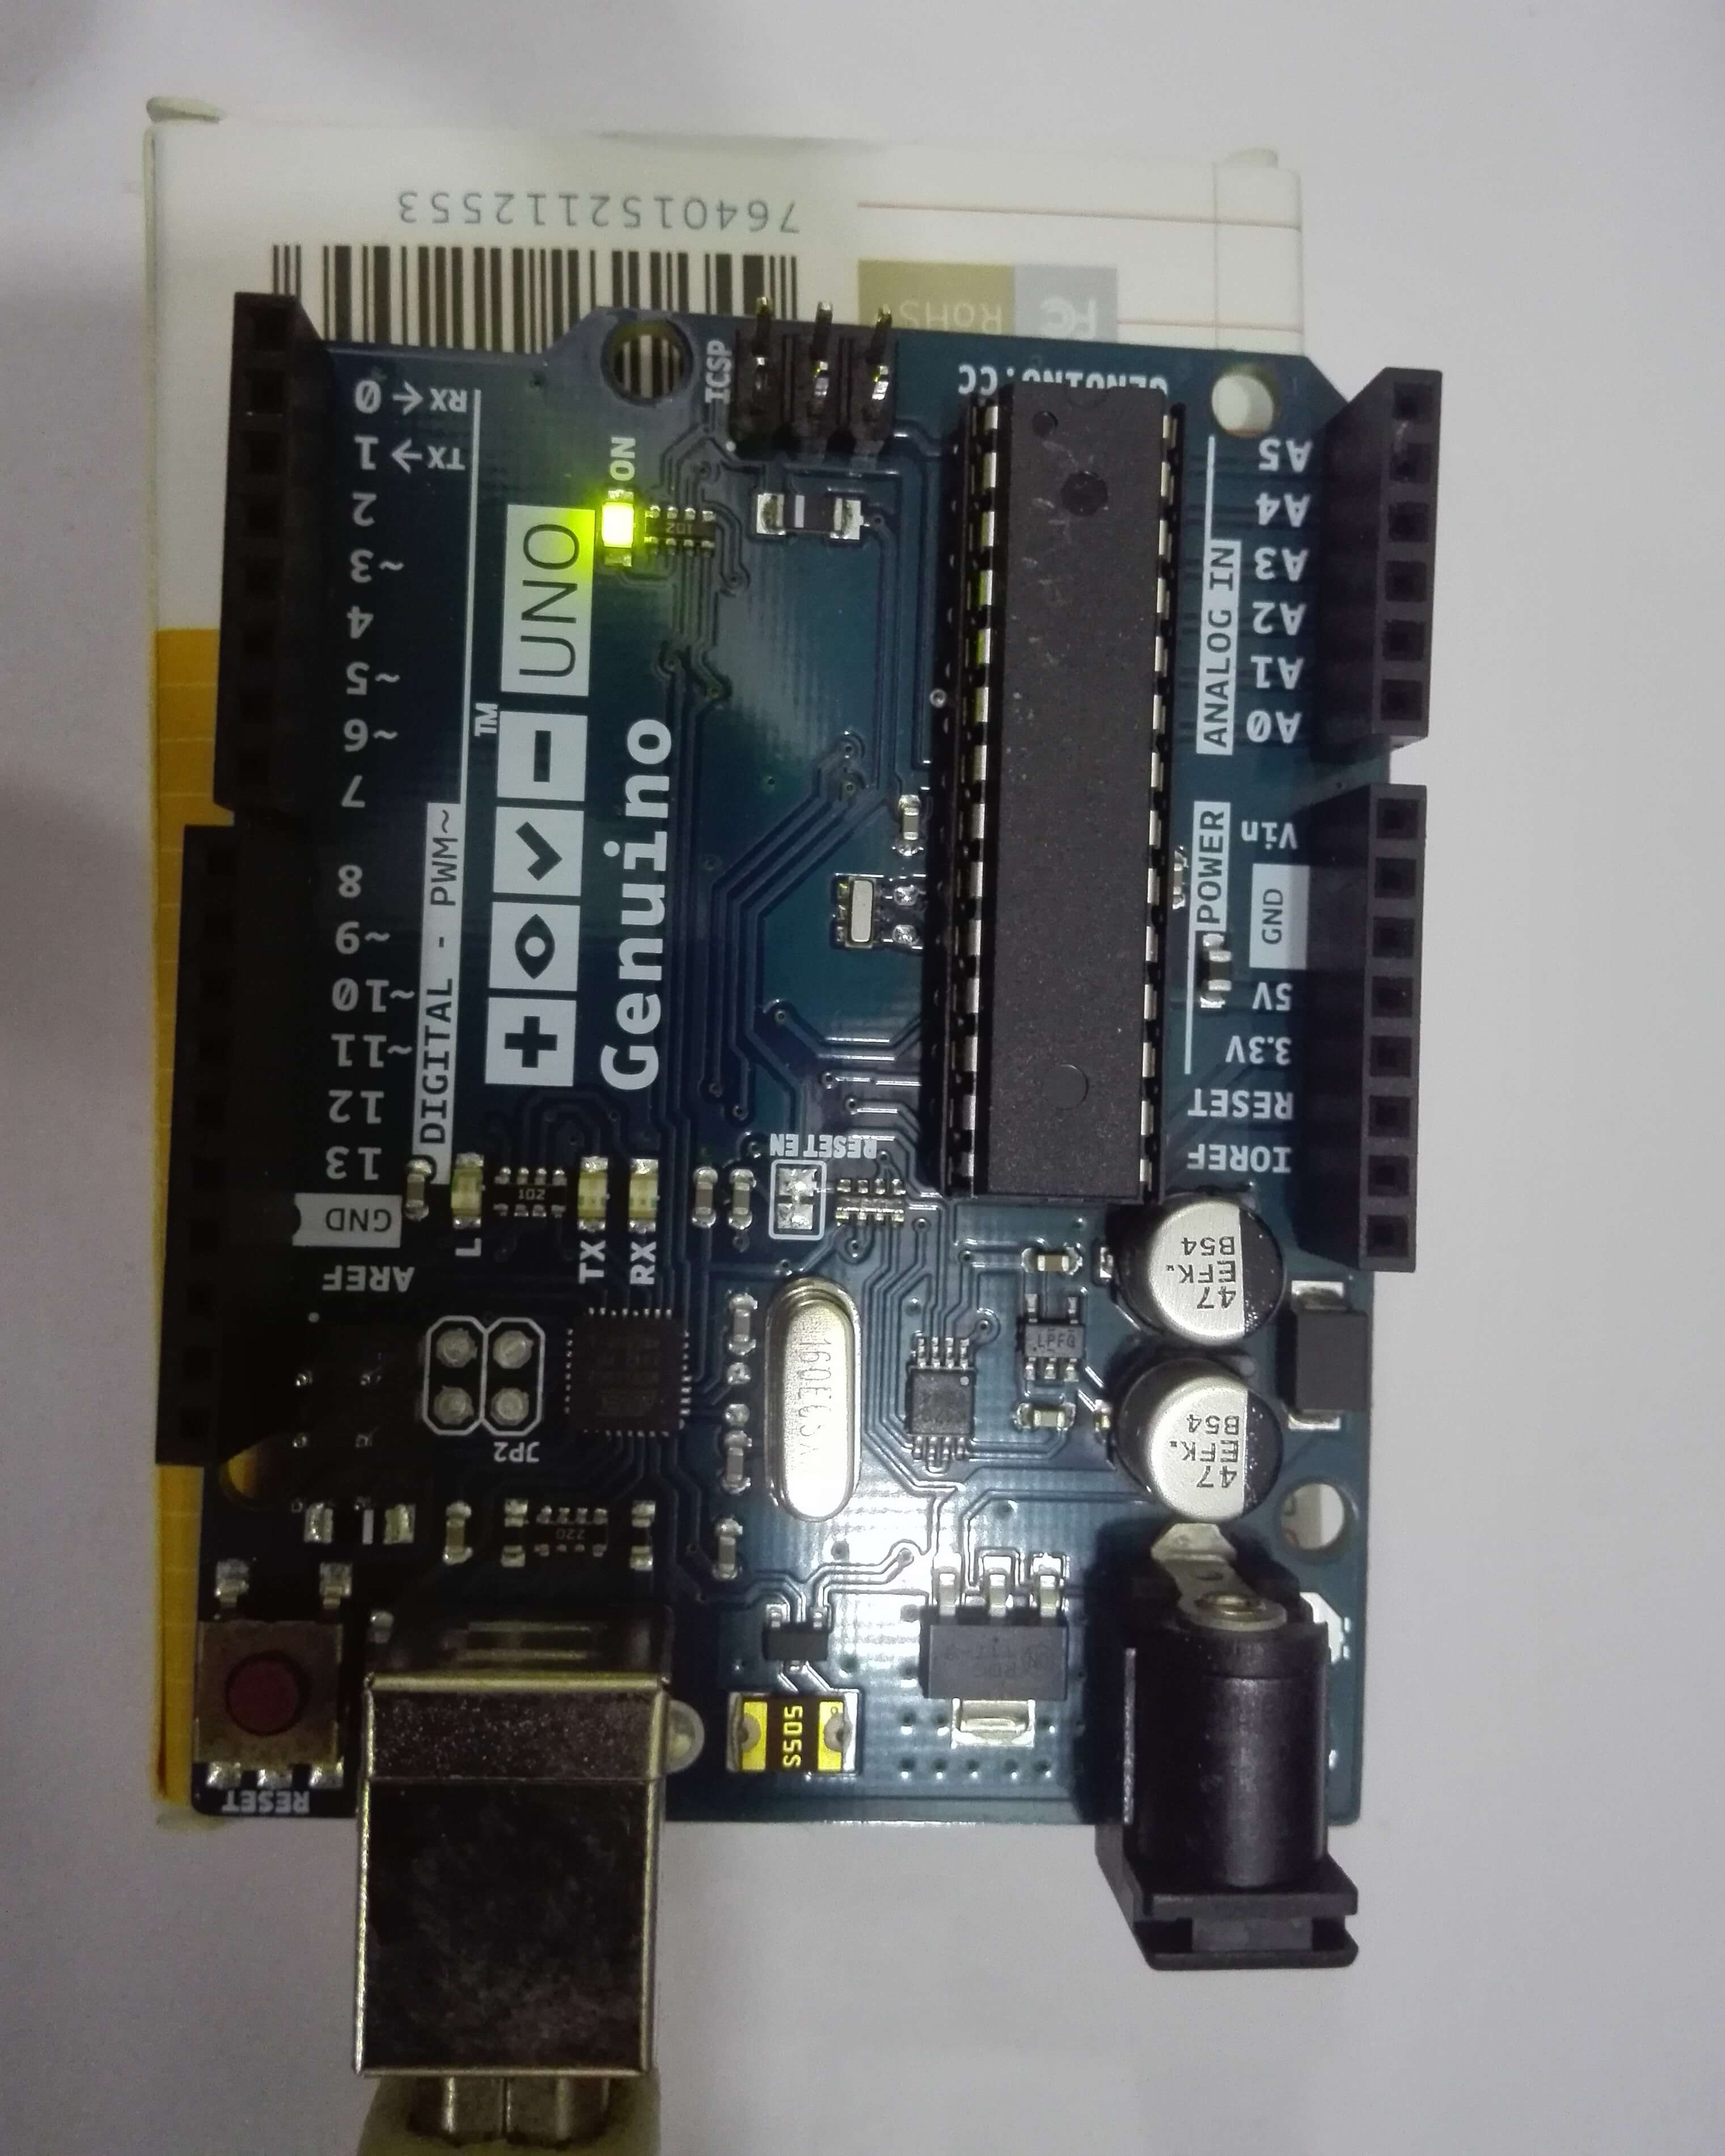
I have hooked it up with a USB cable and once its connected, the status LED lights up as shown below.
I will be posting Arduino/Genuino tutorials in the near future. So don’t forget to subscribe and stay tuned for future updates.
Source (Pinout Diagram): Link
If your host PC (in my case Windows 10) is connected to a VPN but your CentOS 6.x VM is not using the VPN, then do the following:
1: Power off your CentOS VM.
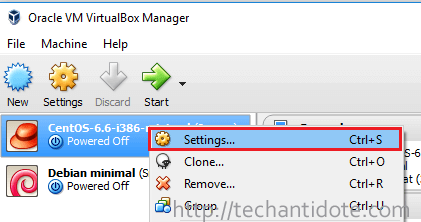
2: Right click your centos machine in virtualbox and then click “Settings“.
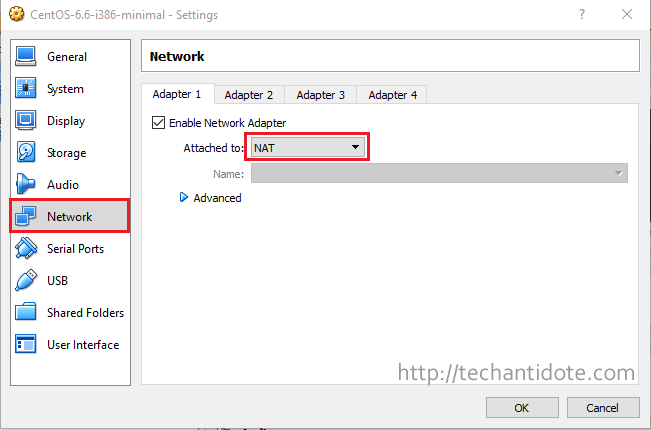
3: Click “Network” and change the Adapter Settings to “NAT“.
4: Now power on your centos virtual machine.
5: Once your VM boots up, login and then restart the network service. You can use the following CLI command “service network restart“.
Your CentOS virtual machine should now to able to use the VPN connection and use it accordingly. Do verify the same in your virtual machine. Hope this helps!
Do like and subscribe if this guide helped you. Cheers!
This is a guide on how to unlock the bootloader on Honor 4c running Android 6.0 from a Windows 10 PC.
Requirements:
Disclaimer: Please follow this guide at your own risk. Following this guide will void your warranty and may result in a bootloop and I assume you would know how to fix bootloop. If your phone gets bricked, don’t blame me.
Step 1. Get required phone details
Model Number:
In your phone, click on Settings>About Phone and you would find “Model Number”. For example, mine is CHM-U01.
IMEI number:
You would have two IMEI numbers, take a note of the 1st IMEI number that you see in the “About Phone” under Settings.
Serial Number:
Go to Settings>About Phone>Status and you should your phone’s serial number.
Product ID:
Open your phone’s dialer and type the following code: *#*#1357946#*#*
Step 2. Enable Developer Mode + USB debugging
Step 3: Install HiSuite
Step 4: Get your unlock code:
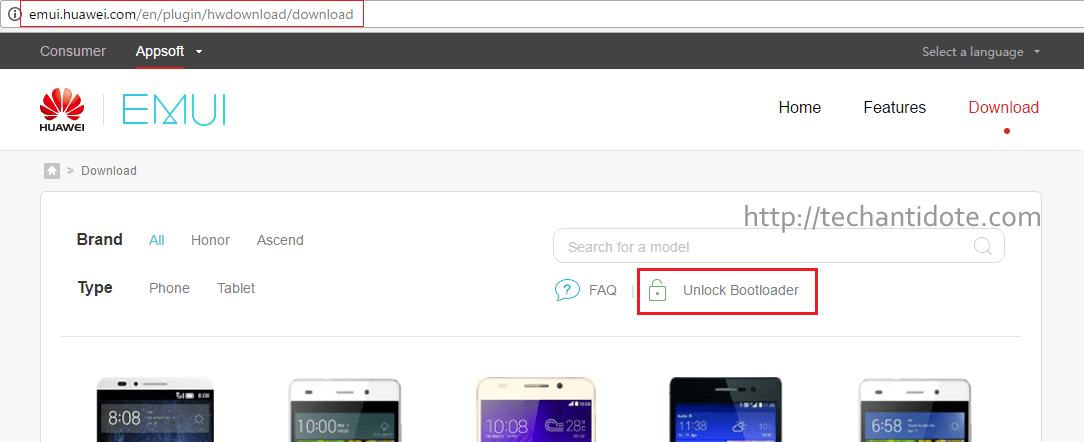
Step 5: Install Minimal Adb and fastboot
https://www.androidfilehost.com/?fid=24521665358595410
[Note: For more information about Minimal ADB and Fastboot package, please visit XDA and support the original creators of the software. (XDA Link)]
Step 6: Unlock bootloader
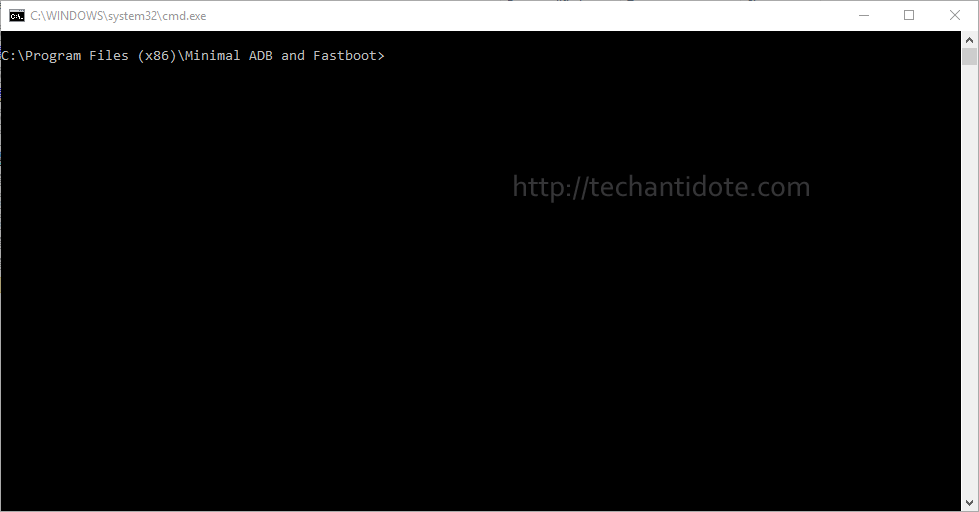
adb.exe devices
You may receive a message in your phone to allow the connection, click Allow when prompted. If the above command does not display your device, then something went wrong with the installation of Huawei HiSuite drivers or your phone is not connected properly to your PC. Below is a screenshot when adb was able to detect my device.

adb.exe reboot bootloader
fastboot.exe devices
fastboot oem unlock 123456789
You should see the message “Phone Unlocked” message in the bottom after the bootloader has been successfully unlocked.
fastboot.exe reboot
Congratutaions, you should have unlocked your bootloader by now. I will link another article soon on how to root and install custom recovery TWRP on Honor 4c running Android 6.0 (Marshmallow).
Do leave a comment below and share if you liked this guide. Cheers!
Source:
Minimal ADB and Fastboot: XDA
This guide on how to protect against Off-path TCP vulnerability CVE-2016-5696 in a CentOS 6.8 machine.
Run the following command to check the kernel version that your box is running:
uname -r
Run the following to verify your Centos version details:
cat /etc/redhat-release
Below is a screenshot for the outputs for the above commands from my CentOS 6.8 box.

Open your sysctl.conf file:
vi /etc/sysctl.conf

Below is a screenshot of my default sysctl.conf file which does not contain “net.ipv4.tcp_challenge_ack_limit”.
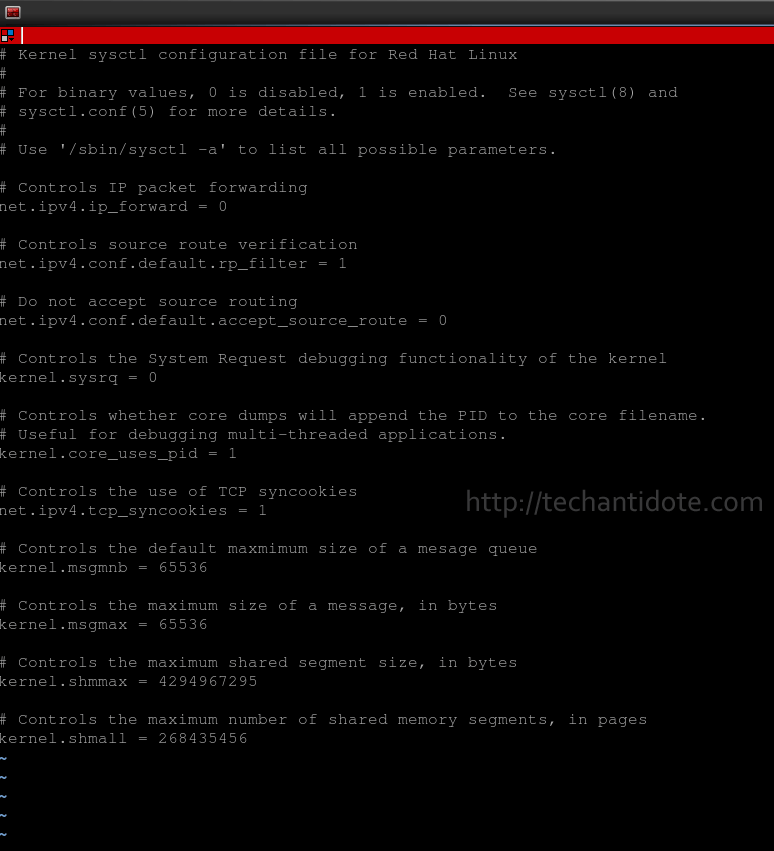
Now add the following line at the end of the config file:
net.ipv4.tcp_challenge_ack_limit = 999999999
Below is a screenshot after editing the config file.
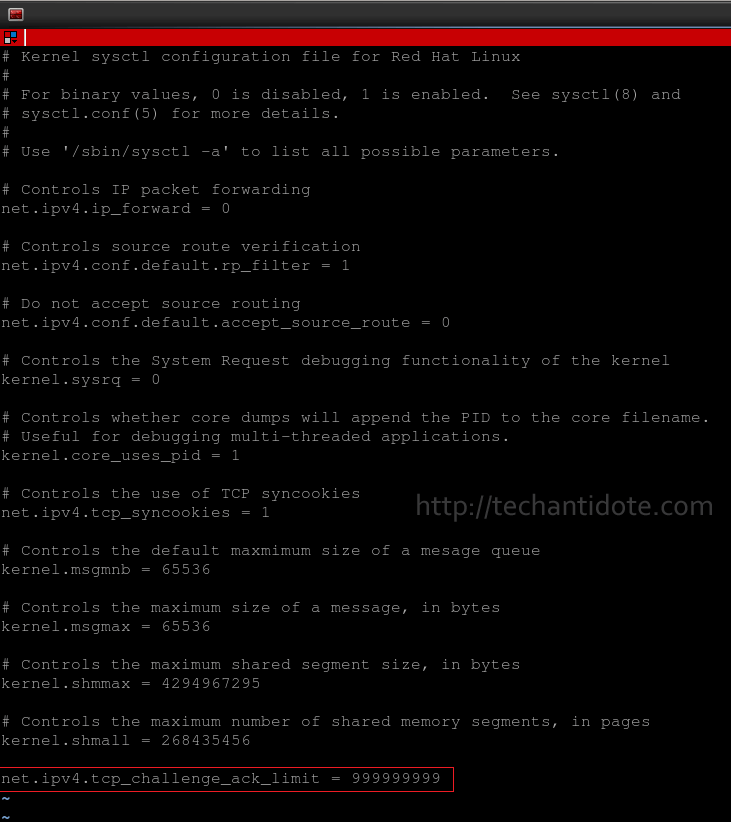
Save and exit the file. (Press ESC and then type :wq and hit Enter in your keyboard).
Use the command below to verify if the value of net.ipv4.tcp_challenge_ack_limit is 999999999.
sysctl -p
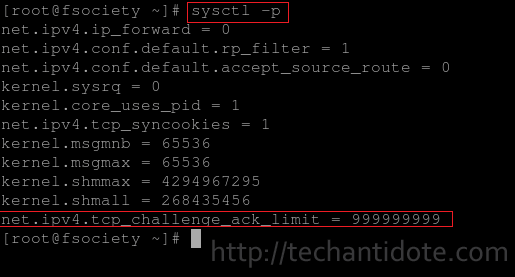
If you are able to see the line in the above screenshot, this means that it will make the exploit extremely hard to perform (practically impossible). The above is a workaround to mitigating the Off-Path TCP attack in a CentOS 6.8 machine and will also work for redhat 6.8.
If you are not looking for the workaround but for a permanent fix, then you can upgrade your Linux kernel to 4.6 or above.
If this article helped you, do leave a comment below and like us on Twitter and Facebook. Cheers!
Source: Bobcares
References: Redhat Portal, Redhat Shared Ack Vulnerability
AMD has announced two more cards RX 470 and the RX 460.
The specs (unconfirmed) that we know so far for the RX 470 and RX 460 are shown below:

If you missed out AMD’s previous announcement about the $199 VR ready card, then you can find it in my previous post here. Now talking about the RX 470, it is meant for 1080p gaming @ 60fps (on a budget) while the RX 460 is suited for games with lower system requirements such as MOBA. The TDP for the RX 460 is speculated to be less than 75W and this is great for gamers who don’t have a beefy PSU and just looking to upgrade to a better GPU.
Personally, I think this was the right time for AMD to announce the RX lineup and I like the direction where they are headed this time. With the RX 480 priced at $199, the RX 470 and RX 460 would be priced lower, these would sell like hot cakes once launched.
Would you buy the RX 480, 470 or the 460? Or would you wait for Nvidia to release their new card? Feel free to leave a comment in the comment section down below.
Do subscribe to get more updates and follow us on Twitter and Facebook. Happy Gaming!
Source: videocardz
AMD has announced the RX 480 14nm GPU which is VR ready. The RX 480 is meant for gaming at 1440p resolution + VR & its 4GB variant will be priced at $199. (R.I.P. Nvidia)

Now that’s a brilliant move from AMD and I believe its going to sell like hot cakes. It will be officially launched on 29th June 2016. There will also a RX 480 8GB version which will be released later but its pricing is officially not out yet.
According to reports from gamespot and pcworld, the RX series of graphics card will support DirectX12, Vulkan gaming APIs, HDMI 2.0b, DisplayPort 1.3/1.4, HDR, and H.265 encoding/decoding.
This is quick guide on how to use netcat (nc) to chat between two PCs over LAN.
VM 1: CentOS 6.6
My CentOS machine did not have netcat (nc) preinstalled so I had to manually install it.
# yum install nc -y
VM 2: Kali Linux 2016.1 | IP: 192.168.1.11 |
The Kali Linux 2016.1 had netcat tools were pre-installed so i didn’t have to install it. Here, we take any one of the 2 Pcs as the chat server and the other as the chat client.
Here, I am selecting the Kali Linux to listen for connections on a random port 12345. [Note: The port you select must be higher than the standard port 1024.]
In this case, I will make Kali as the chat server and set it to listen on port 12345.
# nc -lvp 12345

Now from the 2nd PC i.e. the CentOS machine, we will make a connection to the Kali machine on port 12345.
# nc 192.168.1.11 12345
Once connected, Kali’s terminal would show as message such as shown below:

Now, to start chatting type the text and hit ENTER in your keyboard to send chat messages between the two PCs. Pretty sweet uh?

FYI, There are practically tons of uses of netcat (nc) other than sending messages.
Other uses of netcat:
Have you found any another use with netcat? Post it in the comment section down below. If your on a Linux machine, check out the man page for netcat for more info. Happy exploring!
If you liked this article, don’t forget to subscribe and follow us on Twitter and Facebook.
Source: Cybrary.it
Here are some useful Linux Terminal Shortcuts:
Shortcut 1: Run previous typed command
In your Linux terminal, type:
# ls -l
Now, if you want to run this command again i.e the (previous command), type the following and hit ENTER:
# !!
This will run the command which was previously typed i.e ‘ls -l’.
Shortcut 2: Run command with last argument from previous command
For this example, lets create an empty file one.txt:
# touch one.txt
Now, lets use the following command:
# cp one.txt one.bak
Lets break down this command according to its arguments:
1st argument – one.txt
2nd argument / last argument – one.bak
[ Note: We can logically say that the 0th argument is the command cp itself. ]
Lets say we want to edit the file “one.bak” (which is the last argument for command cp, we can use:
# vi !$
The above command is same as running ‘vi one.back‘. Also note that the !$ passes the last argument of the previous command to the current command vi.
Shortcut 2 (Alternative):
Now, lets use the following command:
# cp one.txt one.bak
An alternative way to provide an argument from the previous command to another command is by using !:<argument number>. For example, to pass the 2nd argument of the last command, we use !:2 as follows:
# vi !:2
Here !:2 means that we are passing the 2nd argument of the previous command.
Shortcut 3 : Linux Terminal Keyboard shortcuts
To get the previous command: Press the UP arrow in the keyboard.
To kill a process when you are in the Linux terminal: Press <CTRL> + C in your keyboard.
Shortcut 4 : Autocomplete:
Trust me when I say this, this shortcut makes your life easier. If you need to auto complete a command, you can use the TAB key in your keyboard. This is one the shortcuts that is used by most Linux users.
Example:
If you want to type ifconfig in your Linux terminal, you can start typing the command and then press the TAB key to auto complete it. In this case, type ifcf and then press TAB and it will autocomplete the command.
The TAB feature can also be used to autocomplete known information such as file names which are passed as arguments.
For example: Lets assume in the current directory that you are on has only two files first.txt and second.txt. Now, if you need to type this command ‘cat first.txt second.txt‘, then you can use the TAB shortcut to auto-complete it by following these steps:
Type cat and then type f and then press TAB to autocomplete it to:
cat first.txt
Then type the first letter of the next argument i.e. type s and then press TAB, which it autocomplete the command to:
cat first.txt second.txt
Shortcut 5: Move between words
Press <CTRL> and <Right Arrow key> in your keyword to move to the next word(towards the right side of current cursor position) in your terminal. This is also applicable in Linux editors such as vi or vim.
Press <CTRL> and <Left Arrow key> in your keyword to move to the previous word/the word to the left side from current cursor position in your Linux terminal (or most editors). You can press it again accordingly, if you need to move the cursor one word at a time towards the left direction.
The above two shortcuts are useful when you are entering commands in the Linux terminal and need to correct a particular word in the command. This helps navigating back and forth between words/parameters in the command with ease.
Other Bash Shortcuts:
To go to the 1st terminal, press CTRL, ALT and the function key F1 in your keyboard.
To go the nth terminal, press CTRL, ALT and Fn (where Fn can be function keys F1, F2, F3 etc).
To paste previously copied text to your Linux terminal/editor, you can press the middle button in your mouse. Now, How cool is that uh? 🙂
To lock your Linux machine press <CTRL> <ALT> and the letter l in your keyboard.
And that’s it for now, hope its been informative. I will be updating this article in the future with more Linux terminal shortcuts as soon as I find new ones, so stay tuned! If this article helped you, do leave a comment below and like us on Twitter and Facebook. Cheers!
Hope this helps!
If you need to read a file and print from a range of line numbers (including the last one), you can use the command as shown below.
cat <filename> | awk 'NR >=linenumber1 && NR <=linenumber2'
To read and display a file along with the line numbers, you can use the following format:.
cat -n <filename>
Example:
cat -n sample.txt

For example:
To print lines starting from line 2 to line 7, then you can use the following command.
cat sample.txt | awk 'NR >=2 && NR <=7'
Sample Output:

If for any reason you need to display the line numbers along with the output, then you can pass the -n argument to cat before piping it to awk as shown below.
cat -n sample.txt | awk 'NR >=2 && NR <=7'
Sample Output:
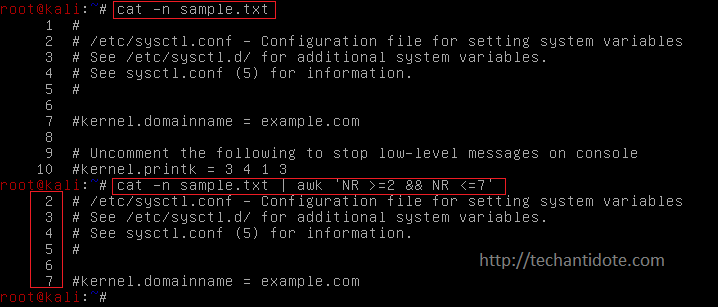
[Note: There are multiple methods to do the same procedure. This method is intended for beginners who are just getting started in Linux.]
Hope this helps!
If this article helped you, do leave a comment below and like us on Twitter and Facebook. Cheers!
Source: Link