7 reasons NOT to buy the Freedom 251 mobile

Here are 7 reasons NOT to buy the Freedom 251 mobile now:

Reason 1:No SAR mentioned

It wont burn a hole in your wallet but will burn one in your pants. 

There is no mention of the SAR value anywhere in the website which is suspicious. According to the Indian law, every phone that is to be sold in India must have a SAR value less than 1.6W/kg.

[Note: If you need to see the specifications of the phone, you can find it here.]

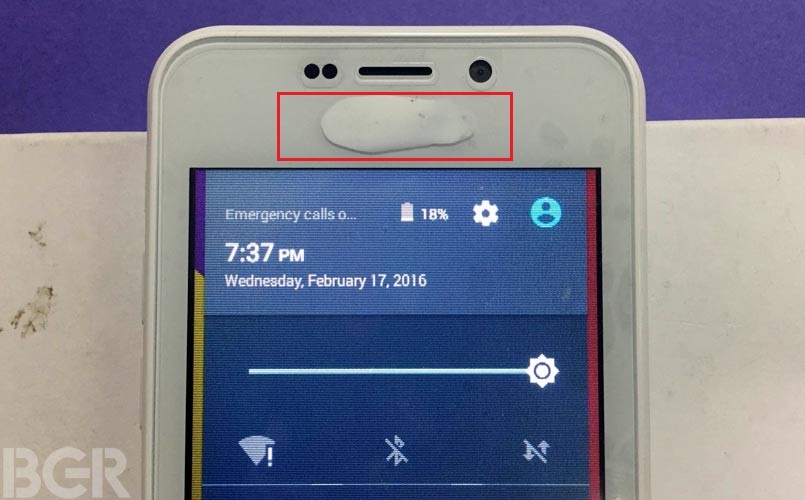
Reason 2: Actual manufacturer logo hidden with whitener. You gotta be kidding me???

According to bgr, the device is actually manufactured from a company “Adcom” and the logo was essentially masked with Whitener ink(see picture below). I mean who does that before such a huge launch? Atleast they should have re-branded the device or changed the mobile shell casing.  I would love to meet the PR guy of Ringing bells in person someday and say “Hey, nice try douchebag“.

freedom-251-ripoff
Image Source: BGR.in (See below for credits)


Reason 3: No proper Wiki Page

Here is a screenshot that I took a few hours before the launch of the device on 18th Feb 2016:

Freedom 251 - Wikipedia page as on 18th feb 2016

Here another screenshot of the manufacturer Wiki page that I took on 18th Feb 2016 a few hours before launch.

Ringing Bells Private Limited - Wiki page

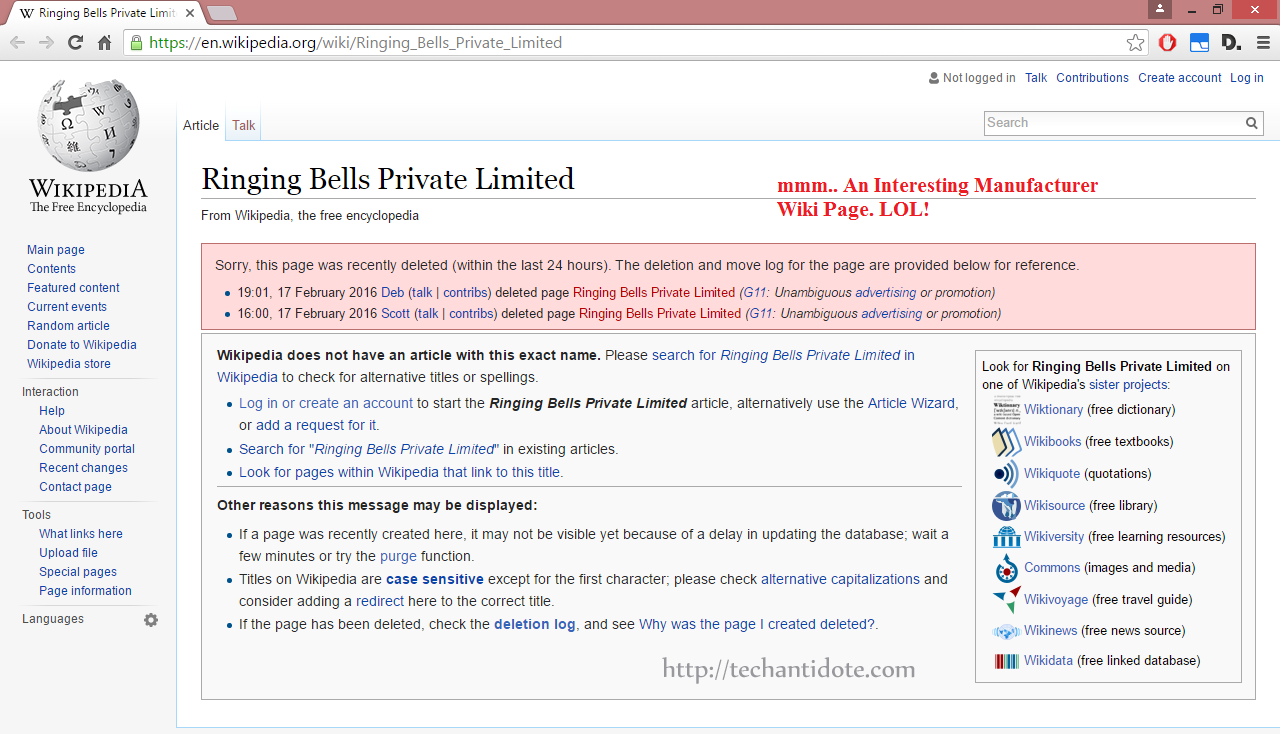
It sounds like the Ringing Bells is just a re-seller who basically has no idea what they are doing or this is an elaborate scheme to market as the cheapest phone.

Reason 4: Not accredited by ICA

The phone is not accredited by ICA (Indian Cellular Association) and so legally it cannot be sold in India.

Reason 5: Website lacks basic security and optimization

Here is one major security problem that will make you think twice about entering your personal information in their website:

  • The website uses Plain Text form of Authentication which basically means the data is send across your PC to their server in plain-text format. So, basically any hacker who has access to your network can easily sniff your username and password

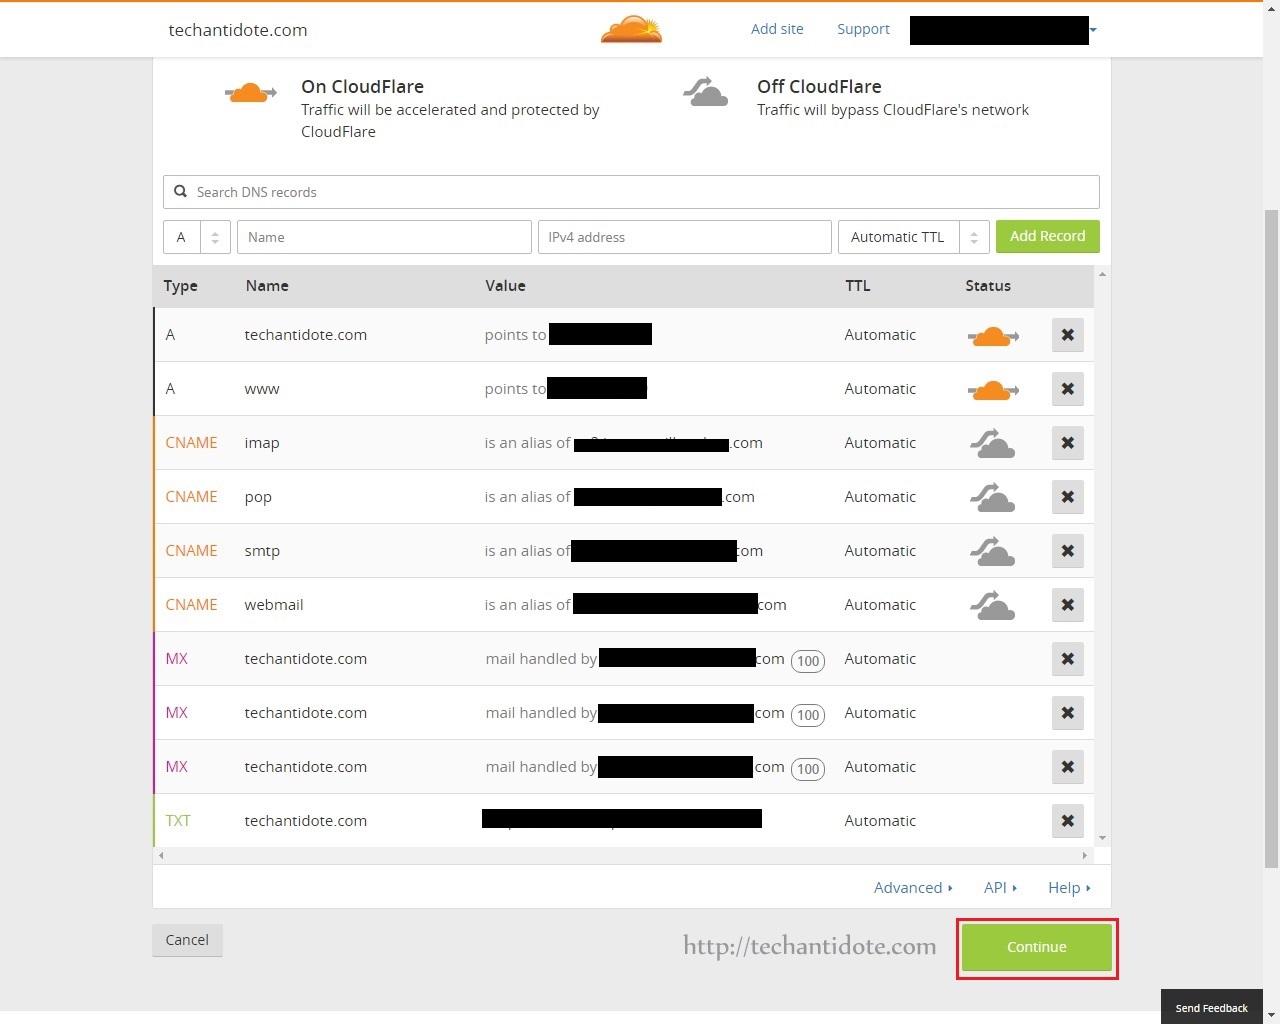
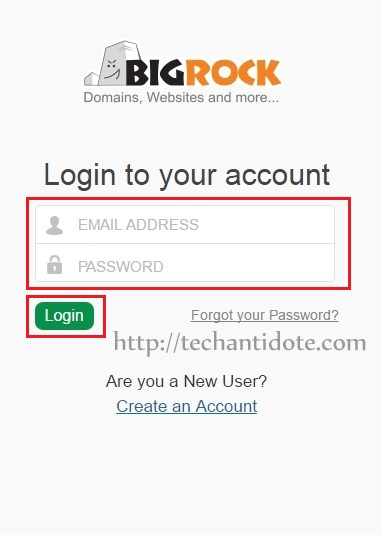
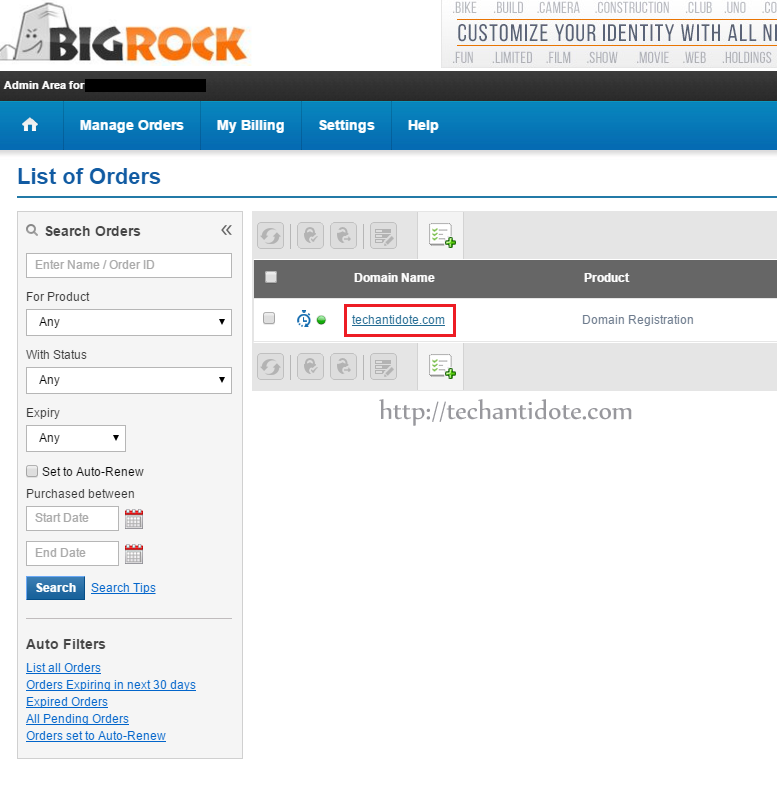
I did a whois lookup on the domain freedom251.com and found it is registered on through registrar Bigrock.in and also it is hosted on Amazon EC2. For those who are not aware, websites such as www.quora.com run on Amazon cloud and have little or no downtime and handle traffic well. The best part is Amazon’s EC2 are well known for its strong network infrastructure and the fact that you can be easily upgraded to a larger instance depending on your website and traffic requirements. I wonder how the mobile manufacturer’s website was unable to handle the traffic and was down couple of times/had to shutdown service on the launch date itself.

freedom 251 domain lookup info

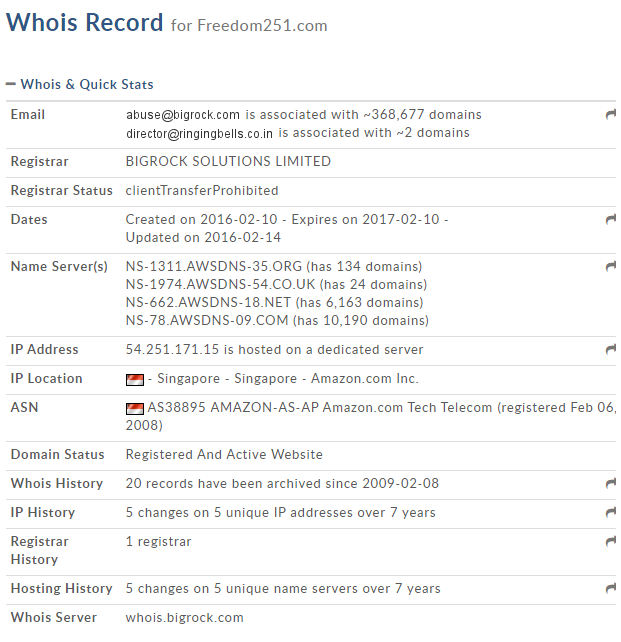
I really hope they did not choose the AWS free tier micro instance for hosting their website to handle such huge amount of traffic.

Reason 6: Long Shipping period

According to Ringing Bells, If you place the order for the mobile today, you will get it only after 4 months. Since most of you already know that its not a Ringing Bells product and its actually from another manufacturer Adcom, you should have already guessed the reason behind the 4 month waiting period. I believe that its one of two reasons:

  • Make customers place the order and accordingly import the Adcom mobiles from China and courier it to the customer (and obviously hide the Adcom branding with whitener before shipping).
  • Its possible that they were trying to adopt the marketing technique from Chinese manufacturer Xiaomi and failed miserably. The difference was that Xiaomi had the mobile shipped and stocked in India to be delivered without the long waiting period unlike the Freedom 251.

Reason 7: User Interface

Looking at the device user interface, it closely resembles Apple’s iOS. Matter of fact the device itself reminds me of my ancient Iphone 3Gs.

There are 1000s of twitter users already angry with the turn of events. What do u think about the turn of events? Do, leave a comment in the comments section below, I would love to hear from you.

Feel free to share this article in facebook, twitter, google+ by clicking on share buttons you see in this page. Do subscribe to get future updates! 🙂

Sources: bgr.in,

How to fix chrome update loop “Nearly up-to-date! Relaunch Google Chrome to finish updating. Relaunch”

This is a guide on how to fix chrome update loop message “Nearly up-to-date! Relaunch Google Chrome to finish updating. Relaunch

Current version: 49.0.2623.39 dev-m (64-bit)

To verify open chrome and check the version in “About” page and then check if you get the above message with a Relaunch button. Then, recheck your chrome version in “About” page and see if it gives the same message.

check chrome about

Relaunch Google Chrome to finish updating error


If its still giving you the error message “Nearly up-to-date! Relaunch Google Chrome to finish updating. Relaunch”, then you can follow these steps to resolve this issue:

[IMPORTANT: Please  backup all your chrome bookmarks and other chrome related data before attempting this troubleshooting just to be on the safe side.]

Step 1. Close all active chrome windows

Open task manger to check if there are any instance of chrome running.

If you are on Windows 8 / Windows 8.1 machine, Press CTRL+ALT+DEL together in your keyboard, and click  “Task Manager“.

Now, you will find chrome in the list, right click that and select “End Task” for any process that says “Google Chrome”.

end task for all chrome


Step 2. Delete old chrome’s executable and folder

Now, Browse to the following folder:
C:\Program Files (x86)\Google\Chrome\Application\

You will see two executable files there: chrome and new_chrome

file location C:\Program Files (x86)\Google\Chrome\Application\

Right click on chrome and select “Delete“.

delete chrome.exe

Now, rename executable file “new_chrome” to “chrome“. So after renaming it will look like this:

rename new_chrome to chrome

Now, Delete the folder with the older version number. In my case, I deleted the folder “49.0.2623.39“.

delete old chrome folder 49.0.2623.39

Step 3. Verify chrome version

Open up your chrome browser. Check the “About

check chrome about


chrome update error fixed

It should now display the message “Google Chrome is up to date.”

And Voila! You have successfully fixed the update issue.

If this article helped you, then support us by leaving a comment down below or by liking us on FacebookTwitterGoogle+ and  Tumbler.

Regards,
ΞXΤЯ3МΞ

Source: Link

How to setup Cloudflare CDN with Bigrock (manually) + Screenshots

This is a guide on how to setup Cloudflare CDN with BigRock (similar for Bluehost,Godaddy, Dreamhost, Hostgator) for your website or blog . You can follow the steps below:

Step 1. Create an account with Cloudflare:

Go to https://www.cloudflare.com and click on the “Signup” button.


cloudlare signup

Fill in your details, tick on “Agree” and then click on “Create Account“.

cloudflare create account

Step 2. Add your website

Now, in the text box below, type your website address and then click on “Scan DNS Records“as shown below.

cloudflare add site and scan dns

It will take a few moments for the scanning to complete.


cloudflare scanning dns records

Once, the scanning is complete, click on “Continue“.


cloudflare dns scanning complete

Now, click on “Continue” in the bottom corner:

cloudflare click continue


Step 3. Select Cloudflare Plan

Now, select the “Free Website” package as shown below and click on “Continue“.


select cloudflare free plan

Step 4. Get new name servers

Now, you will see the Cloudflare name servers as shown below. [This may vary for your website]

cloudflare name servers

As you see, for my website it is requesting to change the name server from

dns1.bigrock.in to linda.ns.cloudflare.com
dns2.bigrock.in to rob.ns.cloudflare.com

Also, also to remove the following nameservers:

dns3.bigrock.in 
dns4.bigrock.in 

[Note: The nameservers that you may see in your screen may be different.]

Step 4: Change your name servers to Cloudflare

Now, open up a new tab and login to your domain host panel (i.e. from where you bought your domain name from eg BigRock, Goddady, Hostgator, Bluehost etc). I have my domain from BigRock so I will be loggin in to my Bigrock account.

domain hosting bigrock login

Now, click on the domain you need to change the name servers to.


bigrock select domain

Now, click on “Name Servers” 


bigrock manage name servers


And you will see your default nameservers as shown below:

default bigrock name servers

Now, change your nameserver to the ones provided by cloudflare. In my case, after changing the nameserver, it will look like this:


cloudflare nameservers update

Now, click on “Update Name Servers“.

domain bigrock nameserver change success

Step 5: Verify in Cloudflare

Now, go back to your cloudflare tab and click on “Continue“.

cloudflare dns nameserver

It should show you show you a green banner with the status: “Active” as shown below.


cloudflare cdn active status[NOTE: If you the status does not show as “Active” then you can click on “Recheck Status” and it then should show that its “Active”]

[IMPORTANT: It would take about 24-48 hours for the DNS to get updated.]

And Voila! You have successfully configured Cloudflare CDN for your blog/website and should load faster.

Do check the  performance of your website after 24-48 hours and let me know in the comments sections below if there was any speed improvement.

If this article helped you, then support us by liking us  us on FacebookTwitterGoogle+ and  Tumbler. 🙂

Regards,
ΞXΤЯ3МΞ

How To fix “This kernel requires an x86-64 CPU, but only detected an i686 CPU. This processor is unsupported in RHEL 7.” when booting from VirtualBox

Error: This kernel requires an x86-64 CPU, but only detected an i686 CPU.
This processor is unsupported in RHEL 7. 

centos-boot-error

[Note: This tutorial is under the assumption that your physical CPU is 64-bit and your installed host OS is 64-bit and will only work in these circumstances.]

Cause:

This mainly happens due two reasons:

  1. If you have a 64-bit OS installed but the VirtualBox OS type is accidentally changed/set to 32-bit after installation.
  2. If Vt-X (Virtualization) is disabled in the BIOS. (This can happen if you reset your BIOS to default settings which may have disabled Vt-X  bit).

Solution:

Step 1: Right Click on the Centos/RHEL OS which is giving you the error and then click on “Settings“.

virtualbox settings

Step 2: In General Tab, check the OS Type and see if you are able to change to “Redhat 64-bit” and follow step 4.

change os type

Step 3: If you are only able to see 32-bit entries in the OS type list and your physical CPU supports 64-bit, this means that Vt-X is disabled in your BIOS. So, restart your PC and boot into your BIOS, enable Vt-X.

For reference, I have a Asus Maximus VII Ranger Motherboard and here is how I enabled Vt-X in my BIOS.

enable vt-x

[Optional: If your CPU supports Vt-d, enable that too, it will improve functionality and performance of your Virtual Machine. Some CPUs will not have the Vt-d function, if you dont have it then you can ignore it]

optional step to enabled vt-d

Step 4: Restart your computer and boot back your CentOS/RHEL VM and it should come right up.

centos boot error fixed

Hope this fixed the issue. If this tutorial helped you,do  leave a thumbs up a comment below. Hope this helps! 🙂

If you have any sort of queries,  just leave a comment below and will get back to you. Don’t forget to follow my blog to get future updates! 😀

Regards,
ΞXΤЯ3МΞ

Hello world!

Welcome to TechAntidote. This is our first post and we are very excited to let you know that the website will be operational soon.


Minor tweaking is underway and will up soon. Do subscribe and stay tuned for future updates!

Regards,
ΞXΤЯ3МΞ

‎ | LINUX | Tech | Security |